In this blog post, we’ll talk about URL Rewriting and how it can be done using Microsoft’s IIS. Why IIS? Because there are not that many tutorials that cover that stuff. Also, some very experienced PHP developers don’t know how to rewrite URLs if their page is hosted on IIS.
URL Rewriting?
URL Rewriting basically means: altering the URL’s apperance without affecting behaviour of your site. But why would someone alter the apperance of an URL?
Well, there are couple of great reasons. First, of course is Search Engine Optimization (SEO). For example, compare the following URL:
http://localhost.com/blog.php?id=1
With this one:
http://localhost.com/CSS-shorthand-properties/1
What are the advantages of URL number two? It’s friendlier to both users and search engines. Users can immediately tell what the blog post is about and it also helps your site to get better search engine rankings.
Of course, there’s another great advantage of URL Rewriting: original query strings used to retrieve blog posts can change and the rewritten URL can stay the same. For example, you might switch to another blog platform that has different inner workings or even another technology like from PHP to ASP.NET and have the URLs stay the same. You just need to change the rewrite rules.
Also, don’t forget the security factor of rewritten URLs: they hide how site works, meaning users don’t really know what query strings are used and what is happening behind the scenes.
OK, now we know URL Rewriting is great. So, how do we do it?
URL Rewriting on Microsoft IIS
URL Rewrite is a module for Microsoft IIS. It enables both simple and robust URL Rewriting based on request headers, IIS Server Variables and other rules. It also can rewrite HTTP response headers, log rewritten URLs etc.
You can download URL Rewrite from IIS.net website or install it using Web Platform Installer.
Installation using WPI

If you already have WPI, note that URL Rewrite is located inside the Products -> Server.
In this practice we’ll setup URL Rewriting for a plain site you created in IIS.
Getting started with URL Rewrite module
Once you install the URL Rewrite module it’s available via the Internet Information Services manager. You can start the IIS manager via Start -> Administrative tools. Or if you’re feeling a little geeky you can start it via Run command. Type in: inetmgr and press Enter.

Select a web site you created and choose URL Rewrite. This is where the magic happens. So, let’s do a couple of easy rewrites to see what the module is capable of.
Simple URL Rewriting example
Great thing about URL Rewrite module is that it includes templates for common URL Rewriting scenarios. Also, there are lots of great tutorials on the IIS site and they should be your further reading.
Click on the “Add Rule(s)…“. A dialog box will open presenting you with a number of options divided into categories:
- Inbound rules
- Inbound and Outbound Rules
- Outbound Rules
- Search Engine Optimization (SEO)
In the SEO category there are useful templates for creating a rule to redirect users to cannonical domain name, to enforce lowercase URLs and managing the trailing slash.

To create those simply select one of them, for example lowercase URLs. When you click OK you’ll get dialog with an additional explanation what does the rule do. It says that search engnes treat Web sites that can be accessed by more than one URL with different letter casing as two separate sites and explains that the rule enforces lowercase URLs.
Simply click Yes to add the rule. The rule will be created and will be visible in the list of Rewrite rules for this site. Good thing is you can double-click this rule to see how it’s made. Which is great, because we can use that in writing our own rules.

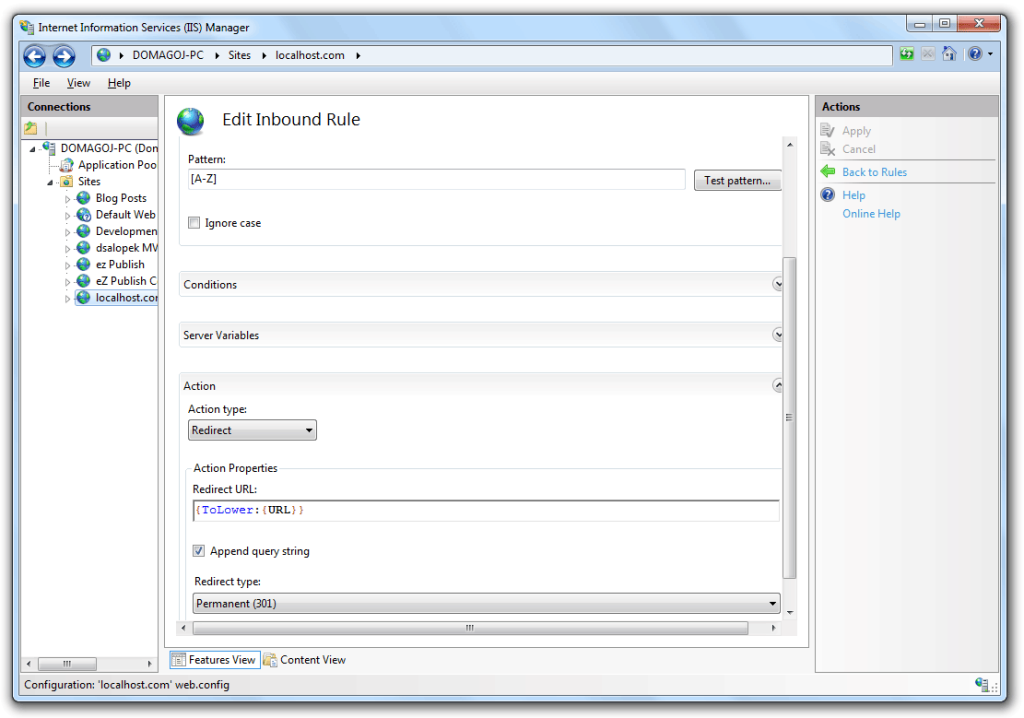
When you edit the rule you’ll see that it’s an Inbound rule, checks the URL using Regular Expressions and then if URL matches the Regular Expression pattern [A-Z]. This pattern matches all uppercase letters from A to Z.
If URL is matched with this pattern we do a HTTP 301 Redirect to url specified with {ToLower:{URL}} action which means all characters matched will be converted to lowercase.
So, we easily created a rule to enforce lowercase URLs. To test you can simply go to your website url written in uppercase, like:
http://localhost.com/BLOG.PHP?TItLe=CsS and you should be redirected to a lowercase version of the URL.
Now, let’s do something more advanced: create our own rules from scratch.
URL Rewriting for a Simple blog site
Let’s say we want to change our URLs from http://localhost.com/blog.php?id=1 to http://localhost.com/blog/blog-title/1. Just like in .htaccess file we’ll use regular expressions to do that.
Open URL Rewrite module and click on the Add Rule(s)…. In the dialog box under Inbound rules select Blank rule and click OK.
Edit inbound rule dialog will open. Under “Name” enter something like “blog.php rewrite”. Under Match URL leave everything on defaults, meaning for Requested URL select “Matches the Pattern“, and under using select Regular Expressions.
So, we need a regular expression to match a string that:
- Begins with “blog/“
- After slash can contain alphanumeric characters and a minus sign
- After second slash “/” can contain one or more numeric characters
NOTE: if you don’t know anything about regular expressions you can still follow this article as it explains some of the basics. For more info about regular expressions be sure to visit regular-expressions.info. They also have a very useful quick reference.
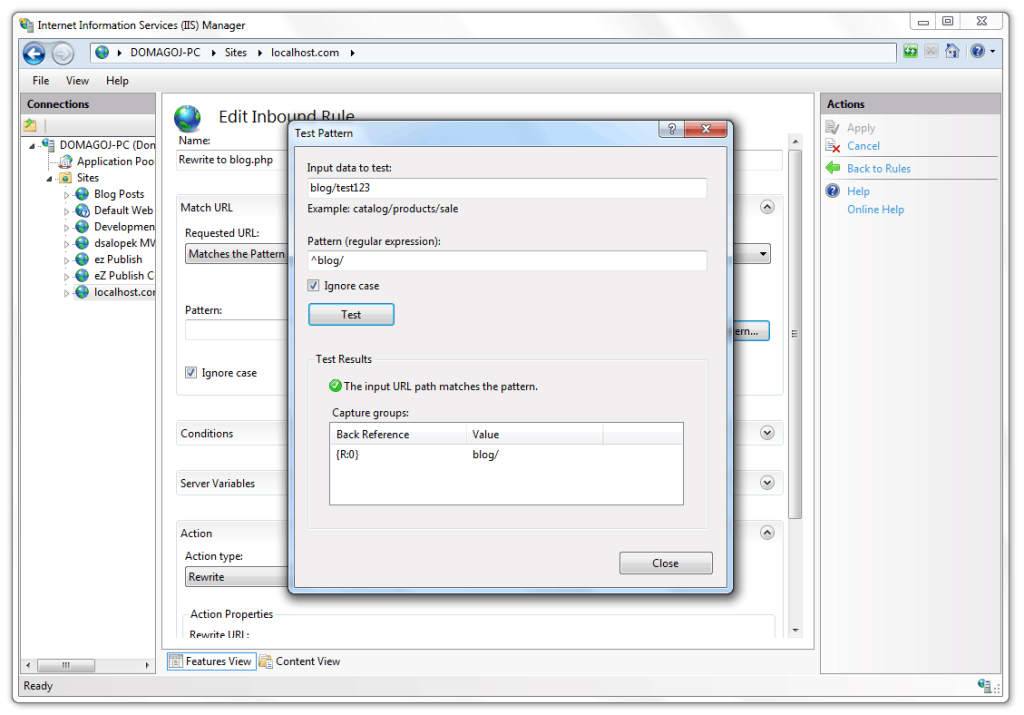
We have a very handy tool for writing and testing our regular expressions. Click on the “Test pattern…” button and a dialog will open that enables us to write data to test against the regular expression.

So, let’s try to write that regular expression. First, we’re looking for something that starts with blog/. For this purpose we’ll use the ^ operator.
So, our regular expression for now is: ^blog/. This matches everything that starts with a “blog/“, but we can’t stop there. We have to be more specific and require the numeric id, so we can rewrite that to blog.php?id=. Next, we need to match all alphanumeric characters and a minus sign. Remember the rule the enforce lowercase URLs template created for us? It had a Regular Expression pattern [A-Z] which matches all uppercase letters from A to Z.
We need something like that. Add it to our regular expression: ^blog/[0-9a-z-]+. Square brackets start and end a character class. A character class matches a single character out of all possibilities. We said the possibilities are: letters from a-z, numbers from 0-9 and a minus sign. After character class we have the plus sign. Plus sign says: repeat previous item once or more as many times as possible, with previous item being character class.
Next, we need to match one or more numeric characters after second slash. This one’s easy. Our regular expression now looks like this: ^blog/[0-9a-z-]+/[0-9]+, which (almost) gets the job done.
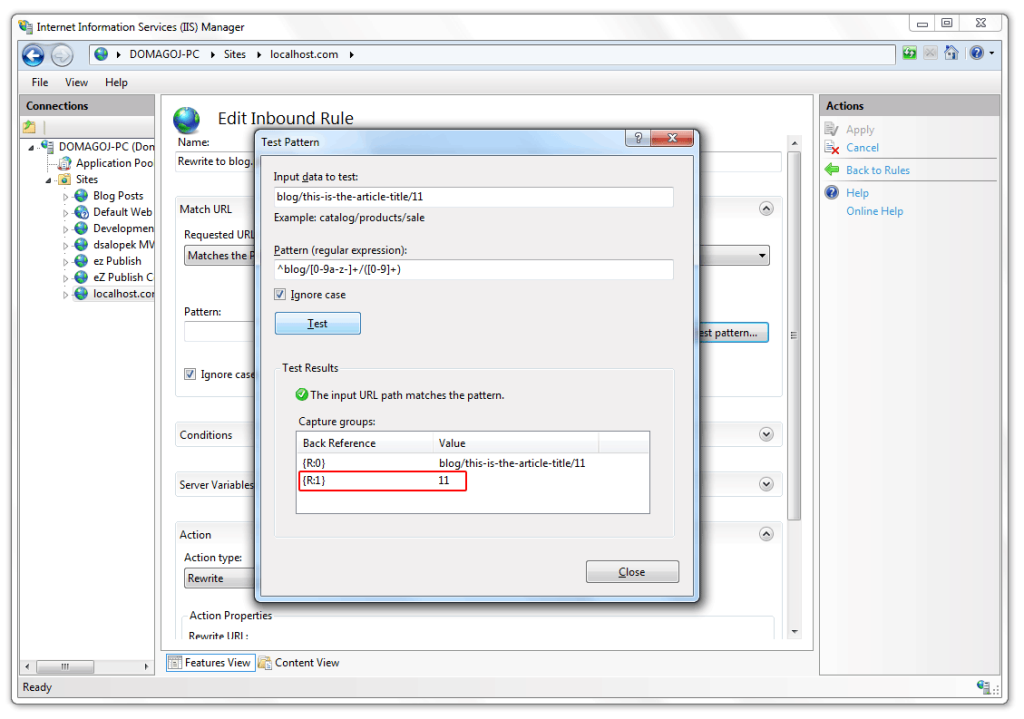
One thing is missing. We need the ability to capture the article id. For this we’ll use parentheses. Parentheses group part of regular expression, enabling us to reference that group. We can use this to our advantage. Change our regular expression to: ^blog/[0-9a-z-]+/([0-9]+) and test this regular expression.

NOTE: we can also capture the article title by adding parentheses to the middle as well: ^blog/([0-9a-z-]+)/([0-9]+).

We have article id and we can very simply make a rewrite rule. When you click close you’ll be prompted to save the rule changes. Please do so. Under Rewrite URL: enter: blog.php?id={R:1}. Leave all other settings on default. Click Apply to create the rule.
Testing the rule
Testing is very simple. Go to your web site folder and create blog.php file.
Blog Article Id is: <?php echo $_GET['id']; ?>
Then try visiting http://localhost.com/blog/blog-article-title/11. You should get output: Blog Article Id is: 11.
If you don’t have PHP on IIS, Create a blog.aspx file and change rewrite rule accordingly.
<%@ Page Language="C#" %>
Blog Article Id is: <%= Request.QueryString["id"] >
You can practice creating some rules yourself and then disabling or enabling them via IIS manager interface to see what happens.
Now you know how easy it is to create rewrite and redirect rules via the IIS manager interface. Rules you create are stored in web.config file located in your site’s root folder. Here are the contents of web.config file containing two rules we created:
<?xml version="1.0" encoding="UTF-8"?>
<configuration>
<system.webServer>
<rewrite>
<rules>
<clear />
<rule name="LowerCaseRule1" stopProcessing="true">
<match url="[A-Z]" ignoreCase="false" />
<conditions logicalGrouping="MatchAll" trackAllCaptures="false" />
<action type="Redirect" url="{ToLower:{URL}}" />
</rule>
<rule name="Rewrite to blog.php" enabled="true">
<match url="^blog/[0-9a-z-]+/([0-9]+)" />
<conditions logicalGrouping="MatchAll" trackAllCaptures="false" />
<action type="Rewrite" url="blog.php?id={R:1}" />
</rule>
</rules>
</rewrite>
</system.webServer>
</configuration>
So, you can use the IIS manager interface to create the rules locally and then transfer the web.config file to your hosting space. Only be careful to not overwrite any existing web.config file.
Additional Useful Regular Expressions and Tricks
So, here’s a couple more useful rewrite rules and tricks.
Additional parameters
Using parentheses we group parts of regular expression. We can then use those parts in rewrite rule:
category/category-name/55/domagoj
Regex: ^category/([0-9a-z-]+)/([0-9]+)/([a-zA-Z]+)
Rewrite: category.php?id={R:2}&name={R:1}&author={R:3}
Alternative writing of character class
^blog/[0-9a-z-]+/([0-9]+)

can be written as:

^blog/[\w-]+/(\d+)
\w means any alphanumeric character, and \d means any numeric.
Everything to single parameter
For example, if you’re building simple MVC framework and use something like:
$params = explode("/", $_GET['load']);
$controller = $params[0];
$action = $params[1];
Your URLs look like: localhost.com/index.php?load=news/index. Well, here’s how to rewrite them to localhost.com/news/index
Regex: ^(.*)$
Rewrite: index.php?load={R:1}
If file or folder exists ignore rule
You usually want to check if requested file or folder exists and if it does then ignore Rewrite rule. This means if a folder named news/index existed then it would be shown and not rewritten to index.php or what have you.
When creating or editing your rule expand “Conditions” and click on Add… button. A dialog box will open. From the “Check if input string” dropdown box select the Is Not a File and click OK. Do the same for Is Not a Directory. You’ll end up with a configuration like below:

web.config now looks something like this:
<rule name="everything to index">
<match url="^(.*)$" />
<conditions>
<add input="{REQUEST_FILENAME}" matchType="IsFile" negate="true" />
<add input="{REQUEST_FILENAME}" matchType="IsDirectory" negate="true" />
</conditions>
<action type="Rewrite" url="index.php?load={R:1}" />
</rule>
Anything .html to index.php
We can have like localhost.com/contact.html and this gets rewritten to index.aspx?show=contact.
Regex: ^(.*)\.html$
Rewrite: index.aspx?show={R:1}
Rewrite only couple pages to index.aspx
Only contact.html, about.html and sitemap.html are rewritten to index.aspx.
Regex: ^(contact|about|sitemap)\.html$
Rewrite: index.aspx?show={R:1}
Importing rules

URL Rewrite module also allows us to import mod_rewrite rules from a .htaccess file. It’s really simple to do this.
Open IIS manager. Under sites select the eZ Publish site we created earlier. Then open URL Rewrite.
Click on the Import rules… button. A dialog box will open where you can enter the rules to import or browse to a file containing the rules you wish to import. Or you can simply copy all the text from .htaccess file directory to that dialogue:

Important stuff to note
As with everything there are some things you should keep in mind when working with IIS Manager to rewrite URLs and with URL rewriting in general.
If you define Rewrite rules for a website via IIS manager and then change that site’s Physical Path via “advanced settings” those rules won’t be copied to a new location.

This makes perfect sense, but it might not occur immediately to you. However, those rules are not lost. Remember, they’re written into web.config file which is located in the old website location.
If you use ASP.NET another important thing is you need to avoid Rewriting of requests for ASP.NET resources. These files are not covered by “file exists” because they are generated dynamically. So, we need to prevent rewriting requests to .axd files:
<rule name="everything">
<match url="^(.*)$" />
<conditions>
<add input="{REQUEST_FILENAME}" matchType="IsFile" negate="true" />
<add input="{REQUEST_FILENAME}" matchType="IsDirectory" negate="true" />

<add input="{URL}" negate="true" pattern="\.axd$" />
</conditions>
<action type="Rewrite" url="index.aspx?load={R:1}" />
</rule>
There’s a really good explanation on Ruslan’s blog. Also, on IIS site you’ll find many other great and useful URL Rewriting Tips and Tricks.
The Conclusion
In this blog post we learned about basics of URL Rewriting and why it’s useful. We also saw how URL Rewriting on IIS is indeed very possible and very simple to do. We have graphic interface, ready templates and tools to assist us with our URL Rewriting efforts.
In the future I expect to come back to this very interesting topic and cover it in more detail both on IIS and Apache. We have lots of other Rewriting options on IIS which I didn’t touch in this blog post. For additional information about URL Rewriting on IIS don’t forget to visit the official URL Rewrite module documentation.
Also, you had the opportunity to see the tiny glimpse of power of regular expressions. This is also a very interesting topic because regular expressions are everywhere and knowing them is useful in many ways.
If you have useful regular expressions for URL rewriting or some other URL Rewriting trick be sure to leave it in the comments and I’ll include them in the blog post together with link to your personal website, Facebook or Twitter. Thank you for visiting this site. Until next time I wish you happy coding!