
In this blog post we’ll create a simple registration using Facebook registration plugin. We’ll also create a simple login system that enables registered users to login to our site.
About Facebook Registration plugin
Facebook registration plugin enables users to register for a website regardless if they have Facebook account or not. However, if they have a Facebook account the registration form will be automatically filled with the user information from their Facebook account.
PLEASE NOTE: This article is provided “as-is” and since it’s published in 2011., it’s mostly kept because of historical reasons and for everybody to see what was hot back then. I will not be able to reply to any questions or comments regarding this article, nor help with implementation. Thanks for understanding.
Domagoj
The advantage of using a registration plugin as opposed to simple “Login with Facebook” buttons is that you can request information from users that isn’t available on Facebook. Also, another HUGE advantage is that users don’t need a Facebook account to register for our site.
For more information about the registration plugin visit Facebook’s documentation.
Stuff needed
In this tutorial we’ll use PHP/MySQL, so you’ll need a local development environment that includes a http server capable of executing PHP files, such as Apache or Microsoft IIS and MySQL server. XAMPP or Web Platform Installer can install everything you need at once.
Also, you’ll need to have a verified developer account to be able to create Facebook applications.
Getting started
First, we need to create a Apache Virtual Host or IIS Web Site with the alias you wish to use for local development. Because Facebook checks for a valid domain name choose something that looks like a valid domain. In this example I’ll use localhost.com.
1. Local environment setup
If you don’t know how to create a Virtual Host, I suggest you look at one of my previous blog posts where I explain just how to create a Virtual Host for both IIS and Apache.
After you create a virtual host, you need to edit your hosts file. The hosts file is located in X:\WINDOWS\system32\drivers\etc\ path. Add a line to your hosts file so when we try to access the localhost.com address the system knows where it is.
127.0.0.1 localhost.com
2. Facebook setup
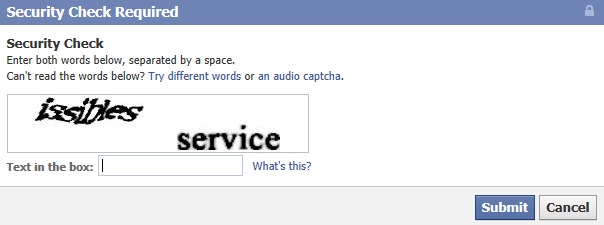
Go to facebook.com/developers and click the button + Create New App. A dialog box will open. Enter the desired name of your application. You can leave the Namespace field blank.
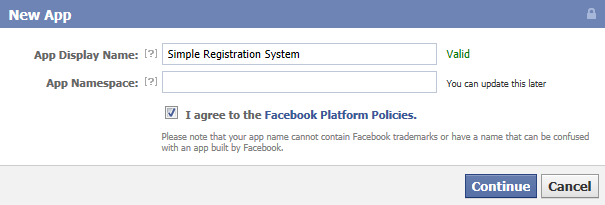
When you click Continue button another dialog box will open with a security check. Enter the words you see and click Submit.
A new application will be created and it’s settings will open. Here you need to change few more things.
First, click on the Website under Select how your app integrates with Facebook and enter http://localhost.com. Then under App Domain enter localhost.com.
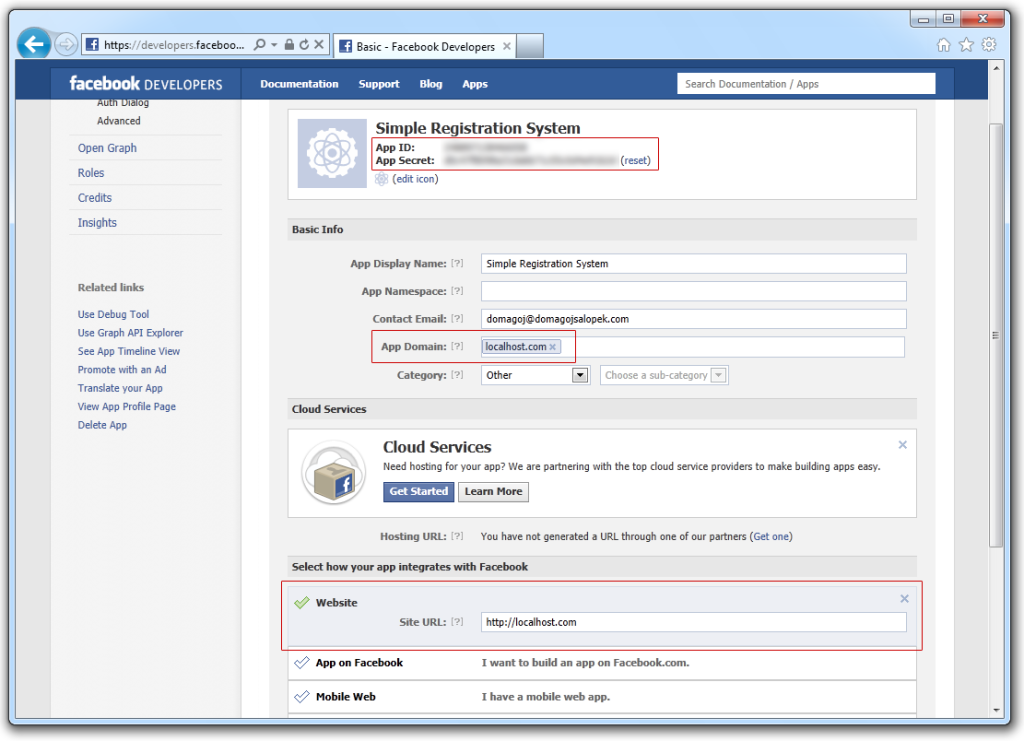
Lastly, make a note of App ID and App Secret, you’ll need it later.
3. Facebook PHP SDK
This tutorial makes use of Facebook’s PHP SDK which you can obtain on github.
Once you download the SDK we’re ready to continue.
4. Create a database and a table to contain user information
To create the database you can use phpMyAdmin or a desktop MySQL client, such as HeidiSQL which I use personally. For your database choose UTF-8 charset. Then to create your table execute this SQL query:
CREATE TABLE `users` (
`id` INT(10) NOT NULL AUTO_INCREMENT,
`facebook` VARCHAR(50) NOT NULL,
`username` VARCHAR(50) NOT NULL,
`password` VARCHAR(50) NOT NULL,
`name` VARCHAR(80) NOT NULL,
`email` VARCHAR(150) NOT NULL,
`location` VARCHAR(150) NOT NULL,
`gender` ENUM('male','female') NOT NULL,
`ip` VARCHAR(30) NOT NULL,
`modified` TIMESTAMP NOT NULL DEFAULT CURRENT_TIMESTAMP ON UPDATE CURRENT_TIMESTAMP,
PRIMARY KEY (`id`),
INDEX `facebook` (`facebook`),
UNIQUE INDEX `username` (`username`)
)
COLLATE='utf8_general_ci'
ENGINE=InnoDB
Getting started with our project
Open your favorite editor and start a new project on the location you choose when you created a Virtual Host.
Create a file named index.php. This will be our home page. It’s content will change depending on the logged-in state of the user. For now, let’s make a basic layout and display the Facebook registration plugin.
<!DOCTYPE html>

<html lang="en-US">
<head>
<title>Simple Registration System</title>
<style>
body { font: normal 14px Verdana; }
h1 { font-size: 24px; }
h2 { font-size: 18px; }
</style>
</head>
<body>

<div id="wrap">

<section id="main">

<div id="fb-root"></div>
<script type="text/javascript">
window.fbAsyncInit = function() {
FB.init({
appId      : 'YOUR_APP_ID_HERE', // App ID
channelUrl : 'http://localhost.com/channel.html', // Channel File
status     : true, // check login status
cookie     : true, // enable cookies to allow the server to access the session
oauth      : true, // enable OAuth 2.0
xfbml      : true  // parse XFBML
});
};
(function(d){
var js, id = 'facebook-jssdk'; if (d.getElementById(id)) {return;}
js = d.createElement('script'); js.id = id; js.async = true;
js.src = "//connect.facebook.net/en_US/all.js";
d.getElementsByTagName('head')[0].appendChild(js);
}(document));
</script>

<h1>Registration</h1>

<div style="float: left; margin-right: 15px;">

<div class="fb-registration"
data-fields='[{"name":"name"},
{"name":"birthday"},
{"name":"location"},
{"name":"gender"},
{"name":"email"},
{"name":"username","description":"Username","type":"text"},
{"name":"password"}]'
data-redirect-uri="http://localhost.com/register.php">

</div>

</section>

</div>

</body>
</html>
Enter your Application Id from Facebook into JavaScript tag where indicated with YOUR_APP_ID_HERE.
Save the index.php file and open the http://localhost.com in your browser to see what we got.
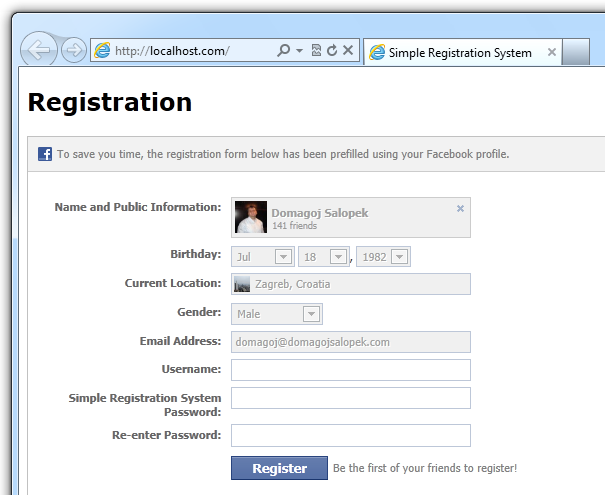
So, what did we do here?
First thing to note is that we used Facebook’s JavaScript SDK to display the registration plugin. To initialize SDK we used our application’s App Id.
Then we used the registration plugin with it’s data-fields parameter supplied in JSON format. We used mostly standard Registration plugin fields to retrieve user’s data from Facebook:
- User’s full name – {“name”:”name”}
- User’s birthday – {“name”:”birthday”}
- Current location – {“name”:”location”}
- Gender – {“name”:”gender”}
- User’s email – {“name”:”email”}
In addition to those fields we also used a password field. This is not password used to login to Facebook. When we use a password field Facebook automatically returns the correct input type password, provides minimum length checking and makes sure the password and confirm password fields have the same value.
Also, we added our own field: Username to the plugin. This is where the user will enter their username to register for our site.
For additional details and field types please consult Facebook’s registration plugin documentation.
At the end of plugin code we used the data-redirect-uri parameter telling Facebook where to redirect the browser after user submits the form, namely to register.php file.
Adding the libraries needed for registration
There are a few more tiny steps to take before we start to make register.php file.
Adding the PHP SDK
First, let’s add PHP SDK to our project and also to create some utility classes needed to continue our work with the registration.
Inside our project folder create a new folder named library. Extract the downloaded PHP SDK. Inside extracted folder you’ll fild the src folder. Copy all files from the src folder to our library folder.
Creating the Database Class
You might say this step isn’t really needed, but I find it’s cool to have a database class which we can later use. This enables us to initialize the connection to MySQL using PDO. The class simply returns a PDO object.
NOTE: If you don’t have experience using PHP PDO I recommend you take a look at my blog post about creating a PHP contact form where PHP PDO is introduced and used.
Enough talk, let’s get into it. First, let’s create a config file. A config file will contain the settings for connecting to database as well as Facebook application settings.
Create a new file in our project’s root directory and name it config.php.
The config.php file contains:
<?php
define (DB_HOST,    'localhost');
define (DB_NAME,    'YOUR_DATABASE');
define (DB_USER,    'YOUR_USERNAME');
define (DB_PASS,    'YOUR_PASSWORD');

define (FB_ID,      'YOUR_APP_ID');
define (FB_SECRET,  'YOUR_APP_SECRET');
That was easy, wasn’t it? Now inside the library folder create a new file named db.php. It will contain our Database class:
<?php

class Db
{
private static $db;

public static function init()
{
if (!self::$db)
{
try {
$dsn = 'mysql:host='.DB_HOST.';dbname='.DB_NAME;
self::$db = new PDO($dsn, DB_USER, DB_PASS);
self::$db->setAttribute(PDO::ATTR_ERRMODE, PDO::ERRMODE_EXCEPTION);
} catch (PDOException $e) {
// Normally, we would log this
die('Connection error: ' . $e->getMessage() . '
');
}
}
return self::$db;
}
}
As you can see this is a very simple class, but for this simple example we don’t really need anything more complicated. What we got is a singleton class that limits class instantiation to one object. That basically means the connection is set up only once, because the class works this way: if a PDO link has been established, return it. If the link doesn’t exist, then create it and return it. For more information consult Wikipedia.
You are encouraged, however to create additional methods that will serve as wrappers for PDO.
Let’s continue with creating the register.php file.
Entering user data into the database
In the root of our project create a new PHP file and name it register.php.
In this file we’ll process the user data returned to us by Facebook and enter it into the database.
In order to be able to do that we need to know what Facebook returns to us. If we take a look at the registration plugin documentation we’ll see that it returns a signed request which is signed using your application secret which is only known by you and Facebook.
We can use the Facebook PHP SDK to decode the signed request and get the registration data, so let’s do just that for now.
This is the register.php file:
<?php

require_once 'config.php';

function __autoload($class_name)
{
require_once 'library/' . strtolower($class_name) . '.php';
}

$facebook = new Facebook(array(
'appId'  => FB_ID,
'secret' => FB_SECRET,
));

$request = $facebook->getSignedRequest();

echo '<pre>';
print_r($request);
echo '</pre>';
Save the register.php file, and open our localhost.com page. When you’re done with the form click the Register button.
You should be taken to the register.php file and you should see the data you entered along with a bunch of other stuff:
Array
(
[algorithm] => HMAC-SHA256
[expires] => 1323543600
[issued_at] => 1323539475
[oauth_token] => YOUR_OAUTH_TOKEN
[registration] => Array
(
[name] => Domagoj Salopek
[birthday] => 07/18/1982
[location] => Array
(
[name] => Zagreb, Croatia
[id] => 1.1661906168146E+14
)

[gender] => male
[email] => domagoj@domagojsalopek.com
[username] => dsalopek
[password] => ThisIsATest
)

[registration_metadata] => Array
(
[fields] => [{"name":"name"},
{"name":"birthday"},
{"name":"location"},
{"name":"gender"},
{"name":"email"},
{"name":"username","description":"Username","type":"text"},
{"name":"password"}]
)

[user] => Array
(
[country] => hr
[locale] => en_US
)

[user_id] => 1054089106
)
As you can see, almost everything we need is in the registration array.
Let’s use user data to register the user for our site. Change the register.php to save that data to the database:
<?php

$status = false;
$errors = array();

require_once 'config.php';

function __autoload($class_name)
{
include_once 'library/' . strtolower($class_name) . '.php';
}

$facebook = new Facebook(array(
'appId'  => FB_ID,
'secret' => FB_SECRET,
));

$request = $facebook->getSignedRequest();

if ($request)
{
$register = $request['registration'];

try {

$db = Db::init();

$fbId = (isset($request['user_id'])) ? $request['user_id'] : 0;

$sth = $db->prepare("SELECT * FROM users WHERE username = ?");
$sth->execute(array($register['username']));

if (!$sth->fetch())
{
$sth = $db->prepare("SELECT * FROM users WHERE email = ?");
$sth->execute(array($register['email']));

if (false != $sth->fetch())
{
if ((false != $sth->fetch()) && ($fbId != 0))
{
$sth = $db->prepare("UPDATE users SET facebook = ? WHERE email = ?");
if ($sth->execute(array($fbId, $register['email'])))
{
$status = true;
}
}
}
else
{
$location = $register['location'];
if (is_array($location))
{
$location = $location['name'];
}

$sql = "INSERT INTO users
(facebook, username, password, name, email, location, gender, ip)
VALUES
(?, ?, ?, ?, ?, ?, ?, ?)";

$data = array(
$fbId,
$register['username'],
md5($register['password']),
$register['name'],
$register['email'],
$location,
$register['gender'],
$_SERVER['REMOTE_ADDR']
);

$sth = $db->prepare($sql);
if ($sth->execute($data))
{
$status = true;
}
}
}
else
{
array_push($errors, 'Username is already taken!');
}
} catch (Exception $e) {
array_push($errors, 'Database error: ' . $e->getMessage());
}
}
else
{
array_push($errors, 'Error with validating Signed request.');
}

if (true === $status)
{
echo "User registered successfully";
}
else
{
echo "Errors during registration";
if (!empty($errors))
{
echo '<ul>';

foreach ($errors as $e)
{
echo '<li>' . $e . '</li>';
}

echo '</ul>';
}
}
What does this code do? First, it checks if the username is already taken and if it isn’t it continues with the registration. Otherwise we simply say to the user that the username is taken. Crude, but OK for this simple example.
Then we check if the user perhaps already registered with the same e-mail address. If it has we simply merge his existing account with this registration by setting his Facebook user id in the database. If we succeed in doing that we set the control variable $status to true.
If the user hasn’t already registered for our site (we can’t find him by E-mail) we simply insert his data in the database (register him) and set the $status to true. Note that we get only the location name from the location array. Also, if the user is not currently logged into Facebook, we won’t have his ID, so we do a check if it’s set, and if isn’t we simply enter zero into the database.
Lastly, we check for registration status. If the status is true, we simply echo that the user registered successfully. If status is false we echo everything in the errors array.
NOTE: currently can be only one thing in the errors array, but in the normal registration we would check if the fields are valid.
Save the file and submit the form again from index.php file.

OK, the register file says the registration has been successful. Let’s see the results in the database:

As you can see the registration went well and the user data is entered into the database. Now, let’s enable logging in for our registered users.
The login system
What’s a registration system by itself, right? A website also needs a login system to enable users to access all the goodies in the registered-users-only area.
We’ll first create a User class that will have the method for logging in the user as well as a property that tell us whether user is logged in or not. So inside a library folder create a new file and name it user.php.
NOTE that a real user class could have other attributes, but as this is a simple example, we won’t get into that.
Edit the users.php file:
<?php

class User
{
private $_db;
private $_isLogged;

public function __construct()
{
if (!session_id())
{
session_start();
}
$this->_db = Db::init();
}

public function login($username, $password)
{
$sth = $this->_db->prepare("SELECT * FROM users WHERE username = ?");
$sth->execute(array($username));
$result = $sth->fetch();

if ($result)
{
if ($result['password'] == md5($password))
{
$this->_setLogin($result);
return true;
}
}
return false;
}

private function _setLogin($userData)
{
$_SESSION['logged'] = true;
$_SESSION['id'] = $userData['id'];
$_SESSION['username'] = $userData['username'];
$_SESSION['ip'] = $_SERVER['REMOTE_ADDR'];

try {

$sth = $this->_db->prepare("UPDATE users SET ip = ? WHERE id = ?");
$sth->execute(array($_SERVER['REMOTE_ADDR'], $userData['id']));

$forCookie = array(
'id' => $userData['id'],
'ip' => $_SERVER['REMOTE_ADDR'],
'username' => $_SESSION['username']
);

setcookie('simpleLogin', serialize($forCookie), time()+60*60*24*30, '/');

} catch (Exception $e) {
die('Database error: ' . $e->getMessage());
}
}
}
What does this code do? First, if session doesn’t already exist it starts the session. Then it creates a DB object. We also have a login method here which takes username and password as arguments. The method itself is pretty simple. If username and password entered match those in the database it calls the _setLogin method that takes an array of user’s data as a parameter.
This method as the name implies sets the session and cookie that indicate that user is logged in our site. It also updates the user’s IP address in the database and stores it into cookie for 30 days.
Now we have the basic login methods and we can create a login form and login our users.
Login form and login page
First, we’ll edit the index.php file. Nothing complicated, we’ll simply add the login form along the registration form:
<!DOCTYPE html>

<html lang="en-US">
<head>
<title>Simple Registration System</title>
<style>
body { font: normal 14px Verdana; }
h1 { font-size: 24px; }
h2 { font-size: 18px; }
</style>
</head>
<body>

<div id="wrap">

<section id="main">

<div id="fb-root"></div>
<script type="text/javascript">
window.fbAsyncInit = function() {
FB.init({
appId      : 'YOUR_APP_ID', // App ID
channelUrl : 'http://localhost.com/channel.html', // Channel File
status     : true, // check login status
cookie     : true, // enable cookies to allow the server to access the session
oauth      : true, // enable OAuth 2.0
xfbml      : true  // parse XFBML
});
};
(function(d){
var js, id = 'facebook-jssdk'; if (d.getElementById(id)) {return;}
js = d.createElement('script'); js.id = id; js.async = true;
js.src = "//connect.facebook.net/en_US/all.js";
d.getElementsByTagName('head')[0].appendChild(js);
}(document));
</script>

<h1>Registration or login needed</h1>

<div style="float: left; margin-right: 15px;">

<h2>Register</h2>
<p>You need to register to fully enjoy this site.</p>

<div class="fb-registration"
data-fields='[{"name":"name"},
{"name":"birthday"},
{"name":"location"},
{"name":"gender"},
{"name":"email"},
{"name":"username","description":"Username","type":"text"},
{"name":"password"}]'
data-redirect-uri="http://localhost.com/register.php"
width="300">
</div>

</div>

<div style="float: left;">

<h2>Login</h1>
<p>
If you already have an account you can login
using the form below:
</p>
<form action="login.php" method="POST">
<div>
<label for="username">Username:</label>
<input type="text" id="username" name="username" />
</div>
<div>
<label for="password">Password:</label>
<input type="password" id="password" name="password" />
</div>
<div><input type="submit" value="Login" /></div>
</form>

</div>
<div style="clear:both;"> </div>

</section>

</div>

</body>
</html>
Inside our project’s root folder create a login.php file:
<?php

$check = true;
$errors = array();

require_once 'config.php';

function __autoload($class_name)
{
include_once 'library/' . strtolower($class_name) . '.php';
}

if (!$_POST['username'] || !$_POST['password'])
{
$check = false;

if (empty($_POST['username']))
array_push($errors, 'Username is required!');

if (empty($_POST['username']))
array_push($errors, 'Password is required!');
}
else
{
$user = new User();
if ($user->login($_POST['username'], $_POST['password']))
{
header('Location: index.php');
}
else
{
$check = false;
array_push($errors, 'Invalid username or password');
}
}
?>

<?php if (false === $check): ?>
<!DOCTYPE html>

<html lang="en-US">
<head>
<title>Simple Registration System</title>
</head>
<style>
body { font: normal 14px Verdana; }
h1 { font-size: 24px; }
h2 { font-size: 18px; }
</style>
<body>

<div id="wrap">

<section id="main">

<h1>Unable to login</h1>
<p>Please try again.</p>

<?php
if (!empty($errors))
{
echo '<ul>';

foreach ($errors as $e)
{
echo '<li>' . $e . '</li>';
}

echo '</ul>';
}
?>

</section>

</div>

</body>
</html>
<?php endif; ?>
So, login.php is basically pretty simple. First we set the control variable $check to true. Then we check if both username and password are entered and if they’re not we set the $check variable to false and add the errors to array.
If the username and password are set we simply create a new User object and call a login method with username and password user entered. As you can recall if the username and password are correct the login method sets login session and cookie and returns true. If something goes wrong it return false. So if it returns true we’ll redirect user back to the index.php page.
If something’s wrong we’ll add a error to the errors array and set the $check to false. Lastly, if $check is set to false, something is wrong and we display the errors to the user.
NOTE: the isset check for post values is omitted for simplicity. Good practice is to check if variables are set.
Save the login.php and visit our site’s home page. Try to login using the login form. If you entered username and password correcty you should be redirected back to index.php file and if you enetered wrong username/password or left the fields empty you should see an error when you submit the form:

Checking if user is logged-in
When we successfully login the user we do a redirect to the home page. However, on the home page he/she is again offered to login/register. So, we need to check if the user is already logged-in and if it is, don’t offer the login form to him, but instead show him/her a welcome message.
For this we’ll edit the user.php file again. First, let’s add a property indicating whether a user is logged in:
private $_isLogged;
Next, we’ll add two methods. One will set a _isLogged property depending on the login status of the user. Other will simply return specified property.
private function _checkLogin()
{
$this->_isLogged = false;

if (isset($_SESSION['logged']) && $_SESSION['logged'])
{
$sth = $this->_db->query("SELECT * FROM users WHERE id = " . $_SESSION['id']);
$result = $sth->fetch();

if ($result['ip'] == $_SESSION['ip'])
{
$this->_isLogged = true;
}
}
else if (isset($_COOKIE['simpleLogin']) && $_COOKIE['simpleLogin'])
{
$cookieData = unserialize($_COOKIE['simpleLogin']);

$sth = $this->_db->query("SELECT * FROM users WHERE id = " . $cookieData['id']);
$result = $sth->fetch();

if ($result['ip'] == $cookieData['ip'])
{
$this->_setLogin($result);
$this->_isLogged = true;
}
}
}

public function isLogged()
{
return $this->_isLogged;
}
First method may need some explaining. First we say: user is not logged in (set the property to false). Then we check for existence of session containing user info. If session exists, we check if the IP address stored in the database matches IP address stored in the session. If they’re equal, user is logged in.
NOTE: Remember, in the _setLogin method we update user’s IP address in the database and in the session each time user successfully logs in. This way we can check for a match when checking is user logged in which adds another layer of security.
Next, if the session doesn’t exist, but the cookie with login details does, we use data stored in the cookie to do the same thing – check if user specified in the cookie exists and if his/her IP address stored in the Database matches IP address stored in cookie.
If it does, we set the login to true and call _setLogin method which stores user’s data in session.
Let’s check if user is logged in every time we create a user object. Edit the class’ constructor:
public function __construct()
{
if (!session_id())
{
session_start();
}
$this->_db = Db::init();
$this->_checkLogin();
}
Displaying different content of index.php to logged-in users
Now we’ll display different content to logged-in users. Open the index.php file and add following code at the top of the file:
<?php

require_once 'config.php';

function __autoload($class_name)
{
include_once 'library/' . strtolower($class_name) . '.php';
}

$user = new User();
if ($user->isLogged())
{
$registerOrLoginNeeded = false;
}
else
{
$registerOrLoginNeeded = true;
}
OK, so we have a $registerOrLoginNeeded variable. If user needs to register or login the variable will have value true and we’ll show login/register form. Else, we’ll show a greeting. Continute editing the HTML part of our index.php file:
<!DOCTYPE html>

<html lang="en-US">
<head>
<title>Simple Registration System</title>
<style>
body { font: normal 14px Verdana; }
h1 { font-size: 24px; }
h2 { font-size: 18px; }
</style>
</head>
<body>

<div id="wrap">

<section id="main">

<?php if (false === $registerOrLoginNeeded): ?>

<h1>Welcome</h1>
<p>You may now enjoy the site.</p>

<?php else: ?>

<div id="fb-root"></div>
<script type="text/javascript">
window.fbAsyncInit = function() {
FB.init({
appId      : 'YOUR_APP_ID', // App ID
channelUrl : 'http://localhost.com/channel.html', // Channel File
status     : true, // check login status
cookie     : true, // enable cookies to allow the server to access the session
oauth      : true, // enable OAuth 2.0
xfbml      : true  // parse XFBML
});
};
(function(d){
var js, id = 'facebook-jssdk'; if (d.getElementById(id)) {return;}
js = d.createElement('script'); js.id = id; js.async = true;
js.src = "//connect.facebook.net/en_US/all.js";
d.getElementsByTagName('head')[0].appendChild(js);
}(document));
</script>

<h1>Registration or login needed</h1>

<div style="float: left; margin-right: 15px;">

<h2>Register</h2>
<p>You need to register to fully enjoy this site.</p>

<div class="fb-registration"
data-fields='[{"name":"name"},
{"name":"birthday"},
{"name":"location"},
{"name":"gender"},
{"name":"email"},
{"name":"username","description":"Username","type":"text"},
{"name":"password"}]'
data-redirect-uri="http://localhost.com/register.php"
width="300">
</div>

</div>

<div style="float: left;">

<h2>Login</h1>
<p>
If you already have an account you can login
using the form below:
</p>
<form action="login.php" method="POST">
<div>
<label for="username">Username:</label>
<input type="text" id="username" name="username" />
</div>
<div>
<label for="password">Password:</label>
<input type="password" id="password" name="password" />
</div>
<div><input type="submit" value="Login" /></div>
</form>

</div>
<div style="clear:both;"> </div>

<?php endif; ?>

</section>

</div>

</body>
</html>
Save the file and visit localhost.com. Login using the login form to verify that the system works. Then close the browser window. If you had cookies enabled on login you should stay logged in if you revisit localhost.com.
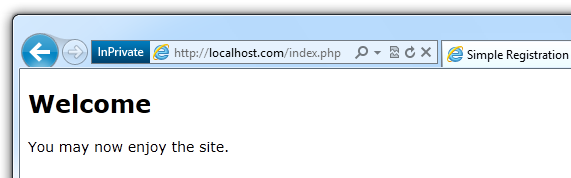
So, as you can see the system works! We have successfully created a registration and login system.
Additional: Automatically login the user via his/her Facebook account
Even if no session or site cookie exist we want to automatically login the user if we detect we have his/her Facebook ID in the database.
Why? If the user connected his Facebook account to our application it means he already registered for our site. Also, we can’t have two same Facebook IDs in our user’s table, which means same user can’t register with Facebook twice. He already registered using Facebook, so he should be logged-in, right? Right.
If previous paragraph didn’t make sense, I suggest you take a look at the Facebook’s suggested best practices (User Registration Flows).
Let’s get into it.
Modifying User class
We need to add another method to our User class (user.php) which enables us to login user via Facebook ID. Add the following method to our class:
public function fbLogin($fbId)
{
$sth = $this->_db->prepare("SELECT * FROM users WHERE facebook = ?");
$sth->execute(array($fbId));
$result = $sth->fetch();

if ($result)
{
$this->_setLogin($result);
return true;
}
return false;
}
Basically, we check if user with the specified Facebook ID exists in our database and if it does we set login session and cookie and return true to indicate that login is successful.
Then we need to edit index.php again. This is the place where we’ll check if user is connected to Facebook and registered for our site. We’ll also add some JavaScript so that the page gets refreshed when the user logs into Facebook.
If user previously registered without using his Facebook account but used the same E-mail address as on his Facebook account we need to merge his existing account using Facebook ID, same as with registration.
The revised index.php now looks like this:
<?php

require_once 'config.php';

function __autoload($class_name)
{
include_once 'library/' . strtolower($class_name) . '.php';
}

$user = new User();
if ($user->isLogged())
{
$registerOrLoginNeeded = false;
}
else
{
$registerOrLoginNeeded = true;

$facebook = new Facebook(array(
'appId'  => FB_ID,
'secret' => FB_SECRET,
));

$fbUser = $facebook->getUser();

if ($fbUser)
{
try {

$userProfile = $facebook->api('/me');
if ($user->fbLogin($fbUser))
{
$registerOrLoginNeeded = false;
}
else
{
$db = Db::init();

$sth = $db->prepare("SELECT * FROM users WHERE email = ?");
$sth->execute(array($userProfile['email']));

if (false != $sth->fetch())
{
$sth = $db->prepare("UPDATE users SET facebook = ? WHERE email = ?");
if ($sth->execute(array($fbUser, $userProfile['email'])))
{
if ($user->fbLogin($fbUser))
$registerOrLoginNeeded = false;
}
}
}

} catch (FacebookApiException $e) {
$fbUser = null;
}
}
}
?>

<!DOCTYPE html>

<html lang="en-US">
<head>
<title>Simple Registration System</title>
<style>
body { font: normal 14px Verdana; }
h1 { font-size: 24px; }
h2 { font-size: 18px; }
</style>
</head>
<body>

<div id="wrap">

<section id="main">

<?php if (false === $registerOrLoginNeeded): ?>

<h1>Welcome</h1>
<p>You may now enjoy the site.</p>

<?php else: ?>

<div id="fb-root"></div>
<script type="text/javascript">
window.fbAsyncInit = function() {
FB.init({
appId      : '<?php echo $facebook->getAppID() ?>', // App ID
channelUrl : 'http://localhost.com/channel.html', // Channel File
status     : true, // check login status
cookie     : true, // enable cookies to allow the server to access the session
oauth      : true, // enable OAuth 2.0
xfbml      : true  // parse XFBML
});
FB.Event.subscribe('auth.login', function(response) {
window.location.reload();
});
FB.Event.subscribe('auth.logout', function(response) {
window.location.reload();
});
};
(function(d){
var js, id = 'facebook-jssdk'; if (d.getElementById(id)) {return;}
js = d.createElement('script'); js.id = id; js.async = true;
js.src = "//connect.facebook.net/en_US/all.js";
d.getElementsByTagName('head')[0].appendChild(js);
}(document));
</script>

<h1>Registration or login needed</h1>

<div style="float: left; margin-right: 15px;">

<h2>Register</h2>
<p>You need to register to fully enjoy this site.</p>

<div class="fb-registration"
data-fields='[{"name":"name"},
{"name":"birthday"},
{"name":"location"},
{"name":"gender"},
{"name":"email"},
{"name":"username","description":"Username","type":"text"},
{"name":"password"}]'
data-redirect-uri="http://localhost.com/register.php"
width="300">
</div>

</div>

<div style="float: left;">

<h2>Login</h1>
<p>
If you already have an account you can login
using the form below:
</p>
<form action="login.php" method="POST">
<div>
<label for="username">Username:</label>
<input type="text" id="username" name="username" />
</div>
<div>
<label for="password">Password:</label>
<input type="password" id="password" name="password" />
</div>
<div><input type="submit" value="Login" /></div>
</form>

</div>
<div style="clear:both;"> </div>

<?php endif; ?>

</section>

</div>

</body>
</html>
The only change you need to really consider is in the PHP portion of the file. First, we try to login the user using the conventional means. If that fails we create a Facebook object and try to return the user object using Facebook API. If we have user object we try to login user to our site using our new fbLogin method.
If we succeed we can consider the user to be logged-in, so we create the session and display the logged-in user content.
Finishing touches
There are some issues with our system, which we’ll address.
Revoked permissions
The above will not work if user has revoked permissions of our Facebook application or if user comes both logged out of Facebook and our site. In those cases we won’t have user’s Facebook ID.
So, we can add Facebook’s login button to our site. Inside our index.php file add a Facebook login plugin. Add the following code somewhere in the login form:
<p>
If you previously registered for this site using Facebook,
you can now login using your Facebook account.
</p>
<div class="fb-login-button" data-show-faces="false" scope="email"></div>
If the user clicks it and enters login information he/she will be logged to Facebook and connected to our site, so our site will reload, detect that user is connected and log the user in if he/she already registered for our site via Facebook.
User changes his E-mail on Facebook and tries to register again
As you see we added a check if a user with the same e-mail address exists and if he does we simply merge his account using his Facebook ID.
But we also can’t have two same Facebook IDs in our database. So what if user changes his Facebook E-mail, revokes permissions of our application and tries to register again while logged-in to Facebook?
Yes, this may be nitpicking, but it could happen. Not to worry, now when we have fbLogin method the solution is very, very simple. We need to edit the register.php file.
$fbId = (isset($request['user_id'])) ? $request['user_id'] : 0;

if ($fbId != 0)
{
$user = new User();
if ($user->fbLogin($fbId))
{
header('Location: index.php');
exit();
}
}
Simply before E-mail check try to login the user via Facebook ID. If we succeed, redirect to index.php file.
Also, now when we have the login & fbLogin methods we can also use them in register.php file to login the user immediately. Open register.php file and change it to use login methods:
<?php

$status = false;
$errors = array();

require_once 'config.php';

function __autoload($class_name)
{
include_once 'library/' . strtolower($class_name) . '.php';
}

$facebook = new Facebook(array(
'appId'  => FB_ID,
'secret' => FB_SECRET,
));

$request = $facebook->getSignedRequest();

if ($request)
{
$register = $request['registration'];

try {

$db = Db::init();

$fbId = (isset($request['user_id'])) ? $request['user_id'] : 0;
$user = new User();

// User tries to register again with the same Facebook ID
if ($fbId != 0)
{
if ($user->fbLogin($fbId))
{
header('Location: index.php');
exit();
}
}

$sth = $db->prepare("SELECT * FROM users WHERE username = ?");
$sth->execute(array($register['username']));

if (!$sth->fetch())
{
$sth = $db->prepare("SELECT * FROM users WHERE email = ?");
$sth->execute(array($register['email']));

if ((false != $sth->fetch()) && ($fbId != 0))
{
$sth = $db->prepare("UPDATE users SET facebook = ? WHERE email = ?");
if ($sth->execute(array($fbId, $register['email'])))
{
// This is new. Try to login the user using Facebook ID
$status = $user->fbLogin($fbId);
}
}
else
{
$location = $register['location'];
if (is_array($location))
{
$location = $location['name'];
}

$sql = "INSERT INTO users
(facebook, username, password, name, email, location, gender, ip)
VALUES
(?, ?, ?, ?, ?, ?, ?, ?)";

$data = array(
$fbId,
$register['username'],
md5($register['password']),
$register['name'],
$register['email'],
$location,
$register['gender'],
$_SERVER['REMOTE_ADDR']
);

$sth = $db->prepare($sql);
if ($sth->execute($data))
{
// Login user immediately using username and password
$status = $user->login($register['username'], $register['password']);
}
}
}
else
{
array_push($errors, 'Username is already taken!');
}
} catch (Exception $e) {
array_push($errors, 'Database error: ' . $e->getMessage());
}
}
else
{
array_push($errors, 'Error with validating Signed request.');
}

if (true === $status)
{
echo 'User registered successfully';
}
else
{
echo 'Errors during registration:';
if (!empty($errors))
{
echo '<ul>';

foreach ($errors as $e)
{
echo '<li>' . $e . '</li>';
}

echo '</ul>';
}
}
This way user will be logged-in immediately upon registering and there’s no need to login again on the index.php file, but when user returns to the index file, he/she will be automatically logged-in.
Conclusion
In this blog post we used Facebook’s Registration plugin to register users for our site. We also created a simple login system that enables users to login using their Facebook account or Username/Password created during the registration process. We also did some securing of login process via user’s IP address.
We didn’t use Facebook login to automatically register users because we wanted to force them to use the registration plugin. This approach enables you to request additional information from your users that’s not available on Facebook (we used Username in this example).
Thanks for visiting this site and until next time I wish you all the best.