
Let’s return to Web Development Category and create a Simple Contact Form. But, just to make things interesting we’ll submit the form using AJAX, so the user gets the feedback without the page refresh. Also, let’s log the User Input into Database for later review.
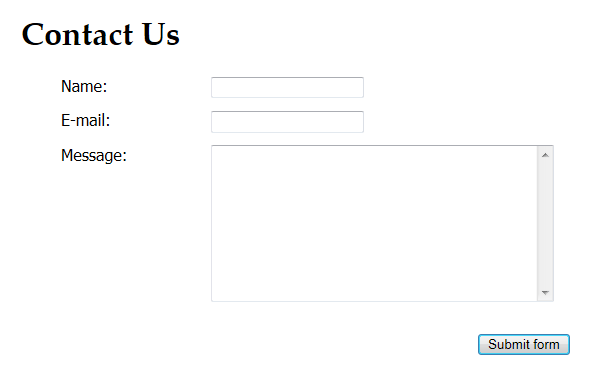
Here’s a screenshot of our form:
The Basic Plot
All the form fields are required. The user fills the fields, we validate them using Javascript and if the fields are not valid we alert the user. If the fields are valid we use jQuery to submit the form via AJAX call to a PHP script.
In the PHP script, we do two things:
- Store the user’s input in the database
- Send contact E-mail over the SMTP server
If either operation succeeds we tell the user the form submit operation was a success, but you can easily change success terms and the way user receives feedback. It’s up to you. We are simply building a template which can (and probably should) be expanded to meet your needs. Anyway, let’s get into it.
The Easy Part: HTML & CSS
The HTML is pretty simple:
<h1>Contact Us</h1>

<form id="contact" method="post" action="contact.php">

<ul>
<li>
<label for="name">Name:</label>
<input id="name" name="name" type="text" />
</li>
<li>
<label for="email">E-mail:</label>
<input id="email" name="email" type="text" />
</li>
<li>
<label for="message">Message:</label>
<textarea id="message" name="message" rows="10" cols="40"></textarea>
</li>
</ul>
<input class="submit" value="Submit form" type="submit" />

</form>
So, here’s what our form looks like:

Just because we’re developing and not designing this time, that doesn’t mean our form has to be THAT ugly. Let’s just improve its looks a bit.
body {
font-family: Tahoma, Geneva, sans-serif;
padding: 0 25px;
}

h1, h2, h3 {
font-family: 'Palatino Linotype', 'Book Antiqua', Palatino, serif;
}

#contact {
width: 550px;
}

#contact ul li {
clear: both;
list-style: none;
}

label {
float: left;
width: 150px;
margin-bottom: 15px;
}

.submit {
float: right;
margin-top: 15px;
}


#contact ul li div {
clear: both;
padding: 8px 0;
font-weight: bold;
}

div.error {
color: #cc0000;
}

div.success {
color: green;
}
That’s more like it. Now, let’s add jQuery submit and validation to our form to make it alive. 🙂
Adding fields validation & AJAX submit mechanism
First of all, we need to include the jQuery library in our file. There are several options to do so, you can download it and link it, or hotlink it from a CDN. I used Microsoft’s CDN:
<script src="http://ajax.aspnetcdn.com/ajax/jQuery/jquery-1.5.2.min.js" type="text/javascript"></script>
After that let’s use jQuery to make the magic happen. First, we’ll bind the event handler to a form so that stuff happens when the form is submitted. Remember, our form ID is contact, so let’s bind to that. Using return false; prevents the form submit action.

$(document).ready(function(){
$("#contact").submit(function(){
alert("The Form is submitted!");
return false;
});
});
See how easy it is? Now instead of simply alerting that the form is submitted we want to validate the user input and if everything is OK, send the data to the PHP script for processing. Using jQuery we can simply get the values the user entered into the form fields and use that for validation:
$(document).ready(function(){
$("#contact").submit(function(){

// If there is anything wrong with
// validation we set the check to false
var check = true;

// Get the value of form field with id="name"
var name = $("#name").val();

// Validate Name
if (name == '') {
check = false;
$('#name').after('<div class="error">* Name is required!</div>');
} else if (name.length < 6) {
check = false;
$('#name').after('<div class="error">* Name is too short!</div>');
}

// If validation is successful
if (check == true) {
alert("Validation success!");
}
return false;
});
});
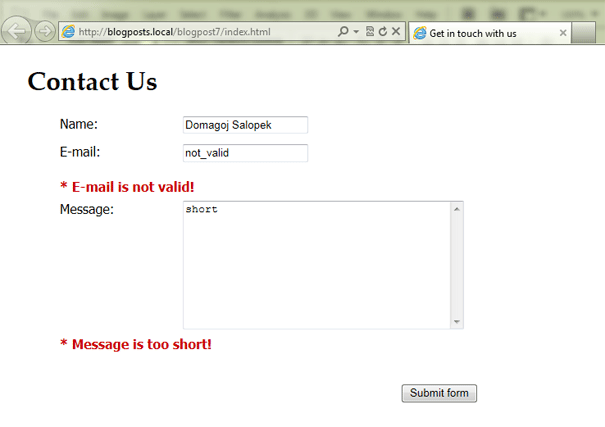
So, simply by checking if the name is empty or if it is shorter than 6 characters we have added simple validation. If there’s a validation error we add the error message after the name field:

This is what we got after adding the validation for the name field. We have to add validation for other fields, and we have to remove previous validation errors, so we don’t see old validation errors on a new submission. So, let’s extend our validation to other fields as well:
$(document).ready(function(){
$("#contact").submit(function(){

// Remove any existing errors
$(".error").remove();

var check = true;
var emailPattern = /^[a-zA-Z0-9._-]+@[a-zA-Z0-9.-]+\.[a-zA-Z]{2,4}$/;

var name = $("#name").val();
var email = $("#email").val();
var message = $("#message").val();

// Validate Name
if (name == '') {
check = false;
$('#name').after('<div class="error">* Name is required!</div>');
} else if (name.length < 6) {
check = false;
$('#name').after('<div class="error">* Name is too short!</div>');
}
// Validate E-mail
if (email == '') {
check = false;
$('#email').after('<div class="error">* E-mail is required!</div>');
} else if (email.length < 6) {
check = false;
$('#email').after('<div class="error">* E-mail is too short!</div>');
} else if(!emailPattern.test(email)){
check = false;
$('#email').after('<div class="error">* E-mail is not valid!</div>');
}
// Validate Message
if (message == '') {
check = false;
$('#message').after('<div class="error">* Message is required!</div>');
} else if (message.length < 6) {
check = false;
$('#message').after('<div class="error">* Message is too short!</div>');
}
// If check is true, validation is successful
if (check == true) {
alert("Validation success!");
}
return false;
});
});
So that’s the entire validation. We also check if the email entered is valid, via the use of regular expressions for the E-mail pattern. If you don’t understand, never mind, just be glad it’s there. 🙂
Now we’re done with the validation. Time for the FUN stuff. Let’use the jQuery to send the data from a form to the PHP script. Just on a side note, if you plan to continue with the PHP part of this tutorial, here’s what you will need:
- HTTP server capable of processing PHP scripts (eg. Apache, Microsoft IIS)
- MySQL server
- Access to SMTP server
To get both Apache, MySQL and PEAR we’ll be using you can download XAMPP which installs everything you need for PHP development and a lot more.
Anyway, let’s finally send our data to the script. We’ll change only the javascript part where validation is successful:
// ... goes after Validation
if (check == true) {
$.ajax({
type: "POST",
url: "contact.php",
data: $("#contact").serialize(),
success: function(response){
alert(response);
}
});
}
So, what’s happening here? Simple! We use the $.ajax to perform an AJAX request for the file contact.php. Using the data option we can send data to the server. From jQuery documentation: Data to be sent to the server. It is converted to a query string, if not already a string. We could assess the data ourselves, but why? Let’s use serialization to provide the data from the form. See: serialize().
Now, let’s go to PHP. Open your favourite PHP editor and create a file named contact.php.
3. Processing our form
We’ll start very simply. In the PHP file just write:
echo "User entered: " . $_POST['name'] . ", " . $_POST['email'] . ", " . $_POST['message'];

So, as you can see we are able to get the data into the PHP script via jQuery AJAX. Now it’s simple to do stuff with that data. 🙂 First, we said we wanted to save it to the database. The table is very, very simple. If you don’t feel like creating it yourself, here’s the SQL code for it:
CREATE TABLE IF NOT EXISTS `contact` (
`id` int(10) NOT NULL AUTO_INCREMENT,
`name` varchar(50) NOT NULL,
`email` varchar(50) NOT NULL,
`comment` text NOT NULL,
PRIMARY KEY (`id`)
) ENGINE=InnoDB DEFAULT CHARSET=utf8;
Now when you have a contact table in your (testing) database, it’s time to actually add submitted values into it. Let’s use PHP Data Objects for database access. Why? For a variety of reasons which include: better security, being more object-oriented, can connect to different servers, etc. And it’s actually easier once you get used to it. So, let’s begin.
First, we need to configure our server and database data and connect to it.
// If it works will be set to true
$dbSuccess = false;
$mailSuccess = false;

// Configuration
$server     = 'your_server';
$username   = 'your_username';
$password   = 'your_password';
$database   = 'your_database';

$dsn        = "mysql:host=$server;dbname=$database";
The DSN is new stuff if you are used to mysql_connect. After configuration, we simply use PDO to connect and insert data.
try {

$db = new PDO($dsn, $username, $password);
$db->setAttribute( PDO::ATTR_ERRMODE, PDO::ERRMODE_EXCEPTION );

$sth = $db->prepare("INSERT INTO contact (name, email, comment) VALUES (?, ?, ?)");
if ($sth->execute(array($_POST['name'], $_POST['email'], $_POST['message'])));
$dbSuccess = true;

} catch (Exception $e) {
$return['databaseException'] = $e->getMessage();
}
Let’s explain this quickly: Using the setAttribute method we set the Error reporting to throw exceptions, which we later catch. Next, we use the prepare() method to (surprise) prepare our query. As you can see preparing lets us define the places for variables. On execution, we fill those places with our variables. More information.
$sth = $db->prepare("INSERT INTO contact (name, email, comment) VALUES (?, ?, ?)");
$sth->execute( array($_POST['name'], $_POST['email'], $_POST['message']) );
NOTE: When using prepared statements, there’s no need for manually escaping or sanitizing input. Any potentially dangerous data is encoded and escaped automatically. There you have it! Connection, Sanitizing, Inserting, Catching!

If the execution was a success we set the $dbSuccess variable to true. We can use that variable to get feedback about the PHP script in our HTML file. Let’s agree to use the $return array for returning stuff from our script. In the example above, you see we use $return array with databaseException key. So the feedback thing would be like:
$return['databaseSuccess'] = $dbSuccess;
When we have our array setup, we can JSON – encode it into a string and provide a feedback that way:
echo json_encode($return);
So our entire PHP script up to this point looks like this:
// If it works will be set to true
$dbSuccess = false;
$mailSuccess = false;

// Configuration
$server     = 'your_server';
$username   = 'your_username';
$password   = 'your_password';
$database   = 'your_database';

$dsn        = "mysql:host=$server;dbname=$database";

try {

$db = new PDO($dsn, $username, $password);
$db->setAttribute( PDO::ATTR_ERRMODE, PDO::ERRMODE_EXCEPTION );

$statement = $db->prepare("INSERT INTO contact (name, email, comment)
VALUES (?, ?, ?)");

if ($statement->execute(array($_POST['name'], $_POST['email'], $_POST['message'])));
$dbSuccess = true;

} catch (Exception $e) {
$return['databaseException'] = $e->getMessage();
}

$return['databaseSuccess'] = $dbSuccess;

echo json_encode($return);
Now we return to our HTML file and change our AJAX call a bit so that it reads the response and if databaseSuccess equals true, provide the user with some feedback. It’s really simple:
$.ajax({
type: "POST",
url: "contact.php",
data: $("#contact").serialize(),
dataType: "json",
success: function(response){

if (response.databaseSuccess)
$("#contact").html('<div class="success">Contact information successfully stored!</div>');
else
$("#contact").html('<div class="error">Something went wrong!</div>');

}
});
See, we just check if databaseSuccess equals true. If yes we print the success message, if not we print the error message. Here’s a SUCCESS response observed in a Firebug:

Here’s a FAIL response and Appropriate exception text we captured using:
$return['databaseException'] = $e->getMessage();

OK, we have finished with the database part. Now for the E-mail part and providing the feedback to the user.
Let’s use the PEAR Mail Extension to send the Contact E-mail via the SMTP server. If you installed XAMPP you probably already have everything necessary to test locally. If your hosting provider doesn’t have PEAR already you can install it using the guide. Once you have the manager it’s simple to add other packages etc …
Additional NOTE: If you’re (like me) using Microsoft’s IIS installed with Web Platform Installer, you can install PEAR manager via the command prompt.

After that switch to the directory where WPI installed PHP (typically: C:\Program Files\PHP\(php_version)) and run the go-pear.bat. Everything on the list should be OK, so just follow the on-screen instructions and in a few seconds you will have PEAR. Then to install individual packages, simply use the commands provided on the PEAR website.
Once we have PEAR and appropriate packages everything is simple. We need to change our contact.php file again. First, we need to include Mail.php file:
require_once "Mail.php";
After that let’s add some SMTP configuration & Setup E-mail data. We can do that right after database operations:
// SMTP configuration
$host = "your_smtp_server";
$username = "smtp_server_username";
$password = "smtp_server_password";

// E-mail data
$mail = filter_var($_POST['email'], FILTER_SANITIZE_EMAIL);
$name = filter_var($_POST['name'], FILTER_SANITIZE_STRING);
$body = filter_var($_POST['message'], FILTER_SANITIZE_STRING);

$from = $name . " <$mail>";
$to = "Your Name <your.name@yourhost.com>";
$subject = "E-mail contact form";
We use the filter_var function to sanitize our input, which is enough safe for sending E-mails. After that, we create our “mail” object and use the send method to actually send the mail.
$headers = array('From' => $from, 'To' => $to, 'Subject' => $subject);

$smtp = Mail::factory('smtp',
array('host' => $host,
'auth' => true,
'username' => $username,
'password' => $password
)
);

$mail = $smtp->send($to, $headers, $body);
From the documentation, we can see that the send method returns either TRUE or a PEAR_Error object on failure. So, if $mail is true, that means everything went well and that the mail is sent. So, we just act accordingly:
if (!PEAR::isError($mail))
$mailSuccess = true;
else
$return['mailException'] = $mail->getMessage();
So, just as with the database, we need to return the feedback about the script’s success. Let’s add the $mailSuccess value to the $return array:
$return['databaseSuccess'] = $dbSuccess;
$return['mailSuccess'] = $mailSuccess;

echo json_encode($return);
Now it’s simple to receive the feedback in our HTML file and act accordingly. In this example, we consider a success either a database entry or a mail sent, but you can change that easily. Anyway, the revised AJAX part goes like this:
$.ajax({
type: "POST",
url: "contact.php",
data: $("#contact").serialize(),
dataType: "json",
success: function(response){
if (!response.mailSuccess && !response.databaseSuccess)
{
$('#message').after('<div class="error">* Something went very wrong! Please try again!</div>');
}
else
{
$("#contact").html('');
if (response.mailSuccess)
$("#contact").append('<div class="success">Mail sent successfully!</div>');
if (response.databaseSuccess)
$("#contact").append('<div class="success">Contact information successfully stored!</div>');
}
}
});
So, as you can see, if both are a success, both messages will be displayed. If only one operation is a success only an appropriate message will be displayed. Only if both operations fail there is an error message.

There you have it, a simple way to both send contact E-mail and record the entry in the database.
The Complete PHP code
// If it works will be set to true
$dbSuccess = false;
$mailSuccess = false;

// Pear mail
require_once "Mail.php";

// Database Configuration
$server     = 'your_server';
$username   = 'your_username';
$password   = 'your_password';
$database   = 'your_database';

$dsn        = "mysql:host=$server;dbname=$database";

try {

$db = new PDO($dsn, $username, $password);
$db->setAttribute( PDO::ATTR_ERRMODE, PDO::ERRMODE_EXCEPTION );

$statement = $db->prepare("INSERT INTO contact (name, email, comment) VALUES (?, ?, ?)");

if ($statement->execute(array($_POST['name'], $_POST['email'], $_POST['message'])));
$dbSuccess = true;

} catch (Exception $e) {
$return['databaseException'] = $e->getMessage();
}

// SMTP configuration
$host = "your_smtp_server";
$username = "smtp_server_username";
$password = "smtp_server_password";

// E-mail data
$mail = filter_var($_POST['email'], FILTER_SANITIZE_EMAIL);
$name = filter_var($_POST['name'], FILTER_SANITIZE_STRING);
$body = filter_var($_POST['message'], FILTER_SANITIZE_STRING);

$from = $name . " <$mail>";
$to = "Your Name <your.name@yourhost.com>";
$subject = "E-mail contact form";


$headers = array('From' => $from, 'To' => $to, 'Subject' => $subject);

$smtp = Mail::factory('smtp',
array('host' => $host,
'auth' => true,
'username' => $username,
'password' => $password
)
);

$mail = $smtp->send($to, $headers, $body);

if (!PEAR::isError($mail))
$mailSuccess = true;
else
$return['mailException'] = $mail->getMessage();

$return['databaseSuccess'] = $dbSuccess;
$return['mailSuccess'] = $mailSuccess;

echo json_encode($return);
The Complete Javascript code
$(document).ready(function(){
$("#contact").submit(function(){
// Remove any existing errors
$(".error").remove();
var check = true;
var emailPattern = /^[a-zA-Z0-9._-]+@[a-zA-Z0-9.-]+\.[a-zA-Z]{2,4}$/;
var name = $("#name").val();
var email = $("#email").val();
var message = $("#message").val();
// Validate Name
if (name == '') {
check = false;
$('#name').after('<div class="error">* Name is required!</div>');
}
else if (name.length < 6) {
check = false;
$('#name').after('<div class="error">* Name is too short!</div>');
}
// Validate E-mail
if (email == '') {
check = false;
$('#email').after('<div class="error">* E-mail is required!</div>');
}
else if (email.length < 6) {
check = false;
$('#email').after('<div class="error">* E-mail is too short!</div>');
}
else if(!emailPattern.test(email)){
check = false;
$('#email').after('<div class="error">* E-mail is not valid!</div>');
}
// Validate Message
if (message == '') {
check = false;
$('#message').after('<div class="error">* Message is required!</div>');
}
else if (message.length < 6) {
check = false;
$('#message').after('<div class="error">* Message is too short!</div>');
}
// If validation is successful
if (check == true) {
$.ajax({
type: "POST",
url: "contact.php",
data: $("#contact").serialize(),
dataType: "json",
success: function(response){
if (!response.mailSuccess && !response.databaseSuccess)
{
$('#message').after('<div class="error">* Something went very wrong! Please try again!</div>');
}
else
{
$("#contact").html('');
if (response.mailSuccess)
$("#contact").append('<div class="success">Mail sent successfully!</div>');
if (response.databaseSuccess)
$("#contact").append('<div class="success">Contact information successfully stored!</div>');
}
}
});
}
return false;
});
});
I hope this post has helped someone. Enjoy!