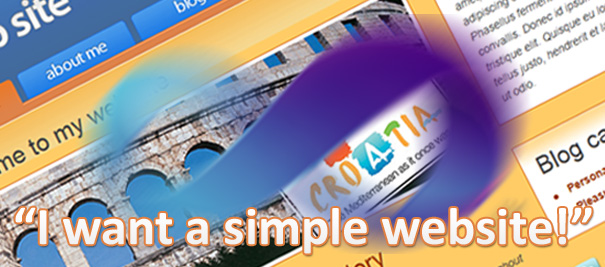
We’ll be creating a simple but fully functional website. We’ll use the design, HTML and CSS from one of my previous blog posts: A step-by-step walkthrough for coding a Web Site from a Photoshop template. So, HTML and CSS are basically already done. Of course, we need to integrate these files into ASP.NET templates, so the basic HTML & CSS will be repeated.
So, the layout is almost done and besides integrating it into templates we have to develop the website functionalities. This time I’ll skip the image gallery part because I believe something like that needs a blog post of its own. We’ll add the image gallery and RSS another time, hopefully soon. 🙂 So, the functionalities will include:
- About Me section with fixed content inside
- Last Blog posts on the home page
- Blog section with posts sorted into categories
- Working Contact form
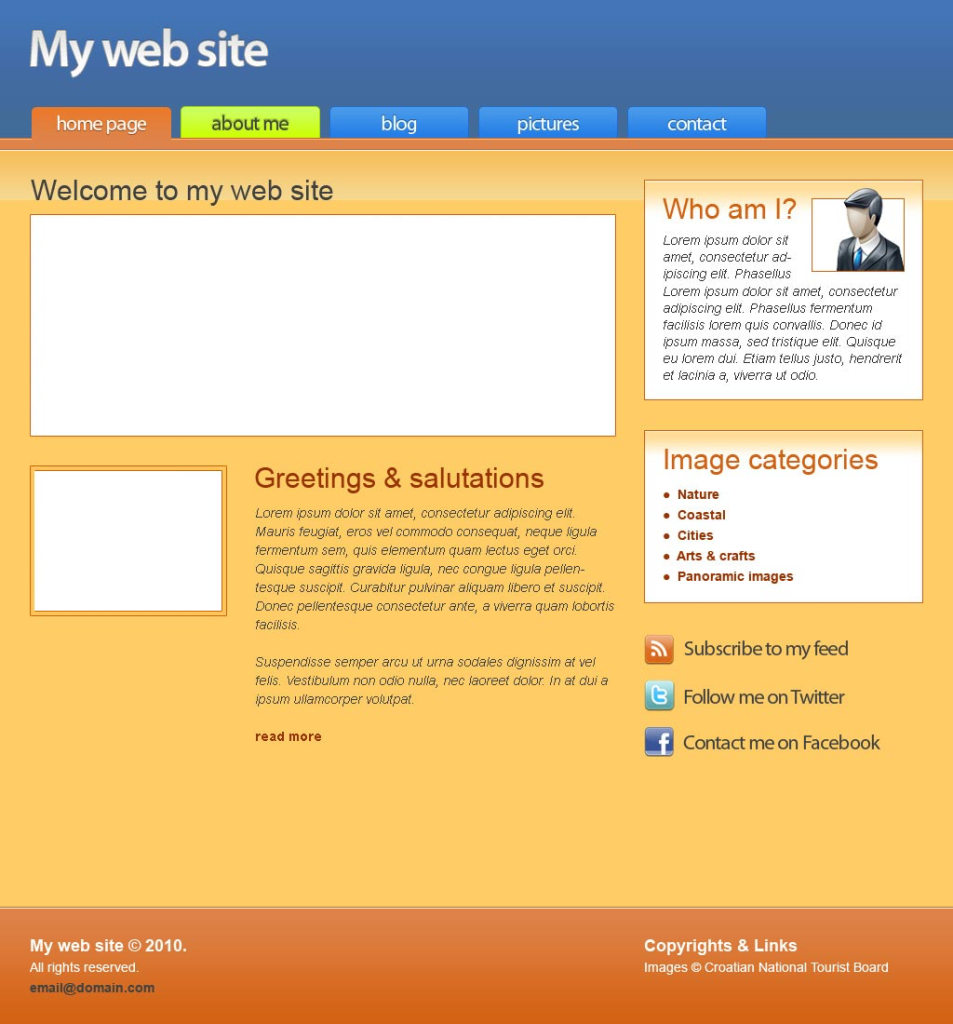
So, we’ll steal some HTML/CSS from this design:
OK, let’s get into it!
What is ASP.NET MVC?
MVC stands for Model-View-Controller. MVC enables us to separate our logic from the presentation. This philosophy is very popular for all the right reasons. One of the biggest advantages is code re-usability. There are other benefits, such as we can let the designers edit the Views, without worrying that they will screw up database access logic. What if we switch to another programming language, such as PHP? We can still use most of the presentation logic with only minimal changes.
So, to summarize:
- Model – Classes that connect and talk to the database
- View – presentation logic – HTML/CSS/JSON, etc
- Controller – loads View, talks to the Model, does stuff that the user asks it to
How to get ASP.NET MVC?
The simplest way to get everything you need to build and run ASP.NET MVC stuff is Microsoft’s Web Platform Installer. Stuff you need:
- IIS
- SQL Server 2008 Compact Edition
- Visual Web Developer Express SP1
- ASP.NET MVC 3 Tools Update
Web Platform Installer can also install PHP on IIS, PHP Manager for IIS and even MySQL server, so basically you can use it to set up your environment for both ASP.NET and PHP projects. Once you select what you want to install, the installer will download the required files and install everything you want it to.
We have the tools. Now what?
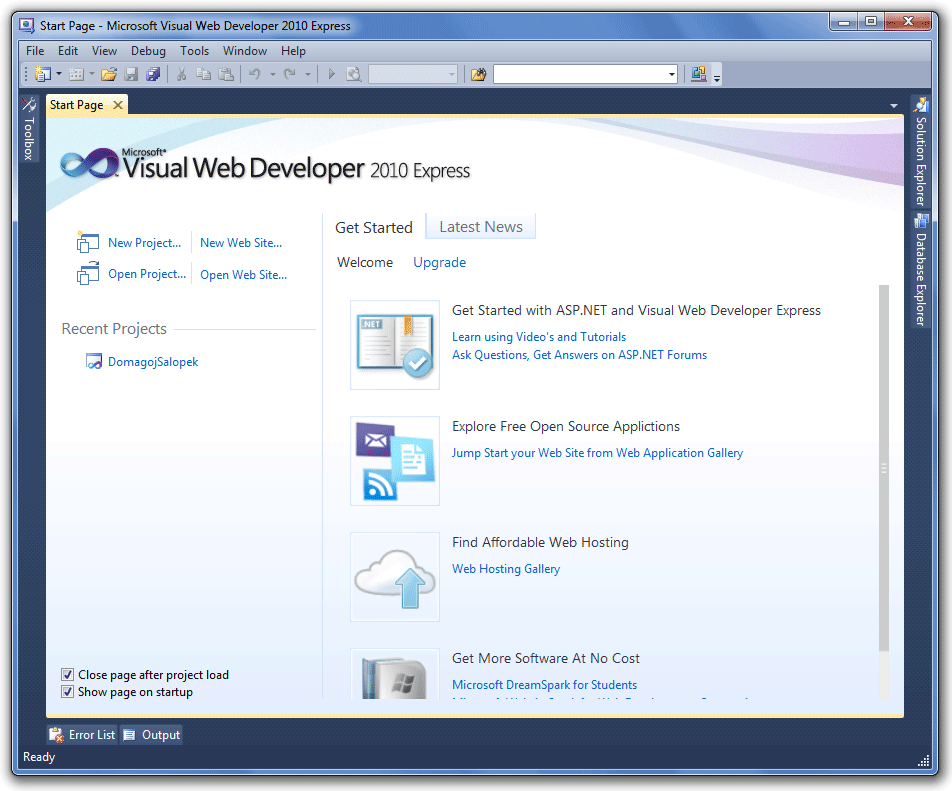
Now start Visual Web Developer 2010 Express. Once you start it you will see a start page. We can use the Start page to create our blog project. Click on the New Project button or go to File -> New Project. Once the dialogue opens, select ASP.NET MVC 3 Web Application, and choose the location and Name. I used my website.
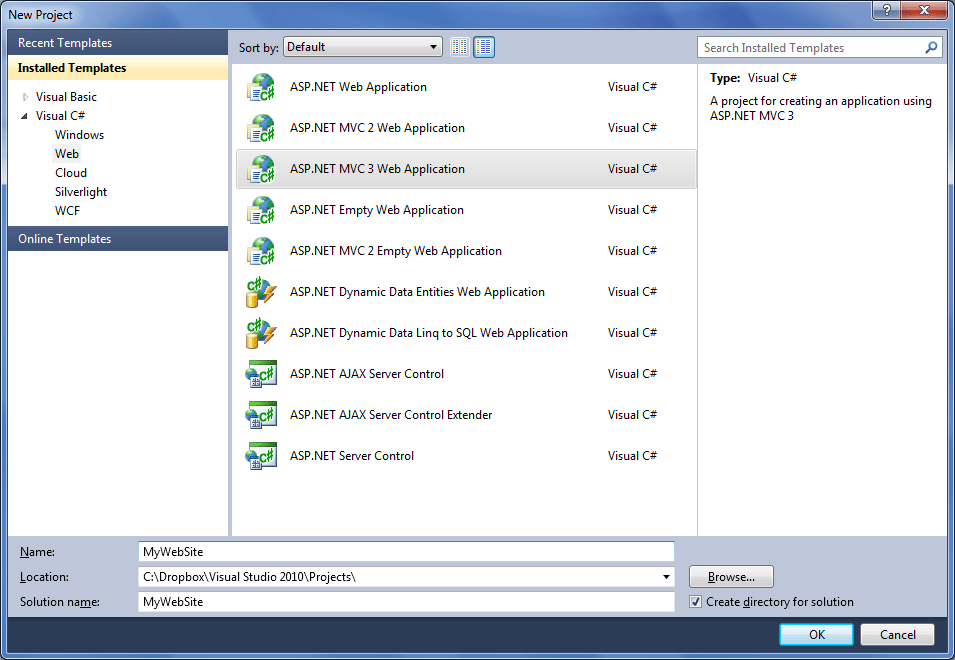
Then select Internet Application, Razor as a View Engine and enable the check box Use HTML5 semantic markup.
So, now Visual Web developer creates the web solution for us. So, we already have a working web application!
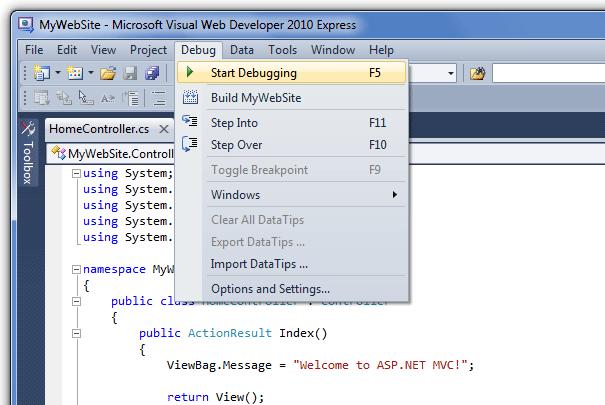
Enough talk, let’s see what we have. From the Debug menu select Start Debugging, or press F5.
Visual Web Developer starts a web server on your computer and displays your application in a Web Browser. This is what our application looks like:
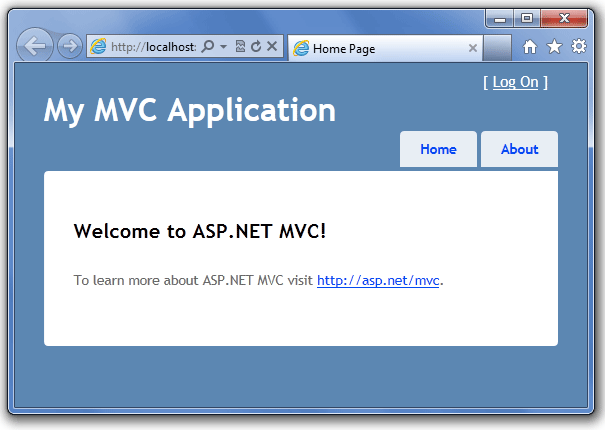
Note that you can go to the about or Log On links. Close the browser to return to our Visual Web Developer.
Adding the design & Static content
Let’s change the layout of the site. We’ll use files Visual Web Developer already created for us and integrate our design into them. First, let’s change the Layout file. The layout enables us to use the look we implement in one template throughout the entire site.
Visual Web Developer created this file beneath the Views folder: Views -> Shared -> _Layout.cshtml, so go ahead and open it. As you can see it currently contains the menu, title and other elements used on all pages, and the Views are displayed inside it, on the location specified by @RenderBody().
So, let’s change it based on our HTML from the previous blog post:
<!DOCTYPE html>
<html lang="en">
<head>
<meta charset="utf-8" />
<title>@ViewBag.Title</title>
<link href="@Url.Content("/repository/Site.css")" rel="stylesheet" type="text/css" />
<script src="@Url.Content("/Scripts/jquery-1.5.1.min.js")" type="text/javascript"></script>
<script src="@Url.Content("/Scripts/modernizr-1.7.min.js")" type="text/javascript"></script>
</head>
<body>
<!-- main div -->
<div id="outer">
<!-- header -->
<header class="main">
<div class="container">
<h1>My web site</h1>
<nav>
<ul id="menu">
<li class="home">
@Html.ActionLink("Home Page", "Index", "Home", new { },
new { @class = ViewContext.Controller.GetType().Name == "HomeController" ? "active" : "a" })
</li>
<li class="about">
@Html.ActionLink("About Me", "Index", "About", new { },
new { @class = ViewContext.Controller.GetType().Name == "AboutController" ? "active" : "a" })
</li>
<li class="blog">
@Html.ActionLink("Blog", "Index", "Blog", new { },
new { @class = ViewContext.Controller.GetType().Name == "BlogController" ? "active" : "a" })
</li>
<li class="contact">
@Html.ActionLink("Contact", "Index", "Contact", new { },
new { @class = ViewContext.Controller.GetType().Name == "ContactController" ? "active" : "a" })
</li>
</ul>
</nav>
</div>
</header>
<!-- / header -->
<div id="wrap">
<!-- container -->
<div class="container">
<!-- content -->
<section id="main">
@RenderBody()
</section>
<!-- / content -->
<!-- sidebar -->
<aside>
<div class="box">
@Html.Partial("_AboutMePartial")
</div>
<div class="box">
blog categories
</div>
<div id="social">
@Html.Partial("_SocialPartial")
</div>
</aside>
<!-- / sidebar -->
<div class="clear"></div>
</div>
<!-- / container -->
</div>
<!-- footer -->
<footer>
<div class="container">
<div class="copyright">
<h2>Copyrights & Links</h2>
<p>Images © Croatian National Tourist Board</p>
</div>
<h2>My web site © 2010.</h2>
<p>All rights reserved.</p>
<a href="mailto:email@domain.com">email@domain.com</a>
</div>
</footer>
<!-- end footer -->
</div>
<!-- / main -->
</body>
</html>
If we now run the application (F5), we’ll see that it still looks something like the version Visual Web Developer created for us:
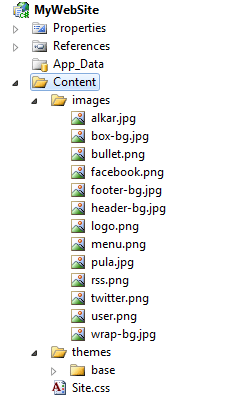
So we also need to add the images and change the CSS to make it look like it’s supposed to. You can download the images and original PSD files. Once you download the file, extract it to your Desktop or somewhere, go inside images folder, select all the images, right-click them and select copy. Then switch to Visual Web Developer, beneath the Content folder, create new Folder named images and paste the images there. Now just to replace the CSS Visual Web Developer created with our own.
In the Step-by-step walkthrough for coding a Web Site from a Photoshop template blog post I went over the details of CSS, so we won’t get into them there. The only differences are a smaller menu and the addition of HTML5 elements. Open file Site.css (make a backup first if you desire) and replace everything inside with CSS for our site:
/********************************************************
CSS Reset & Global
*********************************************************/

body,div,dl,dt,dd,ul,ol,li,h1,h2,h3,h4,h5,h6,pre,form,fieldset,input,textarea,p, blockquote,th,td {
margin:0;
padding:0;
}
fieldset,img {
border:0;
}
address,caption,cite,code,dfn,em,strong,th,var {
font-style:normal;
font-weight:normal;
}
ol,ul {
list-style:none;
}
h1,h2,h3,h4,h5,h6 {
font-size:100%;
font-weight:normal;
}

/* HTML 5 Elements */

header, section, aside, footer, article
{
display: block;
}

/*********************************************************
Styling the layout
*********************************************************/

html {
height: 100%;
}

body {
height: 100%;
font-size: 62.5%; /* 1em = 10px */
font-family: Arial, Helvetica, sans-serif;
}

#outer {
min-height: 100%;
position: relative;
background: #ffcc66;
font-size: 1em;
}

header.main {
height: 160px;
background: #446b9a url('/repository/images/header-bg.jpg') repeat-x;
border-bottom: 1px #c66528 solid;
}

#wrap {
padding-bottom: 200px;
background: #ffcc66 url('/repository/images/wrap-bg.jpg') repeat-x;
border-top: 1px #ffffff solid;
}

footer {
position: absolute;
bottom: 0;
width: 100%;
height: 125px;
background: #de834a url('/repository/images/footer-bg.jpg') repeat-x;
border-top: 1px #d36111 solid;
}

.container, nav {
width: 960px;
margin: 0 auto;
}

section#main {
float: left;
width: 630px;
margin-right: 30px;
padding: 24px 0;
}

aside {
float: left;
width: 300px;
padding: 32px 0;
}

.clear {
clear:both;
}

/*********************************************************
Styling the content
*********************************************************/

/* Images & boxes */

img.photo {
padding: 5px;
background-color: #ffffff;
border: 1px #d36111 solid;
}

img.right {
float: right;
margin-left: 15px;
}

a.post-photo {
float: left;
border: 1px #d36111 solid;
background-color: #ffc757;
padding: 5px;
margin-right: 32px;
}

img.border {
border: 1px #d36111 solid;
background-color: #ffc757;
padding: 5px;
}

a.post-photo:hover {
background-color: #de834a;
}

a.post-photo img {
display: block;
border: 1px #d36111 solid;
}

.box {
padding: 18px;
border: 1px #d36111 solid;
margin-bottom: 32px;
background: #ffffff url('/repository/images/box-bg.jpg') repeat-x;
}

/* Headers */

header.main h1 {
float:left;
background: transparent url('/repository/images/logo.png') no-repeat;
text-indent: -9999px;
width: 259px;
height: 56px;
margin-top: 32px;
}

h1 {
font: 3em Arial, Helvetica, sans-serif;;
color: #414141;
margin-bottom: 10px;
}

h2 {
font: 2.5em Arial, Helvetica, sans-serif;;
color: #414141;
margin-bottom: 10px;
}

section#main h1 a {
color: #993300;
text-decoration: none;
}

section#main h1 a:hover {
color: #d36111;
}

aside h1 a {
color: #d36111;
text-decoration: none;
}

aside h1 a:hover {
color: #2469d1;
}

/* For blog */

.blog {
margin-top: 31px;
}

footer p {
margin: 0;
}

.post {
float: left;
width: 384px;
}

.post p {
font-style: italic;
color: #414141;
margin-bottom: 25px;
float: left;
}

.content p {
font-size: 1.4em;
line-height: 1.6em;
margin-bottom: 25px;
}

.post a {
font-weight: bold;
color: #993300;
text-decoration: none;
}

.post a:hover {
color: #d36111;
}

/* Sidebar */

aside p {
font-size: 1.4em;
line-height: 1.5em;
font-style: italic;
color: #414141;
}

ul.links {
font-size: 1.4em;
line-height: 1.8em;
list-style: inside url('/repository/images/bullet.png');
}

ul.links a {
font-weight: bold;
color: #993300;
text-decoration: none;
}

ul.links a:hover {
color: #d36111;
}

/* Footer */

footer {
color: white;
font-size: 1em;
}

footer .container {
padding-top: 30px;
}

footer .copyright {
float: right;
}

footer h2 {
font-size: 1.8em;
font-weight: bold;
color: #FFFFFF;
}

footer p {
font-size: 1.4em;
line-height: 2em;
}

footer a {
font-size: 1.4em;
font-weight: bold;
color: #414141;
text-decoration: none;
}

footer a:hover {
color: #ffcc66;
}

/*********************************************************
Social links
*********************************************************/

#social a {
display: block;
color: #414141;
font-size: 2.2em;
padding: 5px 0 5px 40px;
font-family: "Myriad Pro", Arial, Helvetica, sans-serif;
text-decoration: none;
margin-bottom: 15px;
}

#social a:hover {
color: #d36111;
}

#social a.twitter {
background: url('/repository/images/twitter.png') no-repeat;
}

#social a.facebook {
background: url('/repository/images/facebook.png') no-repeat;
}

/*********************************************************
Menu
*********************************************************/

#menu {
width: 850px;
float: left;
height: 36px;
margin-top: 15px;
}

#menu li {
display: inline;
text-indent: -9999px;
}

#menu li a {
display: block;
float: left;
background: transparent url('/repository/images/menu.png');
width: 150px;
height: 35px;
margin-right: 8px;
}

#menu a.active { height: 37px; }

#menu li.home a { background-position: 0 0; }
#menu li.home a:hover { background-position: 0 -36px; }
#menu li.home a.active { background-position: 0 -73px; }

#menu li.about a { background-position: -151px 0; }
#menu li.about a:hover { background-position: -151px -36px; }
#menu li.about a.active { background-position: -151px -73px; }

#menu li.blog a { background-position: -302px 0; }
#menu li.blog a:hover { background-position: -302px -36px; }
#menu li.blog a.active { background-position: -302px -73px; }

#menu li.contact a { background-position: -604px 0; }
#menu li.contact a:hover { background-position: -604px -36px; }
#menu li.contact a.active { background-position: -604px -73px; }
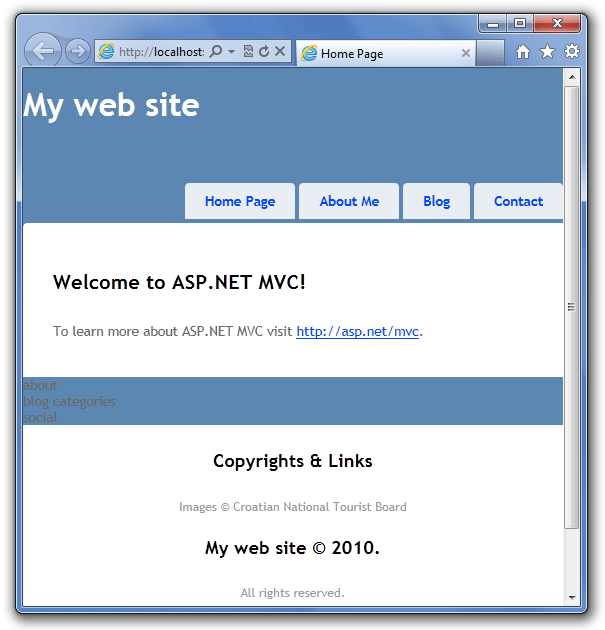
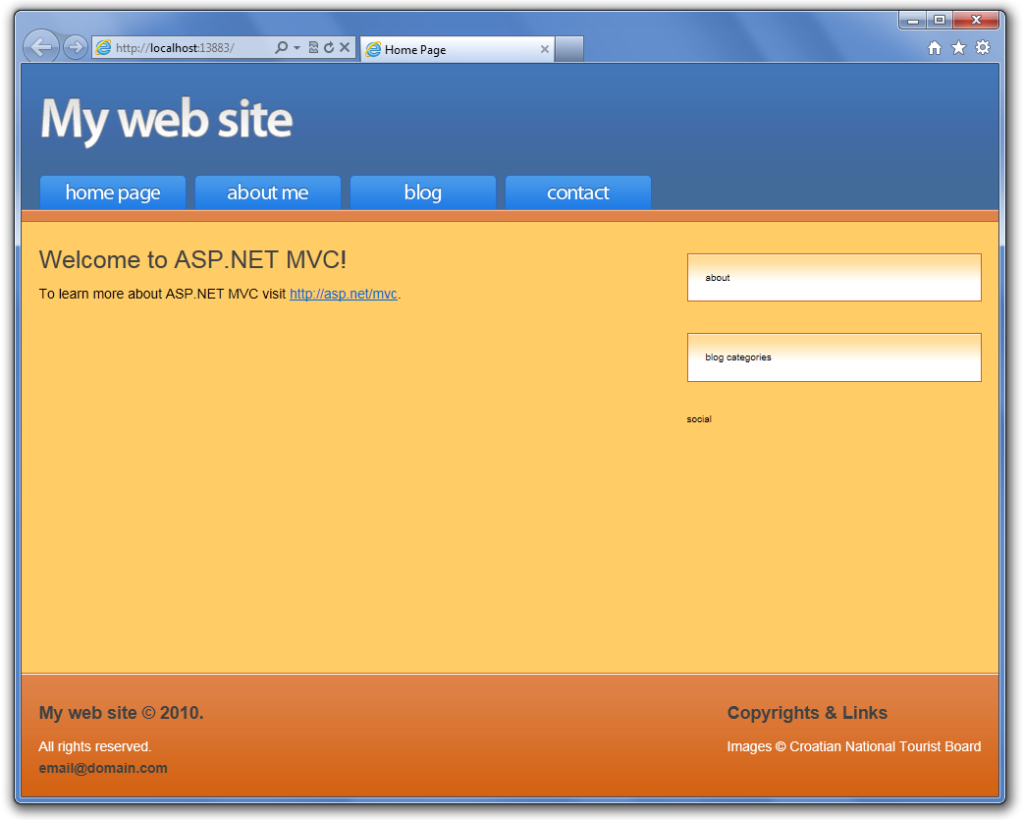
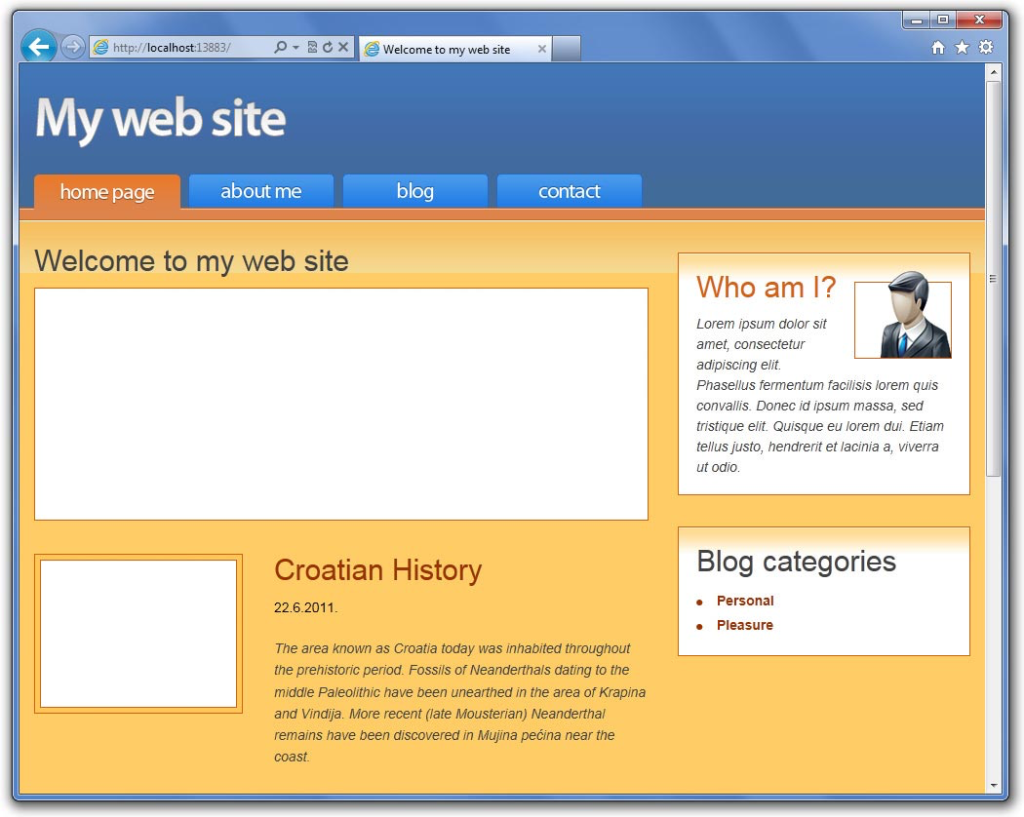
So, after adding the CSS our Website now looks like this:
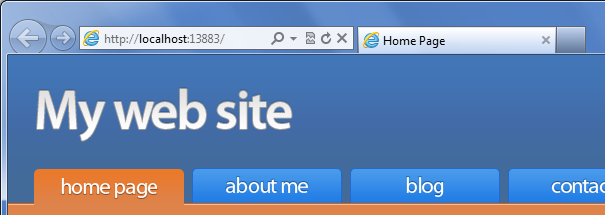
OK, that’s more like it. But, notice, our menu doesn’t indicate that we’re on the home page. In the previous blog post, we used javascript to solve our little problem, but fortunately, a more elegant and versatile solution is available to us now that we use ASP.NET. We’ll create the links in our menu by using HTML link helper included in ASP.NET MVC. So, each link should look like this:
@Html.ActionLink("Home Page", "Index", "Home", new { },
new { @class = ViewContext.Controller.GetType().Name == "HomeController" ? "active" : "a" })
And the entire menu:
<ul id="menu">
<li class="home">
@Html.ActionLink("Home Page", "Index", "Home", new { },
new { @class = ViewContext.Controller.GetType().Name == "HomeController" ? "active" : "a" })
</li>
<li class="about">
@Html.ActionLink("About Me", "Index", "About", new { },
new { @class = ViewContext.Controller.GetType().Name == "AboutController" ? "active" : "a" })
</li>
<li class="blog">
@Html.ActionLink("Blog", "Index", "Blog", new { },
new { @class = ViewContext.Controller.GetType().Name == "BlogController" ? "active" : "a" })
</li>
<li class="contact">
@Html.ActionLink("Contact", "Index", "Contact", new { },
new { @class = ViewContext.Controller.GetType().Name == "ContactController" ? "active" : "a" })
</li>
</ul>
So, we use HTML helper to create links. The helper uses parameters to create links:
- Display link text. What goes between a tags
- Specifies Action Method. For us, it’s always Index since we want that method.
- Specifies Controller
- Specifies any route parameters. As you can see, we don’t use them yet.
- This is probably the most confusing. 5th parameter specifies the HTML attributes we want to add to the link and their value. We use class since we want to add class to links. Regarding the value of a class, we check which controller is currently used. If the name of a current controller matches the specified name, we use the class active, otherwise, we use the class a.
So after we add the menu, and run, we should see the class active added to the first link. One great thing about this method is that even if we request another action from the Home controller we still remain on the Home controller. So, whether we request a Blog list or details of a particular Blog post, the Blog menu button will be active, because they’re just different actions of the same controller.
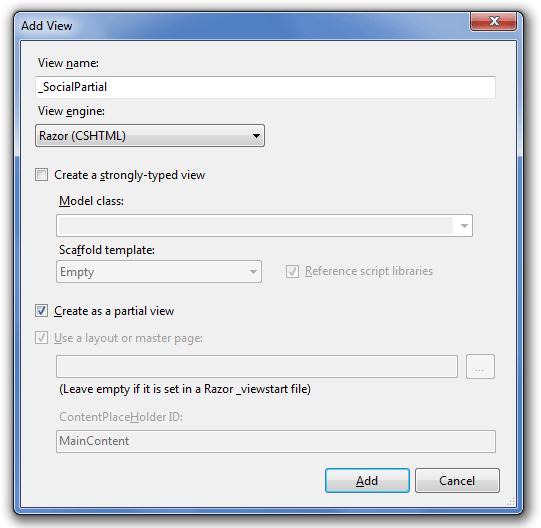
OK, now add other static content, such as the “About Me” section, and Facebook and Twitter link to the sidebar. We’ll add Partial Views. A partial View is simply a View that is intended to display inside a Master View, such as our Layout page. Think of them as included inside a template file.
To add a partial View, right-click on the Views/Shared folder and choose Add->View. For now, we’ll add 2 Partial Views: _SocialPartial and _AboutMePartial. Remember to set Razor as the View Engine. Also, make sure to select the check box “Create as a partial view”
OK, now, let’s add our content to the partial views. _AboutMePartial:
<img class="right" src="/repository/images/user.png" width="100" height="90" alt="Picture of me" />
<h1>@Html.ActionLink("Who am I?", "Index", "About")</h1>

<p>
Lorem ipsum dolor sit amet, consectetur adipiscing elit. Phasellus
fermentum facilisis lorem quis convallis. Donec id ipsum massa, sed
tristique elit. Quisque eu lorem dui. Etiam tellus justo, hendrerit
et lacinia a, viverra ut odio.
</p>
Now put some code in our layout file to render the partial views. We’ll put it in the sidebar:
<div class="box">
@Html.Partial("_AboutMePartial")
</div>

<div class="box">
blog categories
</div>

<div id="social">
@Html.Partial("_SocialPartial")
</div>
Piece of cake. The only static thing to do now is the “About Me” section. As this is a simple website, we’ll add a new Controller, rather than new action in the Home Controller.
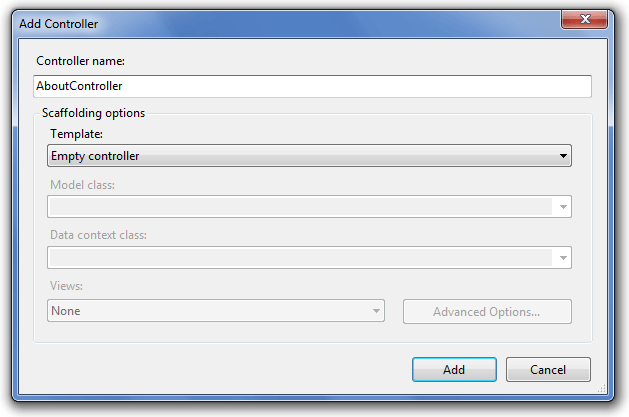
Right-click on the Controllers folder and choose “New Controller ..” As a template select Empty. Name the new controller AboutController and click Add. Now open your new controller. As you can see it also has an Index method which is executed when the user visits http://your.host/About.

NOTE: Now you can delete the About.cshtml from the Views/Home folder and remove the About action from the HomeController as they won’t be used anymore.
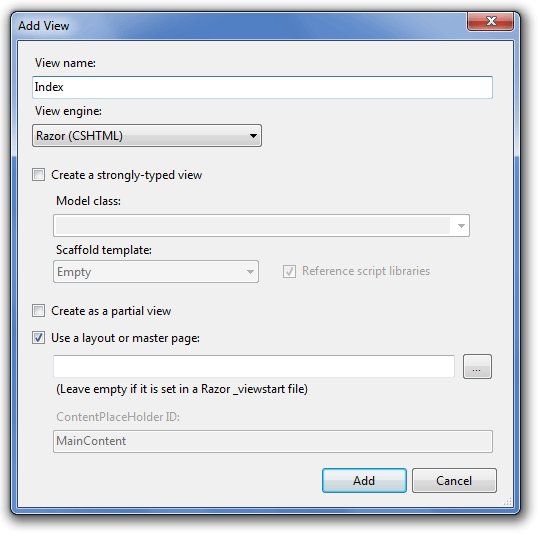
As we said, the content will be static, so no need to change anything in the controller. Just add a View to display the content. Right-click on the Action and select Add View… On the dialogue just click Add.
OK, now we have the View, let’s just add some static content into it:
<img src="/repository/images/alkar.jpg" width="200" height="150" class="right" alt="Alkar Squire in the city of Sinj" />
<h2>About Me</h2>

<div class="content">
<p>
Lorem ipsum dolor sit amet, consectetur adipiscing elit. Integer nec odio.
Praesent libero. Sed cursus ante dapibus diam. Sed nisi. Nulla quis sem at
nibh elementum imperdiet. Duis sagittis ipsum. Praesent mauris. Fusce nec
tellus sed augue semper porta. Mauris massa. Vestibulum lacinia arcu eget
nulla.
</p>

<p>
Class aptent taciti sociosqu ad litora torquent per conubia nostra, per inceptos
himenaeos. Curabitur sodales ligula in libero. Sed dignissim lacinia nunc.
Curabitur tortor. Pellentesque nibh. Aenean quam. In scelerisque sem at dolor.
Maecenas mattis. Sed convallis tristique sem. Proin ut ligula vel nunc egestas
porttitor. Morbi lectus risus, iaculis vel, suscipit quis, luctus non, massa.
Fusce ac turpis quis ligula lacinia aliquet.
</p>
</div>
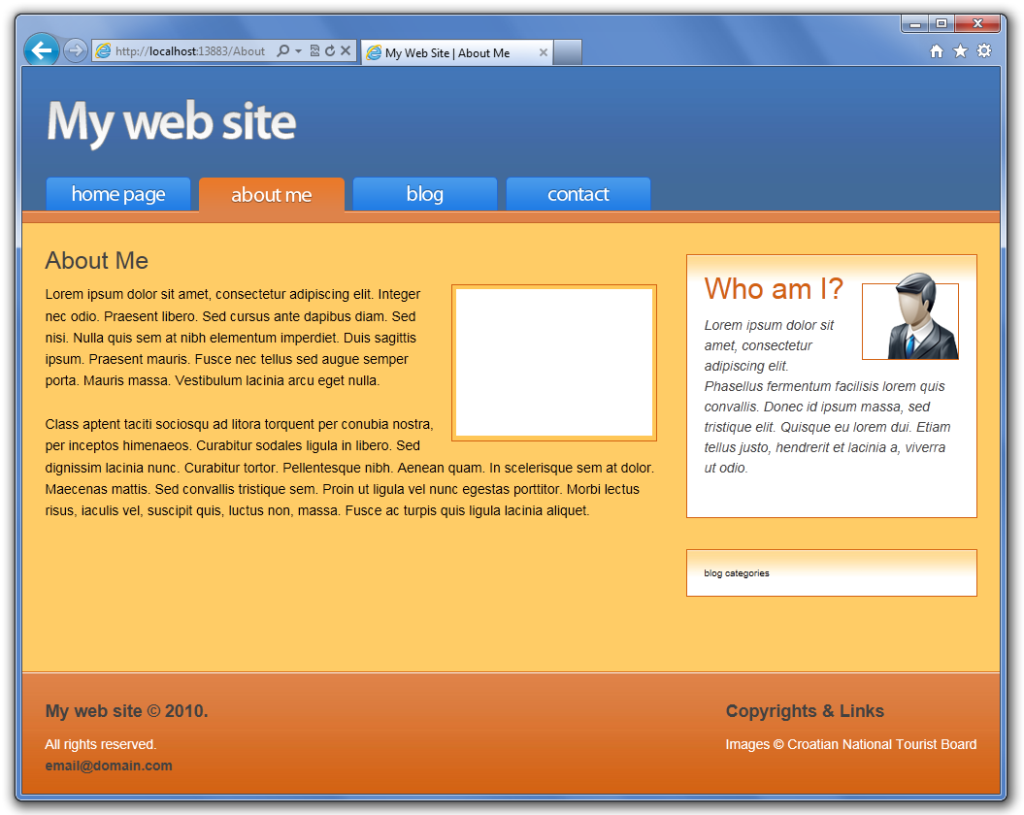
Here’s the about page:
OK, that’s it for the static content. We now turn to the Database Setup to be able to read the blog posts from it.
Database Setup
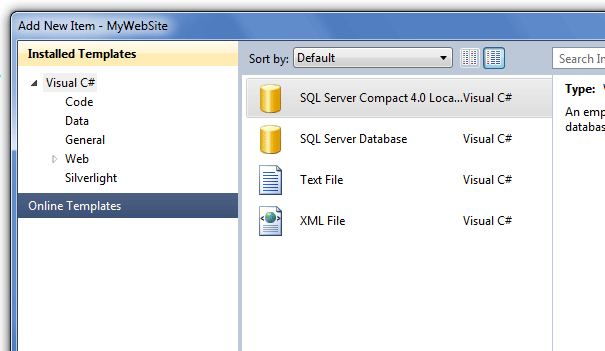
Beneath the Web site’s root, there’s a folder named App_Data. As the name suggests the App_Data folder stores the application’s local database. We’ll add the SQL Server Database there.
Right-click on the App_Data folder and select Add -> New item…. Then select the SQL Server Compact 4.0 Local Database. Yeah, that’s right. From the 4.0 version this type of database can be run on hosting servers and your hosting provider doesn’t need to do anything!
That means we can create and then upload the database to our hosting server as any other file via FTP and no additional configuration from our side or hosting provider’s side is required! Pretty great, huh?!
Name the database MyWebSite.sdf and click Add. Double-click on the database file, so that it will be displayed in the Database Explorer. In the Data Connections, there is our database. Click on the arrow next to it. There’s a folder named Tables. Right-click it and select Create Table.
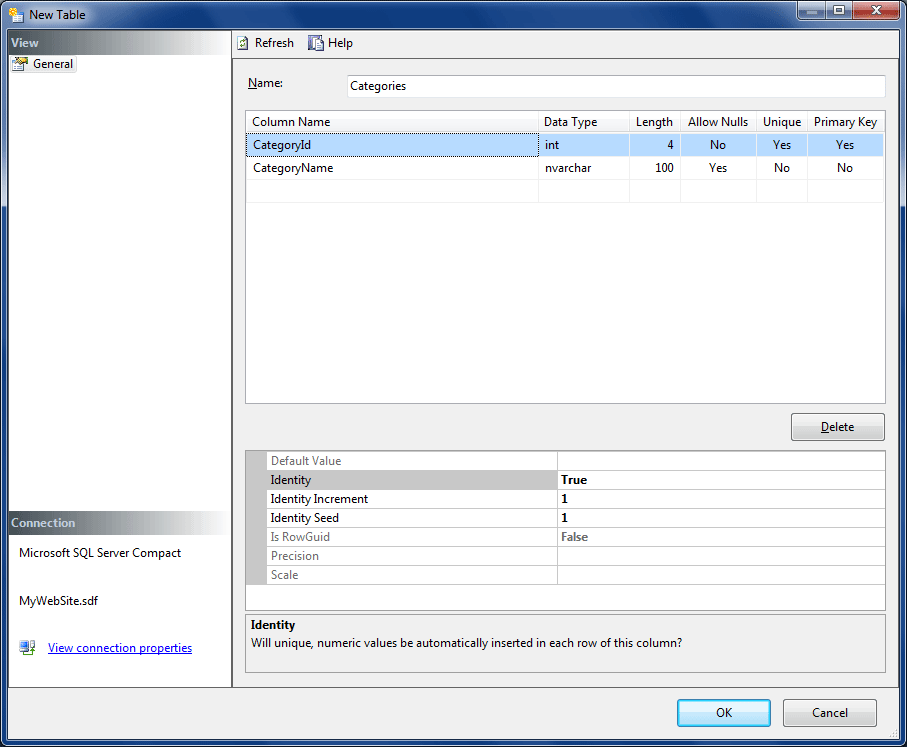
Name the table Categories. Add 2 fields:
- CategoryId – int (4)
- CategoryName – nvarchar (100)
CategoryId is an int data type, and in the properties below select it to be Identity. CategoryName is nvarchar, which means that double the space will be used, but you get to use the field to store Unicode character data, for example, Japanese.
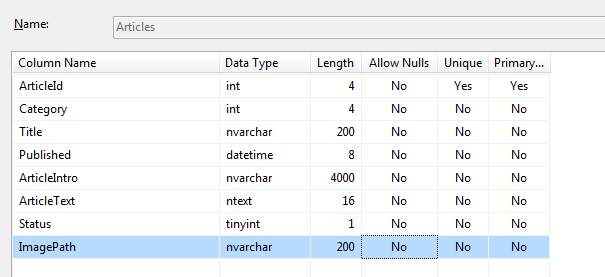
Now create a new table and name it Articles, which we’ll of course use to store Blog posts. Add the following fields:
- ArticleId -int (4)
- Category – int (4)
- Title – nvarchar (200)
- Published – datetime
- ArticleIntro – nvarchar (4000)
- ArticleText – ntext
- Status – tinyint
- ImagePath – nvarchar (200)
For status, you can set the default value to 1. We’ll use the value 1 for marking Article as active and 0 for marking it as inactive. Here, ArticleId is the identity.
NOTE: If you make a mistake you can modify the values of the created table by right-clicking it and selecting Edit Table Schema.
OK, the tables are done, now let’s add a relation between the tables. Relation simply means that the data in one table is linked to the data in another table. In our case, we keep the entire data about Categories in one table and then in the Articles table we simply reference the appropriate Id in the Categories table. Because of that our Articles table has a Category field with the int data type.
To add the relation between the tables, right-click on the Articles table and choose Properties. The dialogue box will open. Go to the Add Relation View. Name the relation simply ArticlesCategories. For Primary Key Table select Categories, and for Primary Key Table Column, select CategoryId, of course.
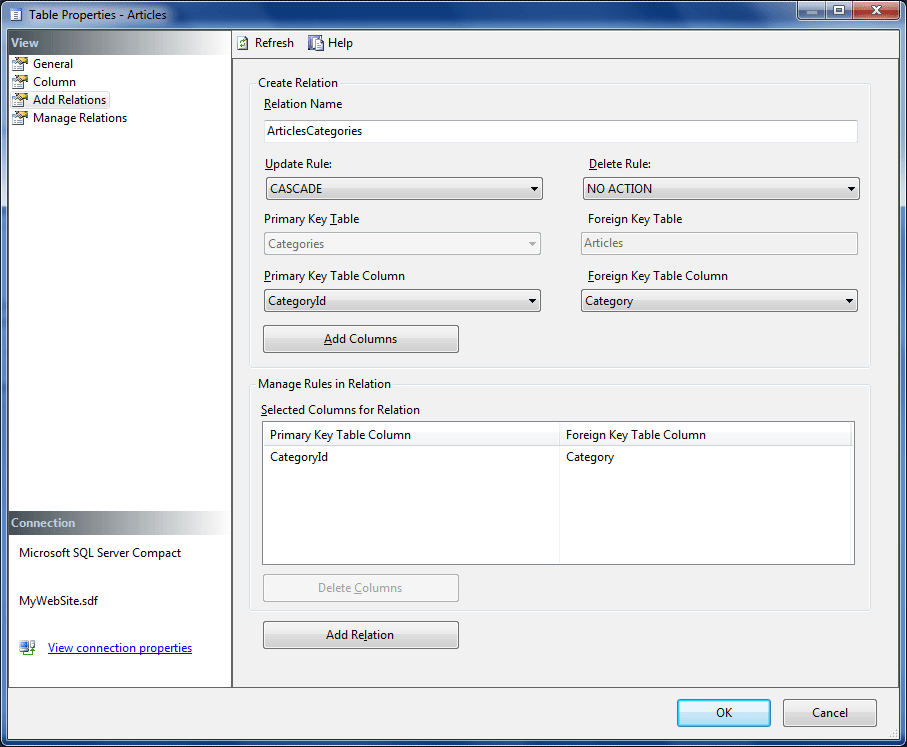
Foreign Key Table is of course Articles, and Foreign Key Table Column is Category. For Update, Rule set CASCADE and for Delete Rule NO ACTION, which means that if we change CategoryId, we’ll update all the rows that use it to the new value. NO ACTION rule for delete means simply that deletion is not allowed.
Once done, click the Add Columns button, then Add Relation button and finally OK.
Now to add some sample data to the database. Right-click the Categories table and select Show Table Data. When the editor opens you can add some Categories for our blog posts. Note that you should only enter the Category names and the CategoryId field will increment automatically because we declared it as an identity. I added the Personal, Pleasure, Business and Advices categories.
Now use the same procedure to add some data to the Articles table. Note that for the Category field in the Articles table you can enter only the Ids that are in the Categories table, meaning if you have 4 categories, you can’t enter number 5 in the Category field of the articles table.
Or if you don’t feel like typing simply use SQL query to add some data to the database. Right-click on the table and select “New Query“. Then simply paste the following SQL into the SQL pane:
INSERT INTO Articles
(Category, Title, Published, ArticleIntro, ArticleText, Status, ImagePath)

VALUES (1
,'Lorem Ipsum'
,getdate()
,'<p>Lorem Ipsum is simply dummy text of the printing and typesetting industry.
Lorem Ipsum has been the industry''s standard dummy text ever since the 1500s,
when an unknown printer took a galley of type and scrambled it to make a
type specimen book.</p>'

,'<p>Lorem Ipsum is simply dummy text of the printing and typesetting industry.
Lorem Ipsum has been the industry''s standard dummy text ever since the 1500s,
when an unknown printer took a galley of type and scrambled it to make a type
specimen book. It has survived not only five centuries, but also the leap into
electronic typesetting, remaining essentially unchanged. It was popularised in
the 1960s with the release of Letraset sheets containing Lorem Ipsum passages,
and more recently with desktop publishing software like Aldus PageMaker including
versions of Lorem Ipsum.</p>'
,1
,'/repository/blog/lipsum.jpg');
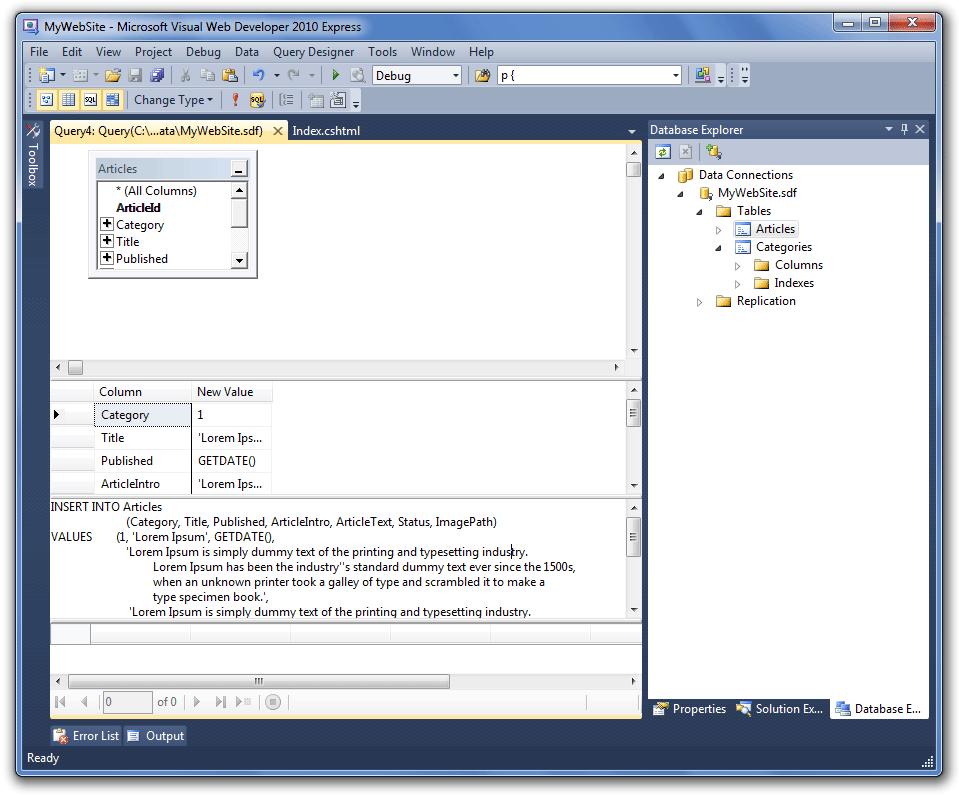
To add multiple Articles, just replace the data provided with your content and execute the query. Note that the status needs to be 1 for active articles and that you must escape any single quote in your text with another single quote. To check the SQL syntax use the “Check SQL syntax” that’s located next to the Execute query (the big red exclamation point).
Once you added the articles you desire, the database setup is complete.
Getting the Data to our Website
OK, we have some data, but the visitors to our site need to see it too. So, we need to get the data from the database for display on the home page and the blog section.
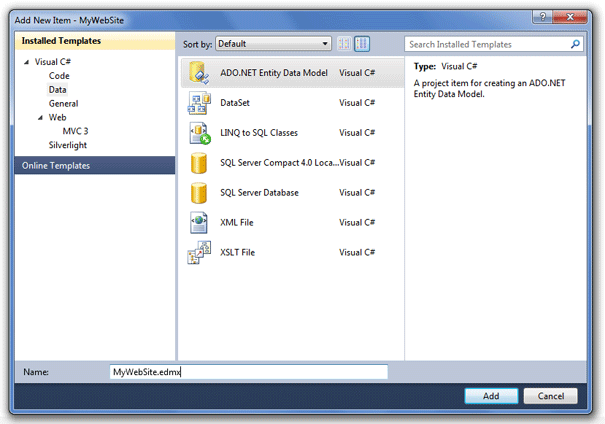
As you will see, this is basically a simple matter with ASP.NET. Switch to the solution explorer, right-click on the Models folder and select New Item… In the dialogue box switch to Data and choose ADO.NET Entity Data Model. Name it MyWebSite.edmx and click Add.
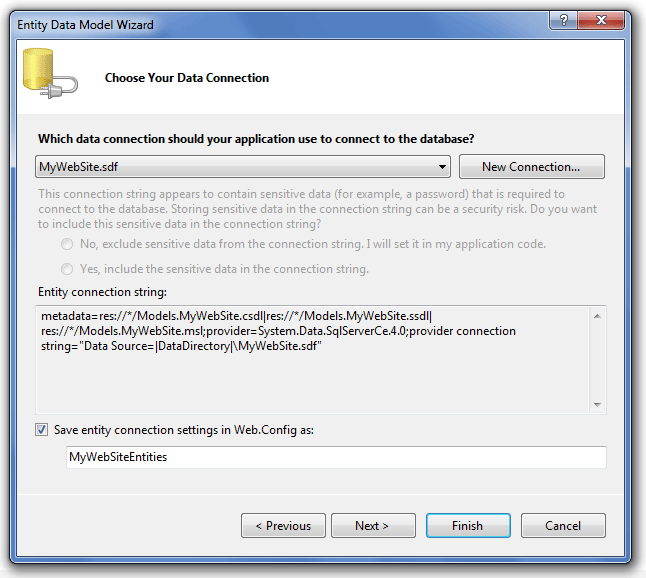
On the dialogue, select Generate from Database. The connection to our database will already be selected, and the Entity connection string will already be written. Select the Save entity connection settings in Web.config as.
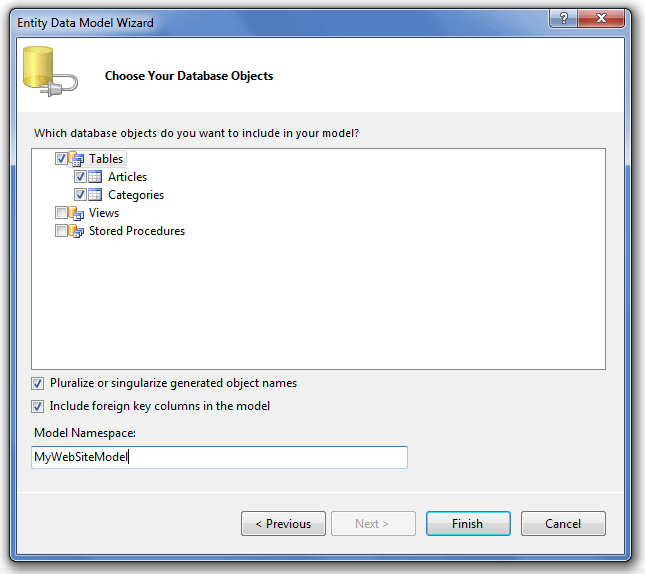
On the next step select both our tables and both checkboxes. Then click Finish.
Now a Model will be opened and here you can change mapping details, but this is a simple project, so there’s no need for that. You can simply close the file. Note that the Visual Web Developer created for us a CS file containing code for our model.
OK, now we have our model generated for us, it’s up to us to use it. In the solution, explorer opens our Home Controller. In the Index Action, we’ll write our code that uses the model to get the data from the database. First, we need to include the Models namespace:
using MyWebSite.Models;
Now we can simply use the models to query the database and return all the blog entries. So the entire Home Controller now looks like this:
using System;
using System.Collections.Generic;
using System.Linq;
using System.Web;
using System.Web.Mvc;
using MyWebSite.Models;

namespace MyWebSite.Controllers
{
public class HomeController : Controller
{

private MyWebSiteEntities _db = new MyWebSiteEntities();

public ActionResult Index()
{
var list = (from a in _db.Articles
where a.Status.Equals(1)
orderby a.Published descending
select a).Take(2);

return View(list);
}
}
}
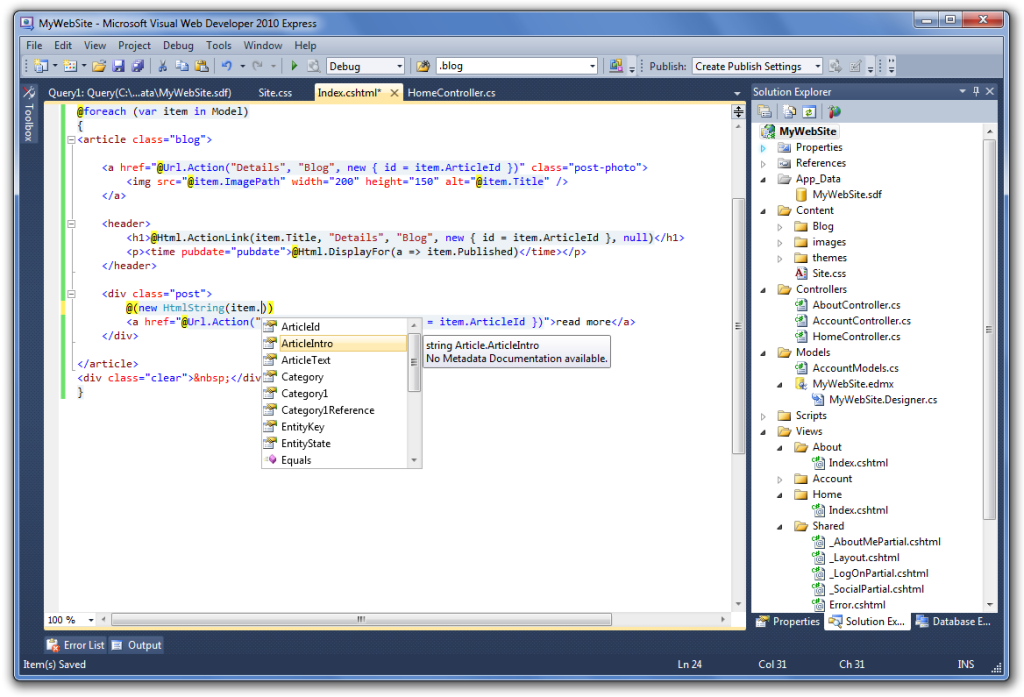
Do you see what we did there? We wrote a LINQ query. When we created our ADO.NET Entity Data Model we basically created the object with attributes that are related to the columns in the database. The wizard we ran automatically translated the database schema into objects. At the runtime. LINQ basically gets translated to SQL and gets executed by the database.
So basically we got the 2 latest articles from the database which are ordered by Date Published. So, on the home page, we will get the latest two articles. In the last statement, we pass that data to the View. Now we need to edit our view to display the blog posts list.
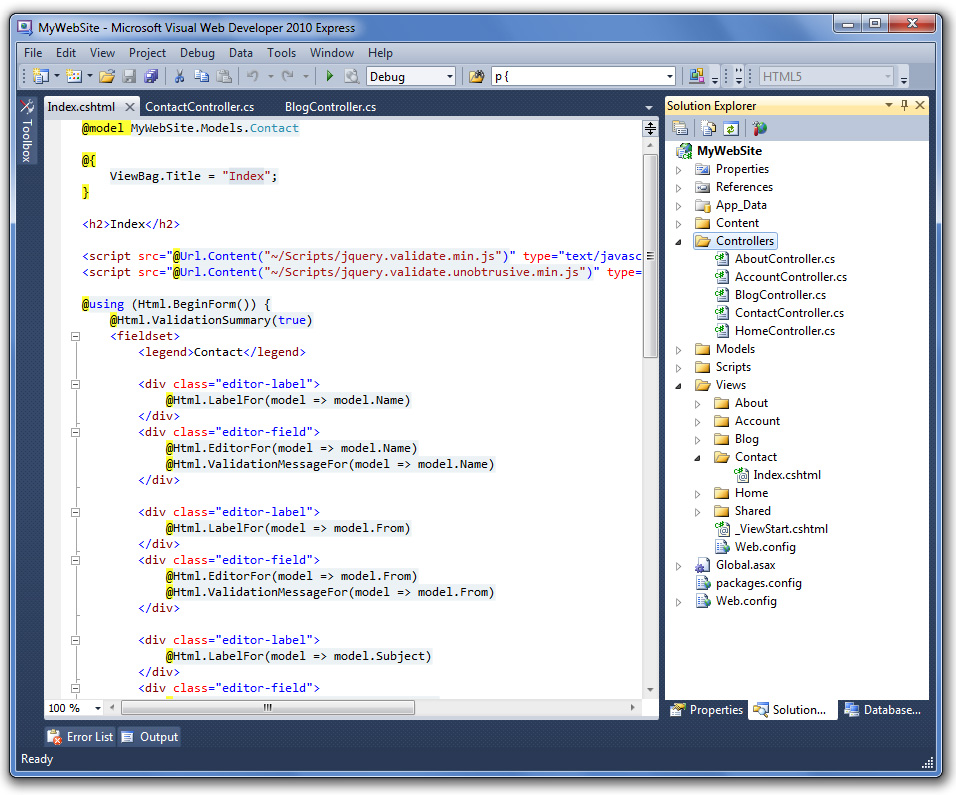
Open the Index.cshtml from the Views/Home folder. We’ll use the data we passed in the controller for displaying to the user.
@model IEnumerable<MyWebSite.Models.Article>

@{
ViewBag.Title = "Welcome to my web site";
}

<h1>@ViewBag.Title</h1>
<img class="photo" src="/repository/images/pula.jpg" width="618" height="227" alt="Roman Amphitheater in the city of Pula" />

@foreach (var item in Model)
{
<article class="blog">

<a href="@Url.Action("Details", "Blog", new { id = item.ArticleId })" class="post-photo">
<img src="@item.ImagePath" width="200" height="150" alt="@item.Title" />
</a>

<header>
<h1>@Html.ActionLink(item.Title, "Details", "Blog", new { id = item.ArticleId }, null)</h1>
<p><time pubdate="pubdate">@Html.DisplayFor(a => item.Published)</time></p>
</header>

<div class="post">
@(new HtmlString(item.ArticleIntro))
<a href="@Url.Action("Details", "Blog", new { id = item.ArticleId })">read more</a>
</div>

</article>
<div class="clear"></div>
}
If you include the @model statement at the top, you tell the view to expect the IEnumerable<MyWebSite.Models.Article> object, which means that each item in the foreach loop is an Article. Now we have full Intellisense support in the code editor. Cool, huh?
Once again we use HTML link helper, to create the links, just like for the main menu. For image links we use Url.Action method which creates the RAW link (without anchor tags). For the Date of publishing, we use another helper which returns HTML markup.
For the article intro, we need to Decode HTML stored in the database, so we create HtmlString and get our HTML decoded. This enables us to store paragraph information, for instance, and not be limited to creating paragraphs in View.
OK, from Debug menu select Start Debugging, or press F5 to see what we have so far.

Not bad at all, huh? Now, let’s just add some CSS classes to fix the date and footer heading colours:
footer h2 {
font-size: 1.8em;
font-weight: bold;
color: #FFFFFF;
}

.post p {
font-style: italic;
color: #414141;
margin-bottom: 15px;
float: left;
}

.post a {
font-weight: bold;
color: #993300;
text-decoration: none;
}

.post a:hover {
color: #d36111;
}

article.blog p, .post a {
font-size: 1.4em;
line-height: 1.6em;
}

article.blog p {
padding-bottom: 20px;
}
OK, that’s better. Now, let’s continue with the article’s details.
Blog Details (full article)
Now we need to create a new controller. As you probably guessed it will be the Blog Controller which will be responsible for displaying a full list of blog posts, blog posts from a specified category and individual post details (full article). First, let’s do the FULL ARTICLE so that we can read the article details when we click the article link on the home page.
So, anyway add a new controller (Right-click on Controllers -> Add -> Controller…). Name it BlogController and in the dialogue for the template simply select Empty and click Add.
The new Controller opens. Now we need to add a new use:
using MyWebSite.Models;
And as in Home Controller, we need to create the new MyWebSiteEntities object to be able to use our generated model:
private MyWebSiteEntities _db = new MyWebSiteEntities();
And add a new Action named Details for displaying the Article details that takes id of type integer as a parameter:
public ActionResult Details(int id)
{
var singlePost = _db.Articles.Single(a => a.ArticleId == id);
return View(singlePost);
}
Of course, we must now create the appropriate View. You already know how to do that. HINT: Right-click inside the Details method and select Add View… In the dialogue box select the Razor as the View engine, checkbox Create a strongly typed view, for model class select Article and under template you will see that you can select Details. Well, it’s an OK template, but we would have to change it too much to look good, so for the template select Empty.
The view for article details is simple. There is no loop, we just need to say where to write the Article model details:
@model MyWebSite.Models.Article

@{
ViewBag.Title = Model.Title + " | My Web Site";
}

<article class="blog">
<header>
<h1>@Model.Title</h1>
<p>
Published: <time pubdate="pubdate">@Html.DisplayFor(model => Model.Published)</time>,
Under: @Html.ActionLink(Model.Category1.CategoryName, "Category", "Blog", new { id = Model.Category }, null)
</p>
</header>

@(new HtmlString(Model.ArticleText))

</article>
Now if you select Run (F5) you can click on the article link and view the details. Pretty cool, huh?
Before we get into Displaying all the posts and posts in the selected blog Categories, let’s do two small things to improve user experience and our flexibility:
SEO friendly URLs
Let’s take a look at the links for the details of our Blog. They aren’t very SEO-friendly because they are in this format: http://localhost:13883/blog/Details/2. It would be great if we could stick the article title in there and have links like http://localhost:13883/blog/Details/Croatian-History/2. So, let’s do that now.
To fill our requirement, we’ll need to edit the Global.asax file located in our project root. Locate it and double-click on it to open it. Now, we’ll need to add a new Route. Now simply copy the existing code for a route and place it above the default route. Now we need to edit it so that the method RegisterRoutes looks like this:
public static void RegisterRoutes(RouteCollection routes)
{
routes.IgnoreRoute("{resource}.axd/{*pathInfo}");

// SEO Friendly
routes.MapRoute(
"BlogSeo", // Route name
"{controller}/{action}/{seo}/{id}", // URL with parameters
new { controller = "Blog", action = "Details", id = UrlParameter.Optional } // Parameter defaults
);

routes.MapRoute(
"Default", // Route name
"{controller}/{action}/{id}", // URL with parameters
new { controller = "Home", action = "Index", id = UrlParameter.Optional } // Parameter defaults
);
}
Now we need to edit our Index.cshtml again. Let’s change our helpers to generate the SEO part:
@Html.ActionLink(item.Title, "Details", "Blog", new { id = item.ArticleId, seo = item.Title.Replace(" ", "-") }, null)
and:
@Url.Action("Details", "Blog", new { id = item.ArticleId, seo = item.Title.Replace(" ", "-") })
Voila! Our links now look like this: http://localhost:13883/blog/Details/Lorem-Ipsum/1 and they WORK!
Display only the date published (and not the time)
We use Html.DisplayFor helper to display the Date published. The great thing about Html.DisplayFor is that we can create the template for it to use and specify that template in the helper call.
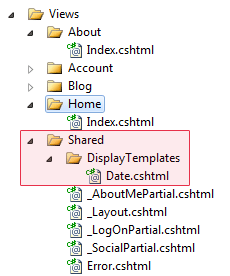
In the Solution Explorer open the Views folder. Inside the Views folder, there is a Shared folder. Inside this folder create a new folder and name it DisplayTemplates.
Now right-click on the newly created folder and select Add->View. In the dialogue box select the Create as a partial view checkbox, deselect the Create a strongly-typed view name the View Date and click Add.
Because we want to always display the date using the <time> HTML 5 tag, we can also enter that into our template. Template content is this:
<time pubdate="pubdate">
@String.Format("{0:d}", Model)
</time>
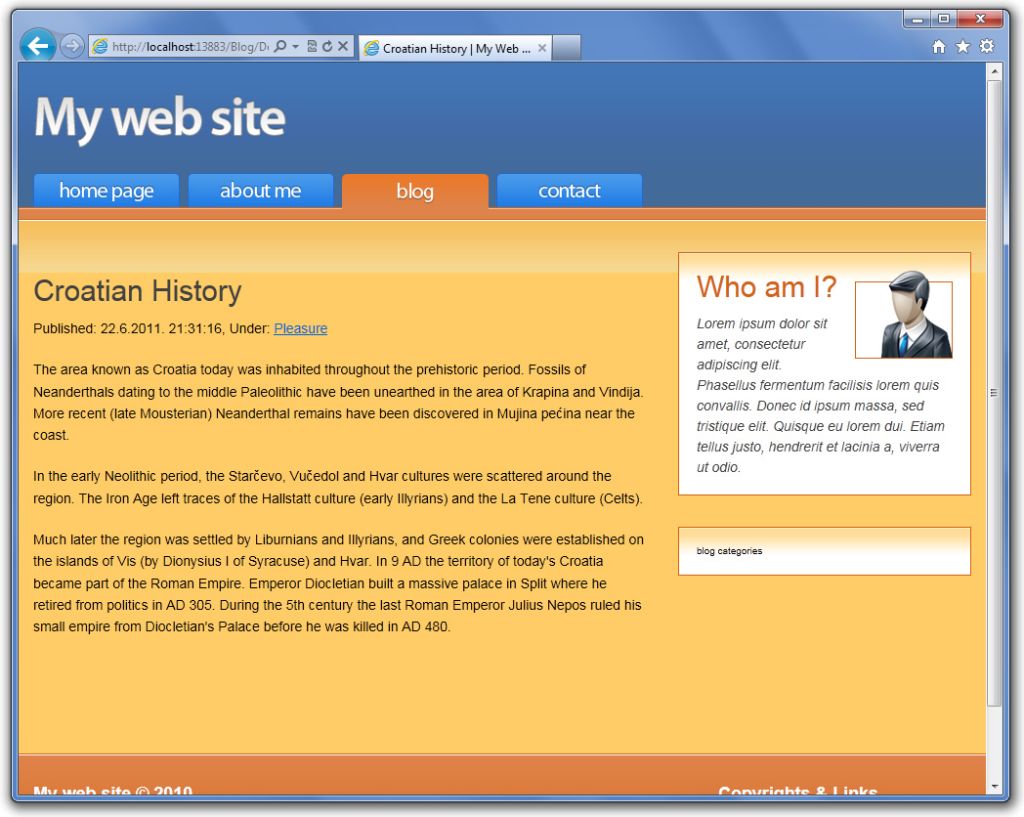
Now we can write out the date using this helper (Date parameter). For instance, you can change the date in Blog Details View:
@Html.DisplayFor(model => Model.Published, "Date")
YES! Now we have only the date written out and appropriate HTML tags created! Of course, it doesn’t take much imagination to conclude that using this technique you can create the template for anything you write out. Now to continue our development.
Displaying all the posts
This one is easy. We already have the controller and action created. The Controller is Blog and the Action is Index because we want that when users to go to /blog URL they get a list of all the blog posts.
So, edit the Index action:
public ActionResult Index()
{
var articles = from a in _db.Articles
where a.Status.Equals(1)
orderby a.Published descending
select a;

return View(articles);
}
When adding the View (Right-click inside the method and select Add View) select the Razor view engine, select the Create a strongly-typed view, select the Article for Model class and Empty as a Template. Of course, as always you need to select Use a layout or master page.
The View itself is pretty simple, it’s almost a copy of the Index view from the Home Controller:
@model IEnumerable<MyWebSite.Models.Article>

@{
ViewBag.Title = "Blog posts";
}

@foreach (var item in Model) {
<article class="blog">

<a href="@Url.Action("Details", "Blog", new { id = item.ArticleId, seo = item.Title.Replace(" ", "-") })" class="post-photo">
<img src="@item.ImagePath" width="200" height="150" alt="@item.Title" />
</a>

<header>
<h1>@Html.ActionLink(item.Title, "Details", "Blog", new { id = item.ArticleId, seo = item.Title.Replace(" ", "-") }, null)</h1>
<p>Published: @Html.DisplayFor(a => item.Published, "Date"),
Under: @Html.ActionLink(item.Category1.CategoryName, "Category", "Blog", new { id = item.ArticleId, seo = item.Category1.CategoryName.Replace(" ", "-") }, null)</p>
</header>

<div class="post">
@(new HtmlString(item.ArticleIntro))
<a href="@Url.Action("Details", "Blog", new { id = item.ArticleId, seo = item.Title.Replace(" ", "-") })">read more</a>
</div>

</article>
<div class="clear"> </div>
}
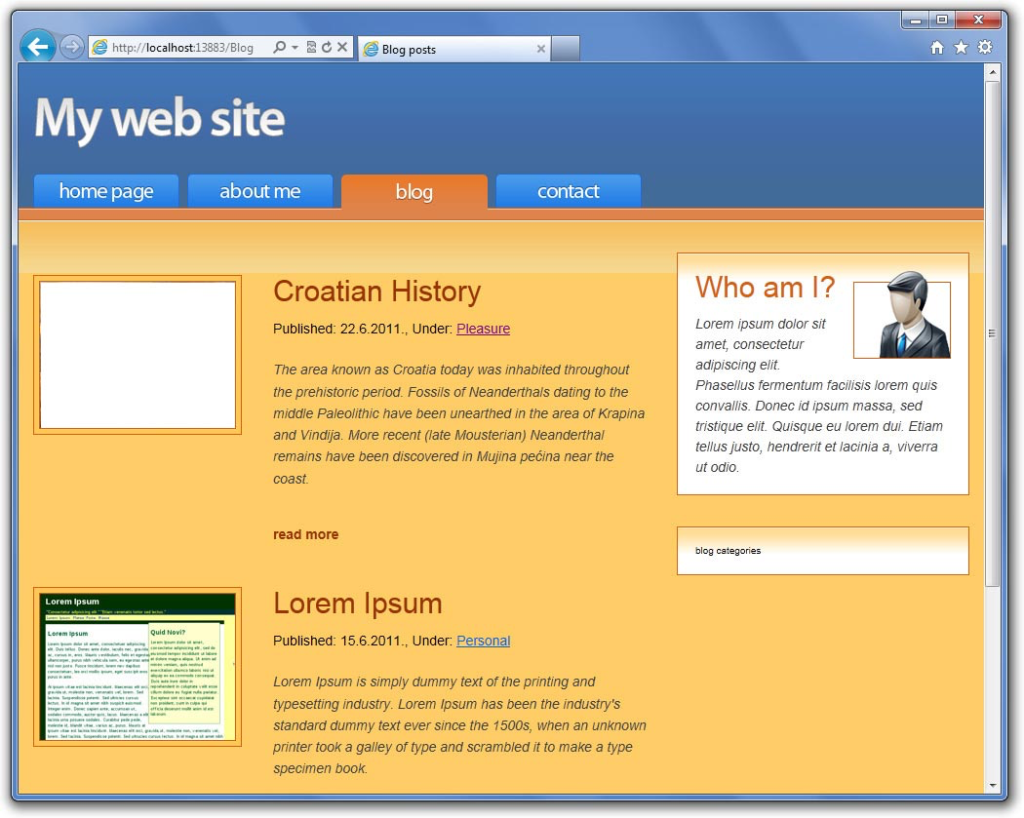
After running, you will see it works:
Posts in the specified Category
Now to make a list of posts in the specified category. This is also simple. As you can see from the links, we need to name the Action Category. The method itself is simple: Return all the posts that are in the specified category. Of course, the View for Category action should be identical to the View for Index action. So, we don’t need to create another view but use an existing one. Here’s the code:
public ActionResult Category(int id)
{
var categoryPosts = from a in _db.Articles
where a.Category == id && a.Status.Equals(1)
orderby a.Published descending
select a;

return View("Index", categoryPosts);
}
So, basically, we’re done here! Run the application, click on the category link and see for yourself. 🙂 Regarding the blog part of the site, the only part left to do is to get the list of Categories on the right side of the toolbar.
List of categories that have the posts
We need a list of categories on every page of the site with a link to the Blog/Category Controller/Action. Open the _Layout.cshtml file that’s located inside the Views -> Shared folder. Find the part that says “blog categories”. It’s inside >aside< section. So, we’ll use Html.RenderAction method.
Change it to:
<div class="box">
@{Html.RenderAction("CategoryList", "Blog");}
</div>
Now we need to create a new action in a Blog Controller called CategoryList which will return the Partial View with a list of categories which have blog posts in them. Open the Blog controller and create a new action:
[ChildActionOnly]
public ActionResult CategoryList()
{
var categories = from c in _db.Categories
from a in _db.Articles
where c.CategoryId == a.Category && a.Status.Equals(1)
select c;

return PartialView(categories);
}
Note that the action is decorated with a ChildActionOnly attribute which means that action can only be called a child action, which we’re doing. Also, using LINQ we limit the results to only those categories that are assigned to at least one Blog post. Also, note that we’re returning a Partial View this time.
One thing left to do is to create a view for this action. Right-click inside the method and select Add View… No need to change the name from CategoryList. Create a strongly typed view, and Create as a partial view should be selected. For the template, you may select Empty or List. Once the View is opened change it to display the list of categories:
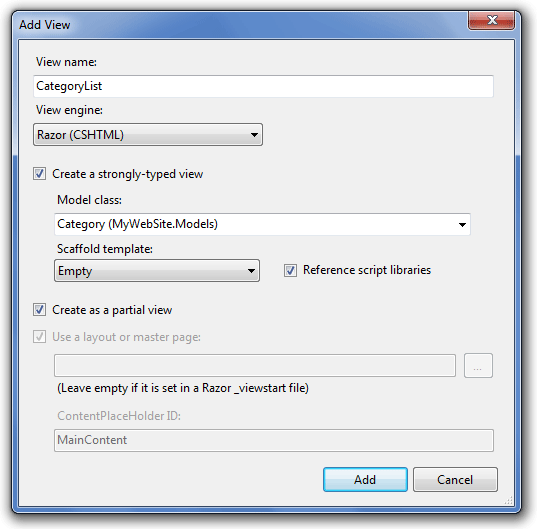
@model IEnumerable<MyWebSite.Models.Category>

<h1>Blog categories</h1>
<ul class="links">
@foreach (var item in Model) {
<li>
@Html.ActionLink(item.CategoryName, "Category", "Blog",
new { id = item.CategoryId, seo = item.CategoryName.Replace(" ", "-") }, null)
</li>
}
</ul>
Run (F5) to check what have we done:
COOL! We are done with the entire Blog part of the site. Only one thing to do: Contact form! 🙂
Contact Form
The goal of a Contact Form is to send the data user entered to the page’s owner or administrator. And every site should provide its users with a means to contact the owner. So, let’s get into it.
The first thing to do is to define a model which will represent our contact form. So, we’ll need to create a new model. Right-click on the Models folder and select Add -> Class… Name the file Contact.cs
Change it to this:
using System;
using System.Collections.Generic;
using System.Linq;
using System.Web;

namespace MyWebSite.Models
{
public class Contact
{
public string Name { get; set; }
public string From { get; set; }
public string Subject { get; set; }
public string Message { get; set; }
}
}
Now when that simple class is done, let’s add validation rules to the model. Validation rules will enable us to check for errors in the user input and act accordingly – if there are errors, the user has to correct them and then re-submit the form. First, we need to reference one additional namespace:
using System.ComponentModel.DataAnnotations;
And now we’re ready to continue:
using System;
using System.Collections.Generic;
using System.Linq;
using System.Web;
using System.ComponentModel.DataAnnotations;

namespace MyWebSite.Models
{
public class Contact
{
[Required(ErrorMessage = "Name is required.")]
[StringLength(50, MinimumLength = 5, ErrorMessage = "Lenght must be between 5 and 50 characters.")]
public string Name { get; set; }

[Required(ErrorMessage = "E-mail is required.")]
[RegularExpression("^([0-9a-zA-Z]([-.\\w]*[0-9a-zA-Z])*@([0-9a-zA-Z][-\\w]*[0-9a-zA-Z]\\.)+[a-zA-Z]{2,9})$", ErrorMessage = "Invalid E-mail.")]
public string From { get; set; }

[Required(ErrorMessage = "Subject is required.")]
[StringLength(150, MinimumLength = 5, ErrorMessage = "Lenght must be between 5 and 150 characters.")]
public string Subject { get; set; }

[Required(ErrorMessage = "Message is required.")]
public string Message { get; set; }
}
}
Now in the Controllers folder create a new Controller, as a template select Empty and name it ContactController. It will already have an Index action which is OK. First, we need to add another use:
using MyWebSite.Models;
Now we need to create a new contact object and pass it to the View so that we can strongly type it. Change the Index method like this:
public ActionResult Index()
{
Contact model = new Contact();
return View(model);
}
First, build the solution (Debug menu -> Build my website), so that the Visual Web Developer knows about our new model and then add a new View (right-click inside the Index method -> Add View). in the dialogue box select the “Create a strongly-typed view” from the drop-down box Model Class select Contact, as a Scaffold template select Create and click Add.
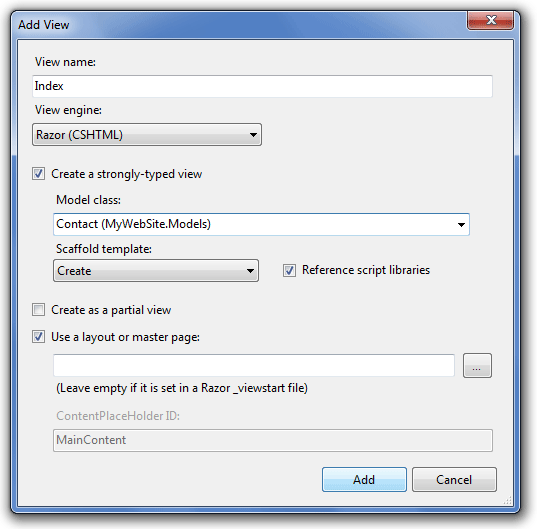
Visual Web Developer creates a very nice starting template for us which we can use with very minor modifications:
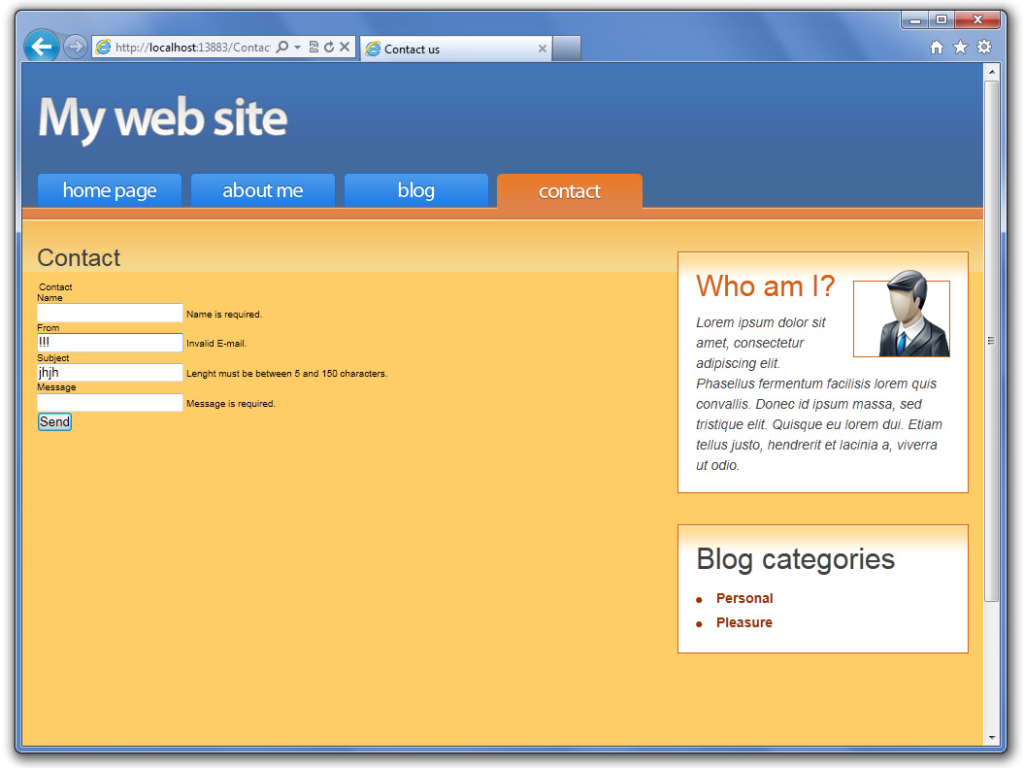
The only thing to do here is to basically remove the entire div with the Back to list link and to change the title. If you want to check out our View simply run (F5) and go to Contact. You’ll notice that the form validation works and that the error messages and validations are the ones we specified in the Contact model annotations.
Cool, now we have the View. Now we need to create a class that will send an E-mail to us and then use the method from that class in our controller.
Right-click on the Models folder, add a new Class and name it Email.
First, we’ll need to reference the namespaces:
using System.Configuration;
using System.Net.Mail;
Then the method for sending mail is actually pretty simple and I’m sure everyone will understand. First, we need to create a MailMessage object:
using System;
using System.Collections.Generic;
using System.Linq;
using System.Web;
using System.Configuration;
using System.Net.Mail;

namespace MyWebSite.Models
{
public class Email
{
public void Send(Contact contact)
{
MailMessage mailMsg = new MailMessage();

mailMsg.Subject = contact.Subject;
mailMsg.Body = contact.Message;

mailMsg.To.Add(new MailAddress(
ConfigurationManager.AppSettings["webMasterMail"],
"Domagoj Salopek"
));

mailMsg.From = new MailAddress(contact.From, contact.Name);
}
}
}
Now we need to use the Send method of the SmtpClient class to send an E-mail. We need to pass our mailMsg object. Add the following code to our SendEmail method:
SmtpClient smtpClient = new SmtpClient(ConfigurationManager.AppSettings["smtpServer"], 25);

smtpClient.Credentials = new System.Net.NetworkCredential(
ConfigurationManager.AppSettings["smtpUser"],
ConfigurationManager.AppSettings["smtpPassword"]);

smtpClient.Send(mailMsg);
Entire Email class:
using System;
using System.Collections.Generic;
using System.Linq;
using System.Web;
using System.Configuration;
using System.Net.Mail;

namespace MyWebSite.Models
{
public class Email
{
public void Send(Contact contact)
{
MailMessage mailMsg = new MailMessage();

mailMsg.Subject = contact.Subject;
mailMsg.Body = contact.Message;

mailMsg.To.Add(new MailAddress(
ConfigurationManager.AppSettings["webMasterMail"],
"Domagoj Salopek"
));

mailMsg.From = new MailAddress(contact.From, contact.Name);

SmtpClient smtpClient = new SmtpClient(ConfigurationManager.AppSettings["smtpServer"], 25);

smtpClient.Credentials = new System.Net.NetworkCredential(
ConfigurationManager.AppSettings["smtpUser"],
ConfigurationManager.AppSettings["smtpPassword"]);

smtpClient.Send(mailMsg);
}
}
}
As you can see we use the AppSettings method to return the values we stored somewhere. That somewhere is a Web.config file that’s located in the ROOT folder.
Open the file, locate the appSettings section and inside it add the configuration lines we specified in our class:
<add key="smtpServer" value="YOUR_SERVER" />
<add key="smtpUser" value="YOUR_USERNAME" />
<add key="smtpPassword" value="YOUR_PASSWORD" />
<add key="webMasterMail" value="you@yourdomain.com" />
OK, the configuration and the class are done. Now let’s return to the Contact Controller so we can use what we made just now to send an E-mail. We need to create a new method with the same name Index, but decorated with HttpPost attribute which means it is executed when called via HTTP POST request and with model parameter. Inside it we use the E-mail class:
[HttpPost]
public ActionResult Index(Contact model)
{
if (!ModelState.IsValid)
return View(model);

Email email = new Email();
email.Send(model);

return View("ContactSuccess");
}
The code is very simple. If the model is invalid (validation via Annotations in the model) simply return the view with the form and the data user entered. If everything is OK, send the mail and return the View that states that the mail was sent successfully (ContactSuccess).
Entire controller:
using System;
using System.Collections.Generic;
using System.Linq;
using System.Web;
using System.Web.Mvc;
using MyWebSite.Models;

namespace MyWebSite.Controllers
{
public class ContactController : Controller
{
//
// GET: /Contact/

public ActionResult Index()
{
Contact model = new Contact();
return View(model);
}

[HttpPost]
public ActionResult Index(Contact model)
{
if (!ModelState.IsValid)
return View(model);

Email email = new Email();
email.Send(model);

return View("ContactSuccess");
}

}
}
Now we just need to create the ContactSuccess view. Right-click inside a new Index action and select Add -> View. Simply select an empty template and unselect the strongly typed View check box. Name the View ContactSuccess, and then click Add.
This view will be very simple. We just need to inform the user that the contact E-mail was sent successfully. Here’s the view:
@{
ViewBag.Title = "Contact Success";
}

<h2>Contact Success</h2>


<div class="content">
<p>Contact E-mail was sent successfully!</p>
<p>Thank you for your interest. We'll contact you as soon as possible!</p>
</div>
That’s basically it. The only thing left to do is to add some CSS styles so our contact and success pages don’t look ugly. 🙂
Open Site.css from the Content folder and add the following lines to it:
.editor-label { clear: both; }

legend {
font-size:1.8em;
font-weight: 700;
color: #FFFFFF;
background-color: #d36111;
padding: 10px;
border:1px solid #414141;
}

fieldset {
margin-top: 25px;
padding: 35px;
border: 1px #d36111 solid;
background: #ffffff url('/repository/images/box-bg.jpg') repeat-x;
}

label {
font-size: 1.6em;
width: 100px;
float: left;
padding-top: 10px;
color: #414141;
}

textarea {
width:400px!important;
height:200px!important;
}

input, textarea {
margin-top: 5px;
background: #ffcc66;
color: #414141;
border: 1px solid #414141;
font-size: 1.4em;
margin-bottom:10px;
padding:4px;
width: 180px;
}

input:hover, textarea:hover {
border:1px solid #2e2e2e;
background-color: #fbc04a;
}

input:focus, textarea:focus {
margin-top: 5px;
background: #d46110;
color: #FFFFFF;
border: 1px solid #181818;
font-size: 1.4em;
margin-bottom:10px;
padding:4px;
}

input[type="submit"] {
padding: 8px 15px;
margin-left: 100px;
}

span.field-validation-error {
display: block;
color: #cc0000;
font-size: 1.5em;
font-weight: bold;
padding-top: 5px;
padding-bottom: 5px;
margin-left: 100px;
}
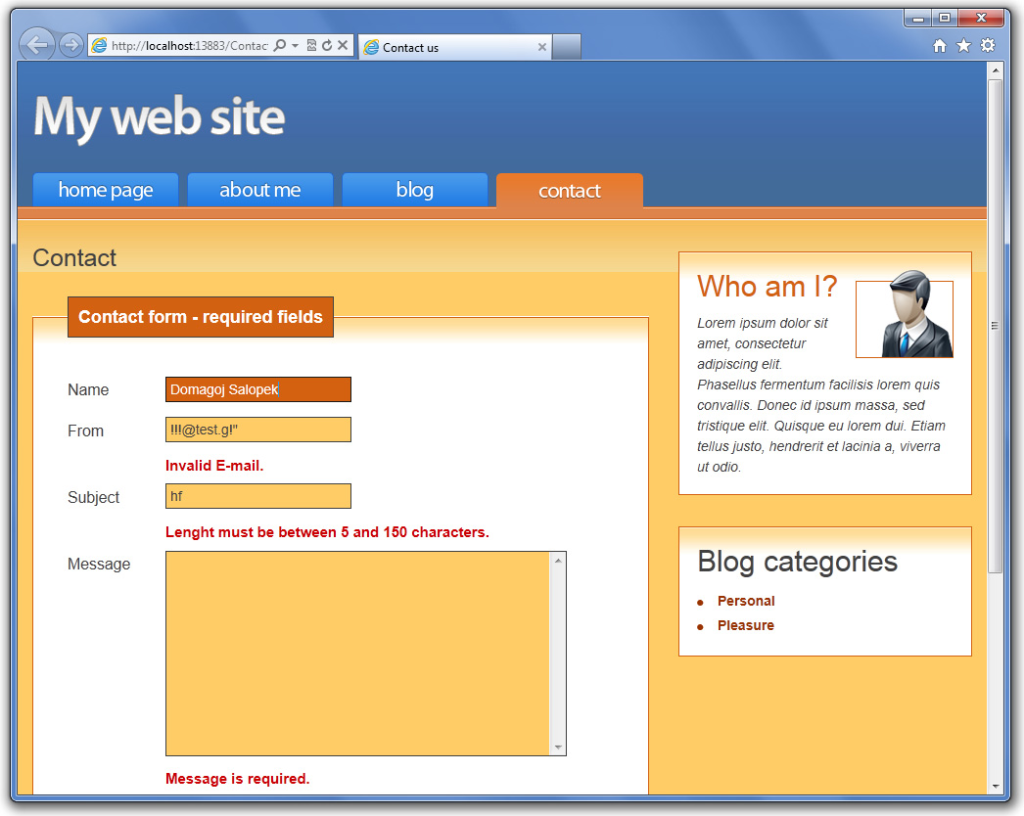
After the added CSS our form looks like this:
OK, if you take a look at our page you’ll see there’s only one thing missing: social links. Luckily, they are simple links to Facebook & Twitter profiles. Since we already have the appropriate CSS, we only need to open _SocialPartial.cshtml that’s located inside our Views -> Shared folder and add the following code into it:
<a href="http://twitter.com/DomagojSalopek" class="twitter">Follow me on Twitter</a>
<a href="https://www.facebook.com/dsalopek" class="facebook">Contact me on Facebook</a>
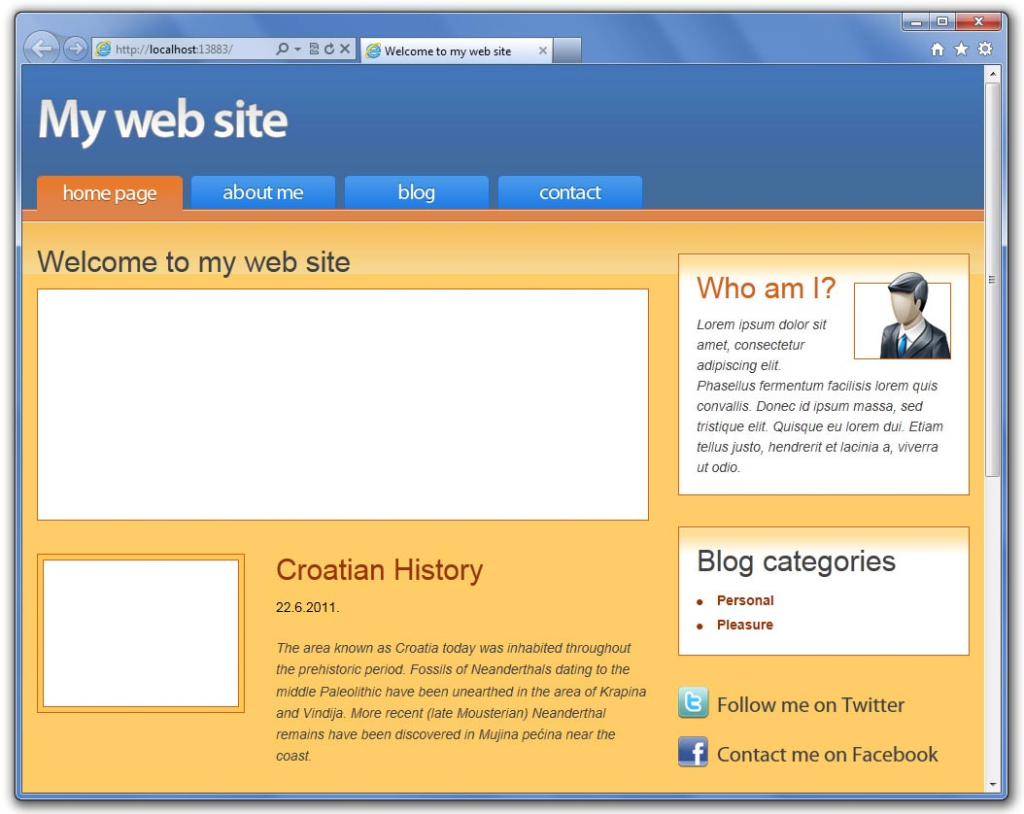
And that’s it! The entire site is DONE! 🙂 Here’s the look of a finished site:
Thanks for visiting this site and for your patience.