In this blog post, we’ll create a simple PHP MVC Framework from scratch. This simple framework can be used as a tool for learning the basic plot behind MVC, or you can modify it and make it grow bigger and more useful.
MVC?
MVC stands for “Model View Controller”. MVC is a concept that enables us to separate our business logic from the presentation. One of the biggest advantages is code reusability. There are other benefits, such as We can let the designers edit the Views, without worrying that they will screw up database access logic.
Please note that this blog post is from 2012 and take it “as is”. I’m unable to answer any questions anymore regarding the implementation. Thank you for understanding.
I’m convinced. What do I need to begin?
For this tutorial you will need PHP/MySQL. You can get them in a variety of ways, but it’s much simpler to get a distribution that installs everything you need for you, such as XAMPP. Or get PHP/MySQL using Microsoft’s Web Platform Installer and run PHP on IIS.
Let’s get to it. We’ll create a PHP MVC framework and use it to create a simple news portal.
Setting up the Database
We’ll have a simple database with just two tables which will contain our news. You can create the MySQL database using phpMyAdmin or an SQL client, such as HeidiSQL, for example.
The basic plot is: One category can have many articles and article can’t be without a category, so we need to add a foreign key to reference categories in the articles table.
Foreign key also controls the changes in the primary key table. For example, we can’t delete a category from categoriestable if there is a article in the articles table that references the category, because that would compromise the integrity of our data.
CREATE TABLE `categories` (
`category_id` int(11) NOT NULL AUTO_INCREMENT,
`category_name` varchar(150) NOT NULL,
PRIMARY KEY (`category_id`)
) ENGINE=InnoDB DEFAULT CHARSET=utf8;

CREATE TABLE `articles` (
`id` int(11) NOT NULL AUTO_INCREMENT,
`category` int(11) NOT NULL,
`title` varchar(255) NOT NULL,
`intro` text NOT NULL,
`article` text NOT NULL,
`date` datetime NOT NULL,
`status` enum('Y','N') NOT NULL,
PRIMARY KEY (`id`),
KEY `FK_articles_categories` (`category`),
CONSTRAINT `FK_articles_categories` FOREIGN KEY (`category`) REFERENCES `categories` (`category_id`)
) ENGINE=InnoDB DEFAULT CHARSET=utf8;
Now use you SQL client to enter some sample data.
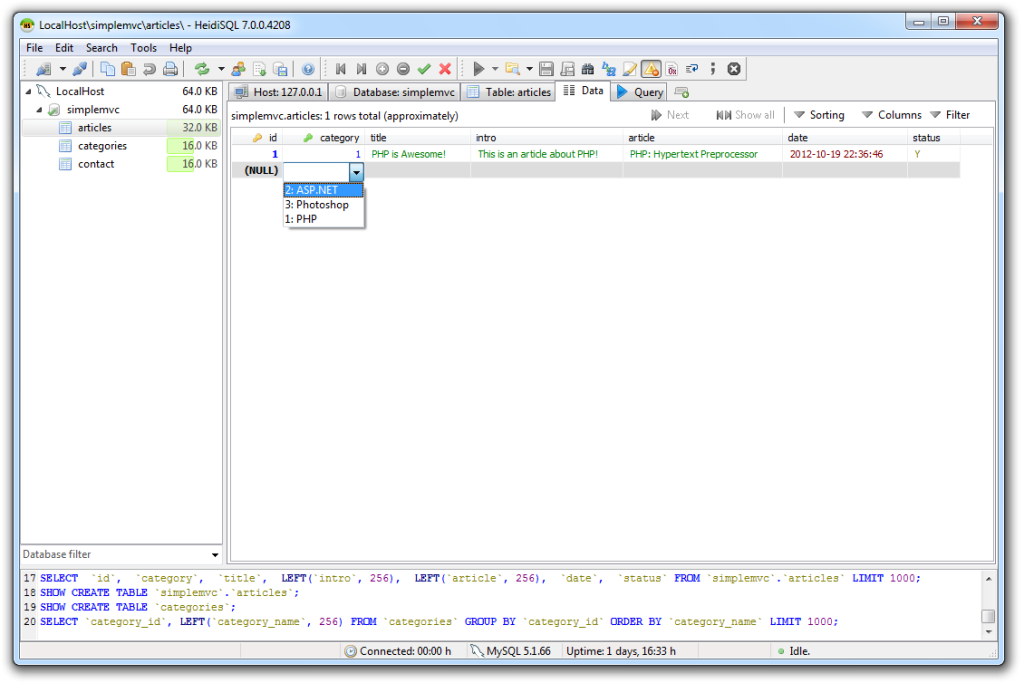
For example, look at the following screenshot. Because HeidiSQL understands that there is a foreign key constraint, it allows us to select the category from the categories table when entering data into articles table:
Once you create the tables, we need some data to play around with.
Basic philosophy
We’ll set up a system where we can include the appropriate file based on url. As user goes through our site, we’ll use the appropriate controller, which is basically just a PHP file which uses our classes (models).
Controllers are the entry points. They say which model to use and which view to display. Models are the business logic. They get the data. We use views to display the data. It may sound complicated, but it’s really not. You’ll see.
Our URLs will look like this: http://simplemvc.local/?load=news/details/1. As you can see, we’ll use load parameter to tell what controller and view to use. In this example, we’ll use news controller and list and details views.
NOTE: We’ll make URLs look better later.
First Steps
First thing we need is to create a View class which will enable us to create PHP templates.
So, let’s demonstrate how to do that.
view.php
<?php

class View
{
protected $_file;
protected $_data = array();

public function __construct($file)
{
$this->_file = $file;
}

public function set($key, $value)
{
$this->_data[$key] = $value;
}

public function get($key)
{
return $this->_data[$key];
}

public function output()
{
if (!file_exists($this->_file))
{
throw new Exception("Template " . $this->_file . " doesn't exist.");
}

extract($this->_data);
ob_start();
include($this->_file);
$output = ob_get_contents();
ob_end_clean();
echo $output;
}
}
This class is simple. When creating objects from this class we simply need to provide path to the Template file. Then we need to set the data we want to display in our template. When we set all the data we simply use the output() method which extracts the data from the array and uses output buffering to “fill” the placeholders in the template with values from the array.
How do I use the View class?
Simple. First, create a Template file and save it as simpletemplate.tpl:
<!DOCTYPE html>

<html lang="en">
<head>
<meta charset="utf-8" />
<title><?php echo $title; ?></title>
</head>
<body>

<h1><?php echo $greeting; ?></h1>

</body>
</html>
Then in a new php file do:
<?php

require 'view.php';

$view = new View('simpletemplate.tpl');
$view->set('title', 'This is a simple template file!');
$view->set('greeting', 'Hello, World');
echo $view->output();
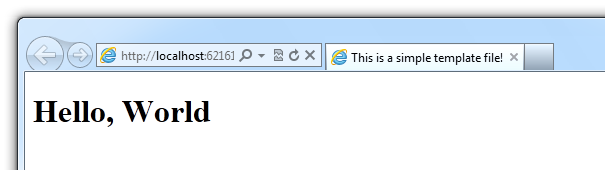
I’m pretty sure you understand how cool is this! 🙂 So, let’s continue with our project!
Other stuff needed
Now we can continue with creating our little MVC project. First, we’ll need a good directory structure. Here is the final:
- controllers
- includes
- utilities
- models
- views
- news
Move the view.php file to utilities folder, we’ll need it to display an appropriate view.
Utilities
We also need is a simple class for connecting to the database. Indide utilities folder create a new file named db.php.
db.php
<?php

class Db
{
private static $db;

public static function init()
{
if (!self::$db)
{
try {
$dsn = 'mysql:host='.DB_HOST.';dbname='.DB_NAME.';charset=UTF-8';
self::$db = new PDO($dsn, DB_USER, DB_PASS);
self::$db->setAttribute(PDO::ATTR_ERRMODE, PDO::ERRMODE_EXCEPTION);
self::$db->setAttribute(PDO::ATTR_DEFAULT_FETCH_MODE, PDO::FETCH_ASSOC);
} catch (PDOException $e) {
die('Connection error: ' . $e->getMessage());
}
}
return self::$db;
}
}
You might say this step isn’t really needed, but I find it’s cool to have a database class which we can later use. Also what we got is a singleton class that limits class instantiation to one object.
Adding the basics
OK, now we have all the utilities we need for successfully connecting to the database and working with Templates. Let’s continue with adding the basics of our simple MVC project.
Create a new PHP file, named index.php. In here we’ll setup autoloading, and include basic files. I got defining DS and HOME constants from this article. It also helped to make my original autoloader a little better.
Our index.php looks like this:
<?php
define ('DS', DIRECTORY_SEPARATOR);
define ('HOME', dirname(__FILE__));

ini_set ('display_errors', 1);

require_once HOME . DS . 'config.php';
require_once HOME . DS . 'utilities' . DS . 'bootstrap.php';

function __autoload($class)
{
if (file_exists(HOME . DS . 'utilities' . DS . strtolower($class) . '.php'))
{
require_once HOME . DS . 'utilities' . DS . strtolower($class) . '.php';
}
else if (file_exists(HOME . DS . 'models' . DS . strtolower($class) . '.php'))
{
require_once HOME . DS . 'models' . DS . strtolower($class) . '.php';
}
else if (file_exists(HOME . DS . 'controllers' . DS . strtolower($class) . '.php'))
{
require_once HOME . DS . 'controllers'  . DS . strtolower($class) . '.php';
}
}
We setup autoloading so correct file is included when we create a new object from a specified class.
config.php
As in some previous blog posts, the config.php file will contain the data needed to connect to the database, so this file is pretty simple.
<?php
define ('DB_HOST',  'localhost');
define ('DB_NAME',  'simplemvc');
define ('DB_USER',  'root');
define ('DB_PASS',  '');
bootstrap.php
After that comes our bootstrap.php file. Create it inside utilities folder, per index.php file. This one’s a bit more complicated, but I’m sure you’ll understand everything:
<?php
$controller = "news";
$action = "index";
$query = null;

if (isset($_GET['load']))
{
$params = array();
$params = explode("/", $_GET['load']);

$controller = ucwords($params[0]);

if (isset($params[1]) && !empty($params[1]))
{
$action = $params[1];
}

if (isset($params[2]) && !empty($params[2]))
{
$query = $params[2];
}
}

$modelName = $controller;
$controller .= 'Controller';
$load = new $controller($modelName, $action);

if (method_exists($load, $action))
{
$load->$action($query);
}
else
{
die('Invalid method. Please check the URL.');
}
If you don’t get it, here’s a simple explanation: First we setup default values for our controller, view and optional query string. So if there’s no load parameter, default controller is news, and default action (view) index.
Next, we create a new Controller object based on the supplied parameters.
$modelName = $controller;
$controller .= 'Controller';
$load = new $controller($modelName, $action);
So, by default it will be like we said:
$load = new NewsController(‘news’, ‘index’);
After that, we simply invoke a method which must be named like our $action parameter. By default that method will be “index()“. This is called Variable functions.
if (method_exists($load, $action))
{
$load->{$action}($query);
}
else
{
die('Invalid method. Please check the URL.');
}
Of course, if there’s no such method, we can’t continue.
Adding main stuff
First, we’ll add a new base Controller class from which all of our Controllers will inherit. This base class will set a default view and have a method to set a model, because we want to be able to set the model manually.
Controller base class
Inside controllers folder create a new controller.php file:
<?php

class Controller
{
protected $_model;
protected $_controller;
protected $_action;
protected $_view;
protected $_modelBaseName;

public function __construct($model, $action)
{
$this->_controller = ucwords(__CLASS__);
$this->_action = $action;
$this->_modelBaseName = $model;

$this->_view = new View(HOME . DS . 'views' . DS . strtolower($this->_modelBaseName) . DS . $action . '.tpl');
}

protected function _setModel($modelName)
{
$modelName .= 'Model';
$this->_model = new $modelName();
}

protected function _setView($viewName)
{
$this->_view = new View(HOME . DS . 'views' . DS . strtolower($this->_modelBaseName) . DS . $viewName . '.tpl');
}
}
Not exactly nuclear science, huh? 🙂 This is simply a base class which enables us to create a new Model, and set a View using already known syntax.
The constructor sets a default view to /views/MODEL_BASE_NAME/ACTION_NAME, so, for example default view for a NewsController controller and a index action would be: /views/news/index.tpl. The Controller class also enables us to setup our own View via the _setView() method.
You also might notice that we don’t create an appropriate Model object. That’s deliberate. For instance, there might be a Controller which doesn’t use Models at all. And for those that do, we have a method to set the Model.
Model base class
Now, let’s create a same base class for our Models. Create a new file named model.php inside the models folder:
<?php

class Model
{
protected $_db;
protected $_sql;

public function __construct()
{
$this->_db = Db::init();
}

protected function _setSql($sql)
{
$this->_sql = $sql;
}

public function getAll($data = null)
{
if (!$this->_sql)
{
throw new Exception("No SQL query!");
}

$sth = $this->_db->prepare($this->_sql);
$sth->execute($data);
return $sth->fetchAll();
}

public function getRow($data = null)
{
if (!$this->_sql)
{
throw new Exception("No SQL query!");
}

$sth = $this->_db->prepare($this->_sql);
$sth->execute($data);
return $sth->fetch();
}
}
We simply created a wrapper around PHP PDO, so all our models that extend the Model class can use those methods easily.
Reading the articles
We’ll add a new class which inherits from the Model Class. This class will use methods from the base class to return an array with articles and the details of a single article.
Adding NewsModel
Inside the models folder create a new file: newsmodel.php. Remember, we setup autoloading to use lowercase.
<?php

class NewsModel extends Model
{
public function getNews()
{
$sql = "SELECT
a.id,
a.title,
a.intro,
DATE_FORMAT(a.date, '%d.%m.%Y.') as date,
c.category_name
FROM
articles a
INNER JOIN
categories AS c ON a.category = c.category_id
ORDER BY a.date DESC";

$this->_setSql($sql);
$articles = $this->getAll();

if (empty($articles))
{
return false;
}

return $articles;
}

public function getArticleById($id)
{
$sql = "SELECT
a.title,
a.article,
DATE_FORMAT(a.date, '%d.%m.%Y.') as date,
c.category_name
FROM
articles a
INNER JOIN categories AS c ON a.category = c.category_id
WHERE
a.id = ?";

$this->_setSql($sql);
$articleDetails = $this->getRow(array($id));

if (empty($articleDetails))
{
return false;
}

return $articleDetails;
}
}
As you can see, this is a very simple class which has two methods. getVisibleNews() method simply returns all the Articles that are active. getArticleById($id) method accepts an $id parameter which specifies the ID of the article to be returned.
Adding the controller
OK, that’s cool. Now we need to create a new Controller which will use the model to get the data and then load the appropriate view. Remember the index.php file? We said there that our default controller will be NewsController. Create a new file named newscontoller.php inside a controllers folder.
<?php

class NewsController extends Controller
{
public function __construct($model, $action)
{
parent::__construct($model, $action);
$this->_setModel($model);
}

public function index()
{
try {

$articles = $this->_model->getNews();
$this->_view->set('articles', $articles);
$this->_view->set('title', 'News articles from the database');

return $this->_view->output();

} catch (Exception $e) {
echo "Application error:" . $e->getMessage();
}
}
}
So, we have a basic controller with one default action -> index. Just like we said in our bootstrap.php file. If we try to run our little application now we’ll get an Exception, because one thing’s missing. Yes, you got that right – our template file (View). So, let’s create it.
Default view
If you followed this blog post from the beginning you have a news folder inside your views folder. That’s because our controller can have lots of actions and almost every action can have it’s view.
Now inside includes folder create a file named menu.inc.php.
<nav>
<ul id="menu">
<li><a href="/">Home</a></li>
<li><a href="/contact/index">Contact</a></li>
</ul>
</nav>
We’ll include this menu in our template files.
Because we’re using a default view for this situation, we’ll create a new file named index.tpl inside the /views/news folder.
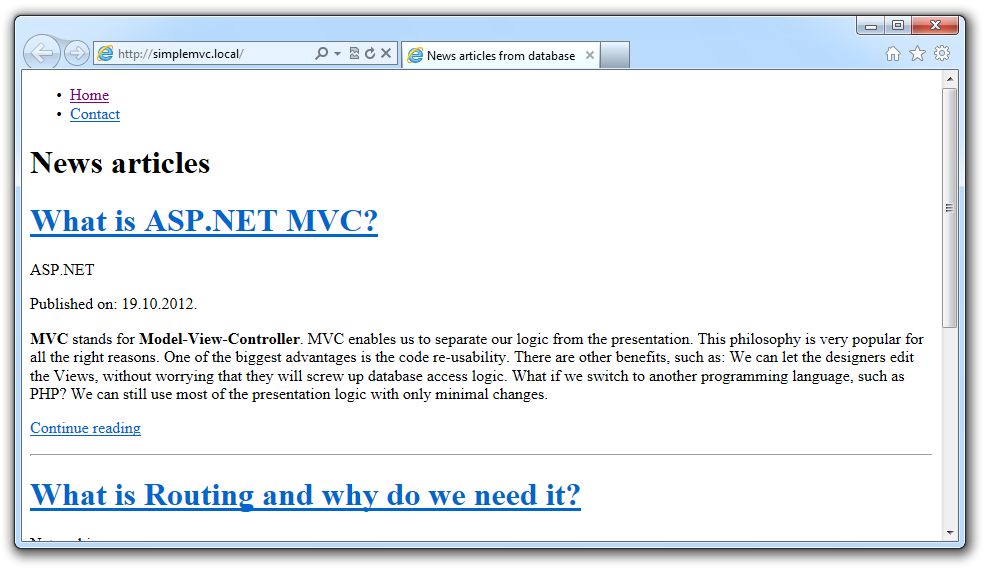
<!DOCTYPE html>

<html lang="en">
<head>
<meta charset="utf-8" />
<title><?php echo $title; ?></title>
</head>
<body>

<?php include HOME . DS . 'includes' . DS . 'menu.inc.php'; ?>

<h1>News articles</h1>

<?php
if ($articles):
foreach ($articles as $a): ?>

<article>
<header>
<h1><a href="/news/details/<?php echo $a['id']; ?>"><?php echo $a['title']; ?></a></h1>
<p><?php echo $a['category_name']; ?></p>
<p>Published on: <time pubdate="pubdate"><?php echo $a['date']; ?></time></p>
</header>
<p><?php echo $a['intro']; ?></p>
<p><a href="/news/details/<?php echo $a['id']; ?>">Continue reading</a></p>
<hr/>
</article>
<?php
endforeach;
else: ?>

<h1>Welcome!</h1>
<p>We currently do not have any articles.</p>

<?php endif; ?>

</body>
</html>
Now save the file and reload the site. You should get something similar to this:
If you try to click on a link you’ll notice the links don’t work. Well, that’s because we need a URL Rewrite to map those pretty URLs to our load parameter from bootstrap.php file. Remember? 🙂
if (isset($_GET['load']))
{
$params = array();
$params = explode("/", $_GET['load']);

$controller = ucwords($params[0]);

if (isset($params[1]) && !empty($params[1]))
{
$action = $params[1];
}

if (isset($params[2]) && !empty($params[2]))
{
$query = $params[2];
}
}
URL Rewriting
So for those pretty URLs to work we need to create a .htaccess (if you’re running XAMPP, LAMPP or something similar) or web.config (if you’re on IIS) file. So, go right ahead and grab the code you need:
.htaccess
RewriteEngine On
RewriteCond %{REQUEST_FILENAME} !-f
RewriteCond %{REQUEST_FILENAME} !-d
RewriteRule ^(.*)$ index.php?load=$1 [PT,L]
web.config
<?xml version="1.0" encoding="UTF-8"?>
<configuration>
<system.webServer>
<rewrite>
<rules>
<rule name="MVCRewrite" stopProcessing="true">
<match url="^(.*)$" ignoreCase="false" />
<conditions logicalGrouping="MatchAll">
<add input="{REQUEST_FILENAME}" matchType="IsFile" ignoreCase="false" negate="true" />
<add input="{REQUEST_FILENAME}" matchType="IsDirectory" ignoreCase="false" negate="true" />
</conditions>
<action type="Rewrite" url="index.php?load={R:1}" appendQueryString="false" />
</rule>
</rules>
</rewrite>
</system.webServer>
</configuration>
Wohoo! Now the URLs work, but we still need a way to display the Article Details. That’s right. We don’t have a detailsaction in our News controller.
Article Details
Open our newscontroller.php and add a details() method so our controller now looks like this:
<?php

class NewsController extends Controller
{
public function __construct($model, $action)
{
parent::__construct($model, $action);
$this->_setModel($model);
}

public function index()
{
try {

$articles = $this->_model->getVisibleNews();
$this->_view->set('articles', $articles);
$this->_view->set('title', 'News articles from the database');

return $this->_view->output();

} catch (Exception $e) {
echo "Application error:" . $e->getMessage();
}
}

// Add THIS
public function details($articleId)
{
try {

$article = $this->_model->getArticleById((int)$articleId);

if ($article)
{
$this->_view->set('title', $article['title']);
$this->_view->set('articleBody', $article['article']);
$this->_view->set('datePublished', $article['date']);
}
else
{
$this->_view->set('title', 'Invalid article ID');
$this->_view->set('noArticle', true);
}

return $this->_view->output();

} catch (Exception $e) {
echo "Application error:" . $e->getMessage();
}
}
// End
}
So, there’s just one thing missing: The View. So, let’s add that.
Inside a /views/news folder create a new file: details.tpl:
<!DOCTYPE html>

<html lang="en">
<head>
<meta charset="utf-8" />
<title><?php echo $title; ?> | Article Details</title>
</head>
<body>

<?php include HOME . DS . 'includes' . DS . 'menu.inc.php'; ?>

<article>
<header>
<h1><?php echo $title; ?></h1>
<p>Published on: <time pubdate="pubdate"><?php echo $datePublished; ?></time></p>
</header>
<p>
<?php echo $articleBody; ?>
</p>
</article>

<a href="/">Back to article list</a>

</body>
</html>
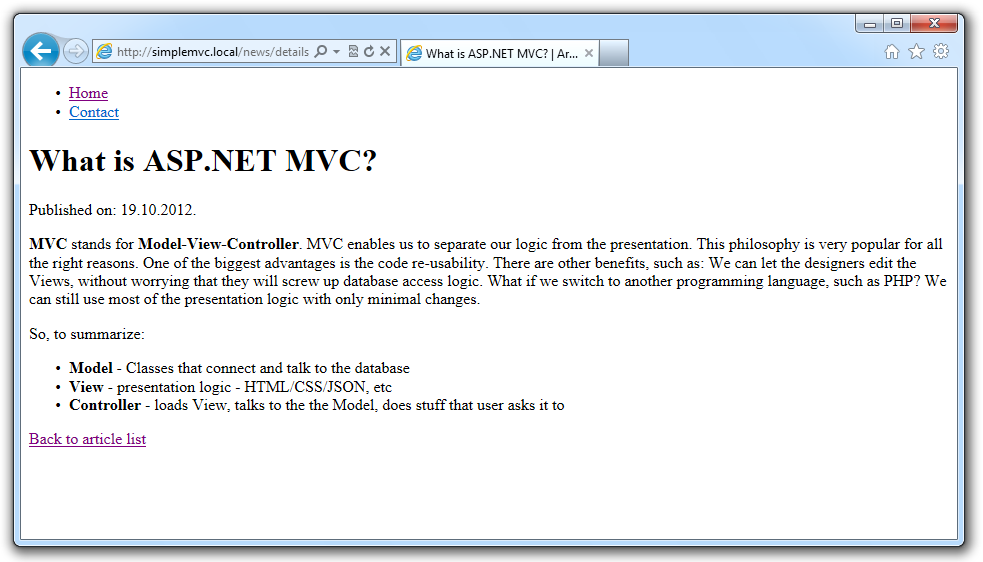
If you check the details page now, you’ll see that it works and we see the article details.
Simple contact form
Now let’s create a simple Contact form that saves info into the database.
First thing we need is, of course, the contact table in the database. Let’s add that:
CREATE TABLE `contact` (
`id` INT(10) NOT NULL AUTO_INCREMENT,
`first_name` VARCHAR(50) NULL,
`last_name` VARCHAR(50) NULL,
`email` VARCHAR(50) NOT NULL,
`message` TEXT NOT NULL,
PRIMARY KEY (`id`)
)
COLLATE='utf8_general_ci'
Next, we’ll need a controller. Create a new file named contactcontroller.php inside the controllers folder.
<?php

class ContactController extends Controller
{
public function index()
{
$this->_view->set('title', 'Simple site Contact Form');
return $this->_view->output();
}
}
This method will simply return the form once user visits /contact url. Now we need a model to handle saving the data to database.
Contact model
Inside the models folder create a new file named contactmodel.php. This class will handle saving the data to the database.
<?php

class ContactModel extends Model
{
private $_firstName;
private $_lastName;
private $_email;
private $_message;

public function setFirstName($firstName)
{
$this->_firstName = $firstName;
}

public function setLastName($lastName)
{
$this->_lastName = $lastName;
}

public function setEmail($email)
{
$this->_email = $email;
}

public function setMessage($message)
{
$this->_message = $message;
}

public function store()
{
$sql = "INSERT INTO contact
(first_name, last_name, email, message)
VALUES
(?, ?, ?, ?)";

$data = array(
$this->_firstName,
$this->_lastName,
$this->_email,
$this->_message
);

$sth = $this->_db->prepare($sql);
return $sth->execute($data);
}
}
This is a simple class. We have set methods for our form data, and a store() method to save the data.
Save method in the controller
Let’s save form input. Add this method to the ContactController class.
public function save()
{
if (!isset($_POST['contactFormSubmit']))
{
header('Location: /contact/index');
}

$errors = array();
$check = true;

$firstName = isset($_POST['first_name']) ? trim($_POST['first_name']) : NULL;
$lastName = isset($_POST['last_name']) ? trim($_POST['last_name']) : NULL;
$email = isset($_POST['email']) ? trim($_POST['email']) : "";
$message = isset($_POST['message']) ? trim($_POST['message']) : "";

if (empty($email))
{
$check = false;
array_push($errors, "E-mail is required!");
}
else if (!filter_var( $email, FILTER_VALIDATE_EMAIL ))
{
$check = false;
array_push($errors, "Invalid E-mail!");
}

if (empty($message))
{
$check = false;
array_push($errors, "Message is required!");
}

if (!$check)
{
$this->_setView('index');
$this->_view->set('title', 'Invalid form data!');
$this->_view->set('errors', $errors);
$this->_view->set('formData', $_POST);
return $this->_view->output();
}

try {

$contact = new ContactModel();
$contact->setFirstName($firstName);
$contact->setLastName($lastName);
$contact->setEmail($email);
$contact->setMessage($message);
$contact->store();

$this->_setView('success');
$this->_view->set('title', 'Store success!');

$data = array(
'firstName' => $firstName,
'lastName' => $lastName,
'email' => $email,
'message' => $message
);

$this->_view->set('userData', $data);

} catch (Exception $e) {
$this->_setView('index');
$this->_view->set('title', 'There was an error saving the data!');
$this->_view->set('formData', $_POST);
$this->_view->set('saveError', $e->getMessage());
}

return $this->_view->output();
}
Now, we’ll need a View to display our form. Inside views folder create a new folder named contact. Then inside it create a file named index.tpl.
<!DOCTYPE html>

<html lang="en">
<head>
<meta charset="utf-8" />
<title><?php echo $title; ?></title>
</head>
<body>

<?php include HOME . DS . 'includes' . DS . 'menu.inc.php'; ?>

<h1><?php echo $title; ?></h1>

<?php
if (isset($errors))
{
echo '<ul>';
foreach ($errors as $e)
{
echo '<li>' . $e . '</li>';
}
echo '</ul>';
}

if (isset($saveError))
{
echo "<h2>Error saving data. Please try again.</h2>" . $saveError;
}
?>

<form action="/contact/save" method="post">

<p>
<label for="first_name">First Name:</label>
<input value="<?php if(isset($formData)) echo $formData['first_name']; ?>" type="text" id="first_name" name="first_name" />
</p>

<p>
<label for="last_name">Last Name:</label>
<input value="<?php if(isset($formData)) echo $formData['last_name']; ?>" type="text" id="last_name" name="last_name" />
</p>

<p>
<label for="email">* E-mail:</label>
<input value="<?php if(isset($formData)) echo $formData['email']; ?>" type="text" id="email" name="email" />
</p>

<p>
<label for="message">* Message:</label>
<textarea name="message" id="message" rows="5" cols="50"><?php if(isset($formData)) echo $formData['message']; ?></textarea>
</p>

<input type="submit" name="contactFormSubmit" value="Send" />
</form>

</body>
</html>
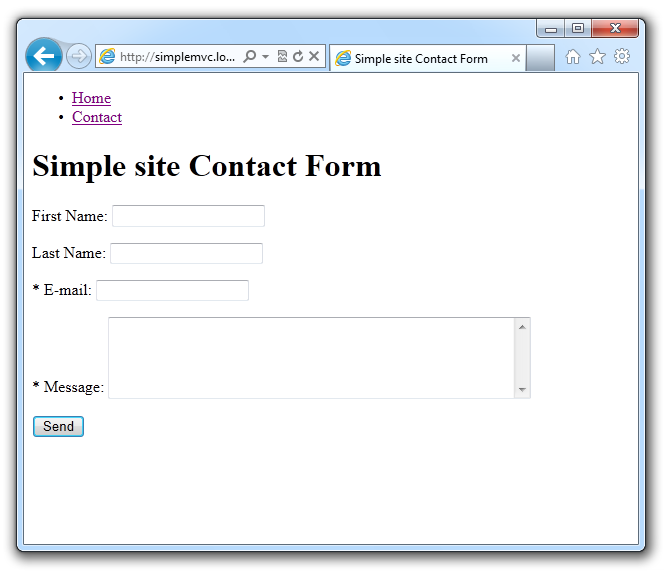
The form looks like this:
As you can see in the save method, we’ll also need a success view. This one’s pretty simple:
<!DOCTYPE html>

<html lang="en">
<head>
<meta charset="utf-8" />
<title><?php echo $title; ?></title>
</head>
<body>

<?php include HOME . DS .  'includes' . DS . 'menu.inc.php'; ?>

<h1><?php echo $title; ?></h1>
<h2>Data stored:</h2>

<?php if (!empty($userData['firstName'])): ?>
<h3>First Name:</h3>
<p><?php echo $userData['firstName']; ?></p>
<?php endif;?>

<?php if (!empty($userData['lastName'])): ?>
<h3>Last Name:</h3>
<p><?php echo $userData['lastName']; ?></p>
<?php endif;?>

<h3>E-mail:</h3>
<p><?php echo $userData['email']; ?></p>

<h3>Message:</h3>
<?php echo $userData['message']; ?>

</body>
</html>
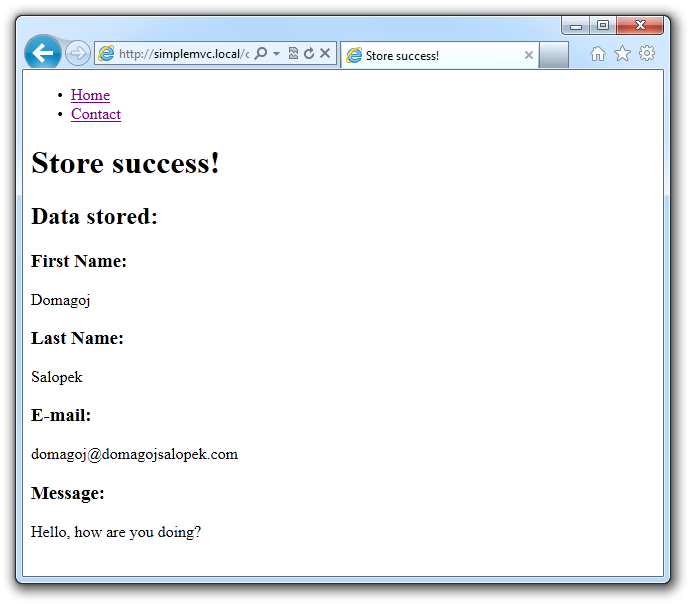
If you submit the form and got a successful view, everything worked!
Conclusion
That’s it. We created a simple MVC framework which you can easily extend to meet your needs.
Article you might want to visit is: Write your own PHP MVC Framework. This article is awesome and it’s the one you should visit next. From there I got defining DS and HOME as well as many other things and this post wouldn’t be written in this manner without this article. I cannot stress enough how helpful it was.
Here are some more articles you might find useful:
- Model View Controller MVC by Kevin Waterson
- Model View Controller(MVC) in PHP
- Comparison of web application frameworks (PHP)
Thank you for visiting. Have a great day!
Please note that this blog post is from 2012 and take it “as is”. I’m unable to answer any questions anymore regarding the implementation. Thank you for understanding.