In this blog post, we’ll create a simple system for registering users in eZ Publish via their Facebook accounts.
To do that we’ll use JavaScript to get users’ information from Facebook and then use AJAX to pass that information to a PHP script that will create and login our users into eZ Publish. So, let’s begin. First, we’ll need to set up a local development environment.
Setup local development environment
First, we’ll need to create a new Virtual Host with an alias for local development. Because Facebook checks the domain name it needs to look like a real domain. In this example, I’ll use localhost.com.
If you don’t know how to create a Virtual Host I suggest you take a look at a previous blog post about eZ Publish where I explain just how to create a Virtual Host for both IIS and Apache.
After that, you need to edit your hosts file. Add this line so the system knows to find the localhost.com domain on your local development environment.
127.0.0.1 localhost.com
Then, we’ll need to create a new Facebook application.
Create a new Facebook Application
To create Facebook applications you’ll need to have a verified developer account. Once you have a developer account you can create a new Facebook application.
Click on the “Create new App” button and enter the app name. Then click Continue. After that enter the security check.
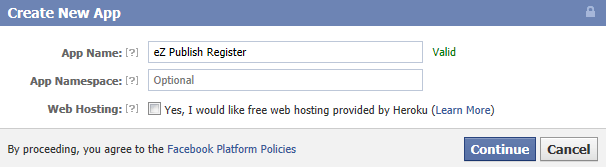
Then for the application domain enter localhost.com.
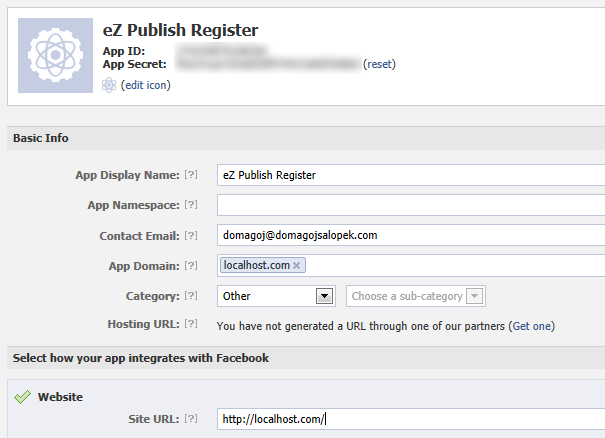
Take note of your App ID and App Secret numbers, you’ll be needing them later.
Create a user content class
We’ll create a new class of users: “Facebook Users” that will be different from normal eZ Publish users. Why? Well, because you might want to store different information for users registering via Facebook and those registering normally.
Also, it will serve as a nice example of how to create your own content classes.
After logging into the eZ Publish administration interface go to Setup->Classes and under Class groups select Users. Now click on the New class button. The class editor will open. For a name enter “Facebook User” and in the “identifier” field enter fb_user.
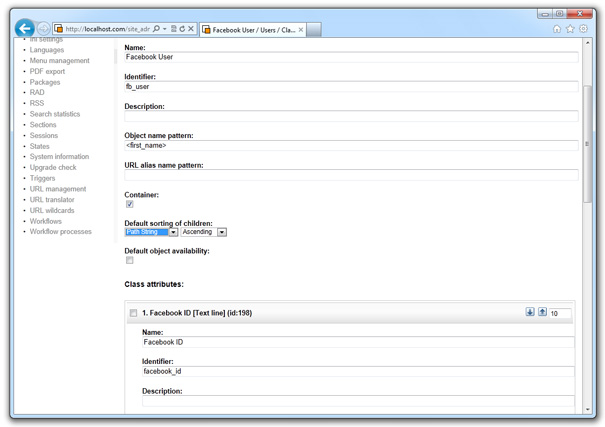
For Description enter whatever you want if you feel the class needs a description. Leave the “Default object availability” and “Container” checkboxes unchecked.
For the Object name pattern, you can enter <first_name> <last_name>.
To add a new attribute to our class simply select Text line from the dropdown menu and add the following attributes to our class:
- Facebook ID [Text line], Identifier: facebook_id, Required, Not searchable
- First Name [Text line], Identifier: first_name, Required, Not searchable
- Last Name [Text line], Identifier: last_name, Required, Not searchable
- User [User account], Identifier: user, Required, Not searchable
OK, our class is done. Now we need a place to store users.
Create a users group and edit permissions
Go to the User Accounts tab. Create a new User group. Name it “Facebook Users” or something.
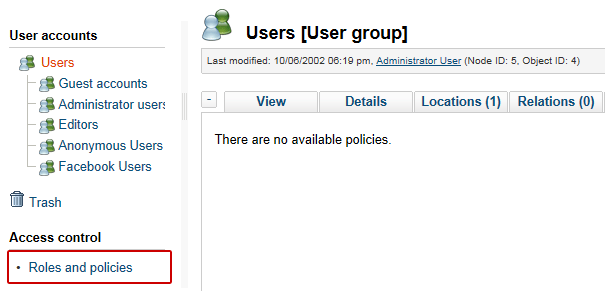
Now go to Roles and policies. When the page opens click on the New role button. Name the new role Facebook Users and click on the New policy button. A policy editor will open. Select content as a module, function: read and click Grant limited access.
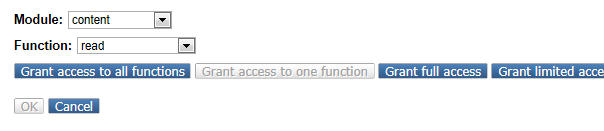
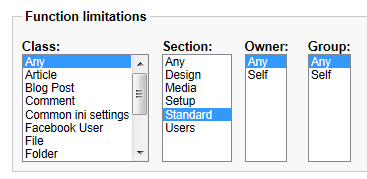
For the Section under Properties select Standard and click OK to save.
When you’re done add a New policy. This time select module: user and click “Grant access to all functions” and click “Save”.
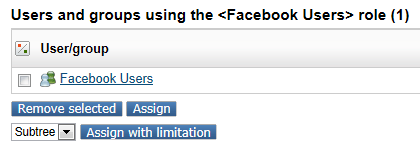
Now we need to assign that role to our new users’ group: Facebook Users. Click on the Assign button. A list of user groups will open. Select our “Facebook Users” group and click Select.
That’s it for the preparation and the configuration. Now let’s have some fun.
Create a new eZ Publish Extension
I’ll use the eZ Publish installation I used in my previous blog post about eZ Publish: Create a simple blog site using eZ Publish, so that design will be loaded in examples. But in the end, it doesn’t matter. You can use a plain eZ Publish installation.
So, let’s get started. We’ll start by creating a new eZ Publish extension, similar to the one we created in the First steps after eZ Publish installation blog post.
Inside the extension directory, create a new directory and name it fbregister. Now make a structure like this:
fbregister
    - modules
        - fbregister
    - settings
Application settings
Inside the settings folder, create a new file and name it site.ini.append.php. It should contain the following code:
<?php  /* #?ini charset="utf-8"?

[RoleSettings]
PolicyOmitList[]=fbregister/register

[TemplateSettings]
ExtensionAutoloadPath[]=fbregister

[FacebookAppSettings]
AppId=YOUR_FACEBOOK_APP_ID
AppSecret=YOUR_FACEBOOK_APP_SECRET

*/ ?>
With the PolicyOmitList setting, we exclude the register file we’ll use for registering users from permission checking. This way even Anonymous users can run the register file.
We’ll also add a FacebookAppSettings section where we’ll enter the data we got from creating a Facebook application. Inside the settings directory, create a module.ini.append.php file:
<?php /* #?ini charset="utf-8"?

[ModuleSettings]
ExtensionRepositories[]=fbregister
ModuleList[]=fbregister

*/ ?>
ExtensionRepositories simply lists extensions which have modules.
Creating a module
First, we’ll need to create a file named module.php inside a /extension/fbregister/modules/fbregister/folder. The file contains some settings about functions in our module:
<?php

$Module = array( 'name' => 'Facebook registration',
                 'function' => array( 'script' => 'register.php' ) );

$ViewList = array();

$ViewList['register'] = array(
    'script' => 'register.php'
);
Create a simple register.php file
Now inside the same directory create a register.php file.
For now, we’ll only use it to echo something, to test if the extension works and if users can run it:
<?php
    echo "Hello, World!";
    eZExecution::cleanExit();
That last static method simply tells eZ Publish to exit without returning the templates. Now we need only to enable our fbregister extension.
Enable and test the extension
To enable the extension we need to edit /settings/override/site.ini.append.php file. Simply add our extension to the list of active extensions:
[ExtensionSettings]
ActiveExtensions[]
ActiveExtensions[]=ezjscore
ActiveExtensions[]=ezie
ActiveExtensions[]=ezoe
ActiveExtensions[]=ezodf
ActiveExtensions[]=simpleblog
ActiveExtensions[]=fbregister
Clear the caches. To do that simply delete the cache folder inside /var directory.
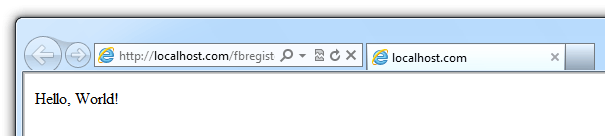
We’re ready to test our extension. Simply visit http://localhost.com/fbregister/register in your browser to see the “Hello, World” text.
We see the extension works and we can call it. So, we’ll use jQuery to send data via AJAX to the register.php file which will create our user with data we got from Facebook.
Adding the JavaScripT
We’ll use Facebook JavaScript SDK to get users’ data from Facebook. As you can see from the documentation page it’s easy to load and use the SDK. We’ll simply use the code nice guys from Facebook provided for us and add our jQuery code right where they indicated (// Additional initialization code here).
REMINDER: don’t forget to add the jQuery library in the head of your main template.
First, we need to do is to add a check if the user is currently logged in. If yes, we’ll simply greet him/her. If the user isn’t logged in, we’ll let him/her log in via a Facebook account. So, open a template file where you wish to put the greeting and log-in button (I’m using aside.tpl from my previous blog post about eZ Publish) and add the following code to it:
{def $user=fetch( 'user', 'current_user' )}

    {if $user.is_logged_in}
        <h2>Welcome, {$user.contentobject.name}</h2>
        <a href={"user/logout"|ezurl}>Log Out</a>
    {else}

    <a href="#" id="facebookLogin">Log In via Facebook</a>

    <div id="fb-root"></div>
    {literal}
    <script>
      window.fbAsyncInit = function() {
        FB.init({
          appId      : '{/literal}{ezini( 'FacebookAppSettings', 'AppId' )}{literal}', // App ID
          channelUrl : '//localhost.com/channel.html', // Channel File
          status     : true, // check login status
          cookie     : true, // enable cookies to allow the server to access the session
          xfbml      : true  // parse XFBML
        });
        // Additional initialization code here
        $(document).ready(function(){
            $('#facebookLogin').bind('click', function(e) {

                e.preventDefault();

                FB.login(function(response) {
                    if (response.authResponse) {
                        FB.api('/me', function(response) {
                            $.ajax({
                                type: 'POST',
                                url: 'fbregister/register',
                                data: {
                                    id: response.id,
                                    firstName: response.first_name,
                                    lastName: response.last_name,
                                    email: response.email
                                },
                                success: function(data) {
                                    alert(data);
                                }
                            });
                        });

                    } else {
                        console.log('User cancelled login or did not fully authorize.');
                    }
                }, {scope: 'email'});
            });
        });
      };
      // Load the SDK Asynchronously
      (function(d){
         var js, id = 'facebook-jssdk', ref = d.getElementsByTagName('script')[0];
         if (d.getElementById(id)) {return;}
         js = d.createElement('script'); js.id = id; js.async = true;
         js.src = "//connect.facebook.net/en_US/all.js";
         ref.parentNode.insertBefore(js, ref);
       }(document));
    </script>
    {/literal}
{/if}
The code is basically simple, but it might need some explanation.
As you already know, eZ Publish uses curly braces for template language, so we need to let it know that the upcoming block of code should be processed “as is”. For that purpose, we use the {literal}{/literal}tags. If we didn’t have those literal tags eZ Publish would misinterpret JavaScript code as part of its template language.
We use ezini function to retrieve the Facebook App Id from our site.ini.append.php file.
Next, we used code from Facebook’s documentation site. Then we used jQuery to bind the event to a click of the link with “facebookLogin” id. We told: hold on. Don’t try to go to the url, but instead use the FB.login method from Facebook’s JavaScript SDK.
If FB.login method returns a response, we use the FB.api method to ask for the user’s information from Facebook. When we get the response we use jQuery’s ajax method to issue a post request to our register.php file with the following fields we got from Facebook:
- User ID
- First Name
- Last Name
If the AJAX request is successful, we simply alert whatever data it returns.
For additional information about Facebook’s JavaScript SDK consult Facebook’s documentation.
Adding the channel.html file
Next, we need to add the channel.html file to our website’s root. Simply create a blank file named channel.html. The file should really contain only one line:
<script src="//connect.facebook.net/en_US/all.js"></script>
Modifying the register.php file
Now open our trusty register.php file. First, we’ll check if we got all the needed data and if yes, we’ll simply echo it. After that, we’ll use that data to add users to our site.
<?php
$http = new eZHTTPTool();
$check = true;
if ($http->hasPostVariable('id') && $http->postVariable('id'))
{
$facebookId = $http->postVariable('id');
}
else
{
$check = false;
eZLog::write("No Facebook Id");
}
if ($http->hasPostVariable('email') && $http->postVariable('email'))
{
$email = $http->postVariable('email');
}
else
{
$check = false;
eZLog::write("No E-mail");
}
if ($http->hasPostVariable('firstName') && $http->postVariable('firstName'))
{
$firstName = $http->postVariable('firstName');
}
else
{
$check = false;
eZLog::write("No First Name");
}
if ($http->hasPostVariable('lastName') && $http->postVariable('lastName'))
{
$lastName = $http->postVariable('lastName');
}
else
{
$check = false;
eZLog::write("No Last Name");
}
if (true === $check)
{
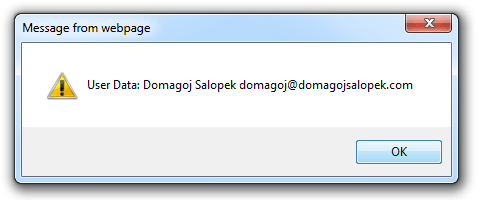
echo "User Data: " . $firstName . " " . $lastName . " " . $email;
}
else
{
echo "Something is wrong. Check the log for details.";
}
eZExecution::cleanExit();
The code is really very simple. First, we create a new eZHTTPTool object and set the control $checkvariable to true. Then we check for every piece of the user’s data. If we have it, we assign it to a local variable, and if we don’t we set the $check to false and write an error to the log. It’s just good practice. Of course, the postVariable method does this too, but this is a great place to introduce you to the eZLog class. 🙂
If all checks pass, the $check variable is still true. If the variable is true, we simply echo the user’s data.
After you change the register.php file refresh the site. You should get the “Login via Facebook” link. If you click it now, and you’re logged into Facebook, Facebook will prompt you with a permissions dialogue.
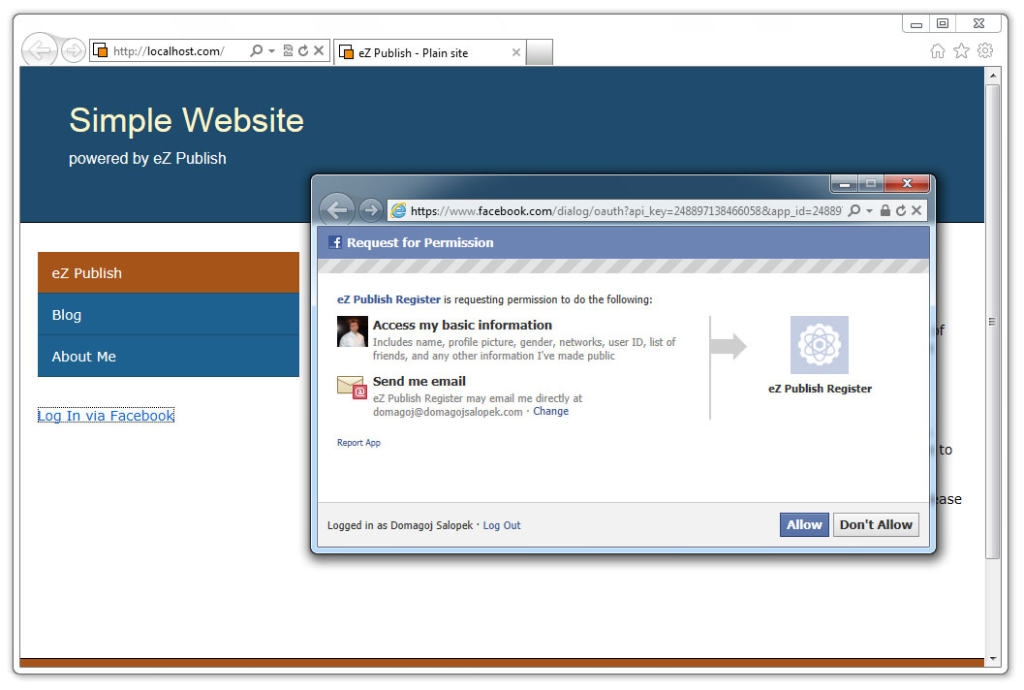
If you click Allow an Ajax will be issued to the register.php file and you should see an alert box with your data from Facebook.
So, we got the data, we did almost all the preparation, and we’re almost ready to register the user. However, we do need some additional configuration. Don’t worry, it is simple.
Configuration for registering the users
Our little script needs to know the class ID of our Facebook User class. It also needs to know where to store Facebook Users so we need to supply the Node Id of the Facebook Users user group.
Login to the site admin interface of eZ Publish. To find out the Class ID of Facebook User class simply go to Setup->Classes. For example, my Facebook User Class ID is 19. To find out the node ID of the Facebook Users group go to User Accounts (tab) and click on the group. Look for code similar to Last modified: 03/09/2012 05:04 pm, Administrator User (Node ID: 68, Object ID: 69)
So, the Facebook Users group Node ID is 68. Open site.ini.append.php to add this information to our extension’s configuration:
<?php  /* #?ini charset="utf-8"?

[RoleSettings]
PolicyOmitList[]=fbregister/register

[TemplateSettings]
ExtensionAutoloadPath[]=fbregister

[FacebookAppSettings]
AppId=YOUR_FACEBOOK_APP_ID
AppSecret=YOUR_FACEBOOK_APP_SECRET

# Facebook User Content Class ID
ContentClass=19

# Where to store Facebook Users
ParentNode=68

*/ ?>
Now we have all the configuration, it is time to Register the user.
Creating user objects
We need to edit the register.php file. At the top of the file include the following:
include_once 'kernel/classes/ezcontentfunctions.php';
include_once 'kernel/classes/datatypes/ezuser/ezuser.php';
Edit the part after we get all the data from Facebook. The beginning of the file is basically the same. So, this is the new register.php:
<?php

    include_once 'kernel/classes/ezcontentfunctions.php';
    include_once 'kernel/classes/datatypes/ezuser/ezuser.php';

    $http = new eZHTTPTool();

    $check = true;

    if ($http->hasPostVariable('id') && $http->postVariable('id'))
    {
        $facebookId = $http->postVariable('id');
    }
    else
    {
        $check = false;
        eZLog::write("No Facebook Id");
    }

    if ($http->hasPostVariable('email') && $http->postVariable('email'))
    {
        $email = $http->postVariable('email');
    }
    else
    {
        $check = false;
        eZLog::write("No E-mail");
    }

    if ($http->hasPostVariable('firstName') && $http->postVariable('firstName'))
    {
        $firstName = $http->postVariable('firstName');
    }
    else
    {
        $check = false;
        eZLog::write("No First Name");
    }

    if ($http->hasPostVariable('lastName') && $http->postVariable('lastName'))
    {
        $lastName = $http->postVariable('lastName');
    }
    else
    {
        $check = false;
        eZLog::write("No Last Name");
    }

    if (true === $check)
    {
        $ini = eZINI::instance();

        $classId = $ini->variable("FacebookAppSettings", "ContentClass");
        $class = eZContentClass::fetch( $classId );

        $attributesData = array(
            'first_name' => $firstName,
            'last_name' => $lastName,
            'facebook_id' => $facebookId
        );

        $params = array(
            'attributes' => $attributesData,
            'class_identifier' => $class->Identifier,
            'creator_id' => $ini->variable("UserSettings", "UserCreatorID"),
            'parent_node_id' => $ini->variable("FacebookAppSettings", "ParentNode"),
            'section_id' => $ini->variable("UserSettings", "DefaultSectionID")
        );

        $contentObject = eZContentFunctions::createAndPublishObject( $params );

        if ( $contentObject )
        {
            $password = mt_rand();
            $login = "facebook_" . $facebookId;

            $ezUser = eZUser::create($contentObject->ID);
            $ezUser->setInformation($contentObject->ID, $login, $email, $password);
            $ezUser->store();

            eZLog::write("Registered new user with Facebook Id: " . $facebookId);

            $ezUser->loginCurrent();
            $status = "OK";
        }
        else
        {
            $status = "FAIL";
            eZLog::write("Failed to create new Facebook User object");
        }
    }
    else
    {
        $status = "INSUFFICIENT_DATA";
    }

    echo $status;
    eZExecution::cleanExit();
The code is not very complicated. Basically, we use createAndPublishObject static method to create a new Facebook User object. First, we prepare the data about object attributes (remember our Facebook User class?) and store it in an array with named keys. The keys must be named like the attributes of our class.
Then we prepare some other information required by the method like the Class identifier and the Node ID of the location where we wish to store users. Remember, we stored the Class ID used to get the class identifier and the Node ID of the location in our site.ini.append.php file.
If object creation is successful, we create a new eZUser object to manage the user account we added to our class. Then we update the user’s info and log in the user.
Back to frontend
We return the “OK” status if the user is successfully logged in. Now, we just need to check if the Ajax call returns OK.
Our JavaScript goes like this:
$('#facebookLogin').bind('click', function(e) {
e.preventDefault();
FB.login(function(response) {
if (response.authResponse) {
FB.api('/me', function(response) {
$.ajax({
type: 'POST',
url: 'fbregister/register',
data: {
id: response.id,
firstName: response.first_name,
lastName: response.last_name,
email: response.email
},
success: function(data) {
if (data == "OK")
{
// If user is Logged In
window.location.reload();
}
else
{
alert('Something went wrong. Please try again!');
}
}
});
});
} else {
console.log('User cancelled login or did not fully authorize.');
}
}, {scope: 'email'});
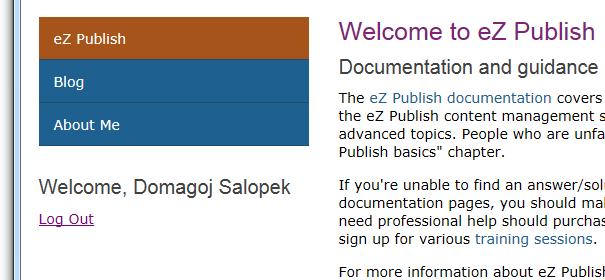
});
To test our new script simply click on the Log In via Facebook link. Our Ajax will run and if registration goes OK, we simply reload the page. Then eZ Publish should detect the user is logged in and display a Welcome message.
Logging in already registered users
Of course, there’s one thing missing. When the user Logs Out and tries to Log In again we need to know if he/she’s already registered and then only Log In.
It’s really simple to do that. We simply need to change our register.php script a bit so it first tries to locate the user via their Username. Remember, usernames have a format like this: “facebook_” . $facebookId. So if the user exists, we simply do the Log In.
Final register.php goes like this:
<?php

    include_once 'kernel/classes/ezcontentfunctions.php';
    include_once 'kernel/classes/datatypes/ezuser/ezuser.php';

    $http = new eZHTTPTool();

    $check = true;

    if ($http->hasPostVariable('id') && $http->postVariable('id'))
    {
        $facebookId = $http->postVariable('id');
    }
    else
    {
        $check = false;
        eZLog::write("No Facebook Id");
    }

    if ($http->hasPostVariable('email') && $http->postVariable('email'))
    {
        $email = $http->postVariable('email');
    }
    else
    {
        $check = false;
        eZLog::write("No E-mail");
    }

    if ($http->hasPostVariable('firstName') && $http->postVariable('firstName'))
    {
        $firstName = $http->postVariable('firstName');
    }
    else
    {
        $check = false;
        eZLog::write("No First Name");
    }

    if ($http->hasPostVariable('lastName') && $http->postVariable('lastName'))
    {
        $lastName = $http->postVariable('lastName');
    }
    else
    {
        $check = false;
        eZLog::write("No Last Name");
    }

    if (true === $check)
    {
        // This is new. First we try to Fetch the existing user
        $user = eZUser::fetchByName( "facebook_" . $facebookId );

        // If user exists, we simply do the Log In
        if ( $user && $user->isEnabled() )
        {
            $user->loginCurrent();
            eZLog::write("User with Facebook Id: " . $facebookId . " logged in.");
            $status = "OK";
        }
        else
        {
            $ini = eZINI::instance();

            $classId = $ini->variable("FacebookAppSettings", "ContentClass");
            $class = eZContentClass::fetch( $classId );

            $attributesData = array(
                'first_name' => $firstName,
                'last_name' => $lastName,
                'facebook_id' => $facebookId
            );

            $params = array(
                'attributes' => $attributesData,
                'class_identifier' => $class->Identifier,
                'creator_id' => $ini->variable("UserSettings", "UserCreatorID"),
                'parent_node_id' => $ini->variable("FacebookAppSettings", "ParentNode"),
                'section_id' => $ini->variable("UserSettings", "DefaultSectionID")
            );

            $contentObject = eZContentFunctions::createAndPublishObject( $params );

            if ( $contentObject )
            {
                $password = mt_rand();
                $login = "facebook_" . $facebookId;

                $ezUser = eZUser::create($contentObject->ID);
                $ezUser->setInformation($contentObject->ID, $login, $email, $password);
                $ezUser->store();

                eZLog::write("Registered new user with Facebook Id: " . $facebookId);

                $ezUser->loginCurrent();
                $status = "OK";
            }
            else
            {
                $status = "FAIL";
                eZLog::write("Failed to create new Facebook User object");
            }
        }
    }
    else
    {
        $status = "INSUFFICIENT_DATA";
    }

    echo $status;
    eZExecution::cleanExit();
When you click on the Log In link, the window should reload and you should get something similar to this:
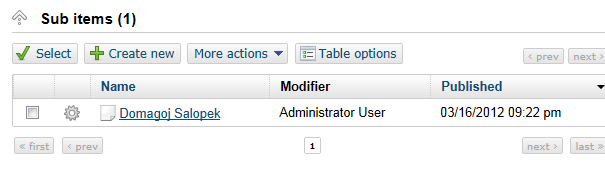
By opening the “Facebook Users” user group you should see that the Facebook User object is created:
Alternate solution
To be sure the data is really from Facebook and not some form we could rewrite the app using Facebook’s PHP SDK. The cookie from JavaScript SDK identifies the current user. PHP SDK can read the cookie JavaScript SDK stores. This way we could use PHP SDK to access users’ profiles and we could do all that from the register.php file.
The code would go like this:
require 'php-sdk/src/facebook.php';

$facebook = new Facebook(array(
  'appId'  => 'YOUR_APP_ID',
  'secret' => 'YOUR_APP_SECRET',
));

// See if there is a user from a cookie
$user = $facebook->getUser();

if ($user) {
  try {

    // Proceed knowing you have a logged in user who's authenticated.
    $user_profile = $facebook->api('/me');

    // Do stuff with data from user's profile, eg. create eZ Publish objects

  } catch (FacebookApiException $e) {
    echo '<pre>'.htmlspecialchars(print_r($e, true)).'</pre>';
    $user = null;
  }
}
For more information about that solution consult the Facebook developer blog.
Why didn’t we do that? Well, the point of this tutorial was to have a register solution that could be used with a standard form as well as Ajax requests with only minimal modifications. Also, this way it’s simple to convert the register.php file to a file that doesn’t have anything to do with Facebook.
The most useful thing in this tutorial IMO is creating eZ Publish nodes via PHP. If we complicated the tutorial with Facebook PHP SDK some people would probably get a little lost.
Not to mention that I covered Facebook’s PHP SDK in my last blog post about using Facebook’s registration plugin and didn’t want to repeat myself. 🙂
Conclusion
Once again we have seen eZ Publish’s ability to do awesome stuff without even touching the database. We registered users, added roles to them and gave them different permissions, all without the need to edit the database or create custom tables. We also used eZ Publish’s libraries from PHP to do cool stuff.
We made a script that can easily be modified to not be dependent on data from Facebook, but to use Username and Password the user provided in a standard register form, for example.
Thanks for visiting and until next time I wish you all the best.