
What is NAT?
NAT is short for “Network Address Translation”. The basic purpose of NAT is to translate private IP addresses which are used inside the company into public (global) IP addresses.
NAT is primarily used to conserve global IP addresses because it allows many IP-enabled devices to use a few public IP addresses. It’s really easy to see NAT at work. For instance, at your workplace, you and your colleagues are probably represented by a single IP address and NAT allows you all to access the Internet at the same time.
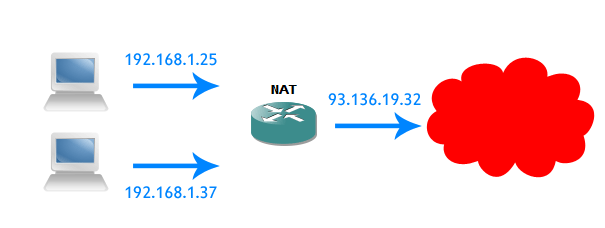
To verify all this simply go on some What’s my IP? service from yours and your friend’s computer, and you’ll see that you and your friend have the same IP address. In reality the address you see is the address of a router that runs NAT.
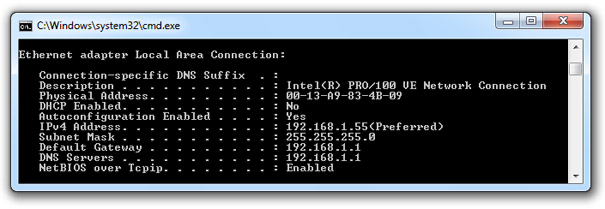
Even at your home, you can see the effects of NAT. Go to Start->Run and type CMD. When the prompt opens type: ipconfig /all to see the IP addresses of all your devices. It will probably be something like: 192.168.1.X.
On a Mac, you can use ifconfig en0, for example.
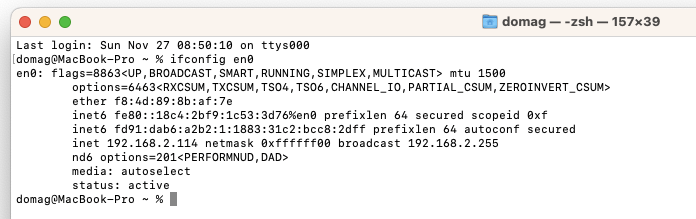
Then go on the What’s my IP? service and you’ll see that your IP address you use to access the Internet is different. That’s NAT at work.
How NAT works?
In order to better explain how NAT works, we need to know types of addresses that exist in NAT:
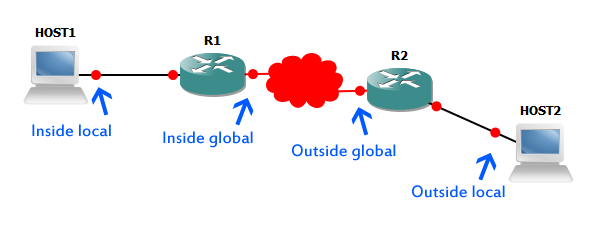
- Inside local – This is the source address before the NAT translation, assigned to a host on a private network, from a private address range.
- Inside global – Source address after translation. This is the address the destination sees. This is the public IP address assigned by the ISP.
- Outside global – Destination address known by the source. This is a public IP address.
- Outside local – Destination private address. This is known to the hosts on their private network.
So, how does NAT work? First, HOST1 sends a packet to the R1 router that’s configured with NAT. R1 then sees that HOST1 source IP address is a inside local, translates it to the Inside global address and forward it with new new (translated) source address as a packet source. R1 makes note of translation in the NAT table.
So, basically NAT modifies the IP packet with a new source address. Router forwards the packet with a new address. The packet then normally continues to it’s destination.
When replying the external HOST2 forwards the packet to it’s default gateway, R2. R2 is directly connected to R1, whose address is now a destination address, because it was used as a source. When packet arrives at the R1, R1 translates address back to the inside local address using the NAT table. When the translation is done, R1 forwards the packet to the HOST1.
NAT types
There are three types of NAT:
- Static NAT
Static NAT allows us to translate IP addresses in one-to-one ratio, which means we need one public Internet address for every host in the network. - Dynamic NAT
Dynamic NAT allows us to have a “pool” of public addresses, which are translated into the same number of host addresses. Same thing, we need one public Internet address for every host in the network. However, unlike static NAT with dynamic NAT the translation doesn’t really take place until one is needed. - NAT Overload (PAT – Port Address Translation)
Now we’re talking! This is the most useful type of NAT available. NAT Overload enables us to map multiple private IP addresses to single public IP address (N:1)! How? Router uses port numbers to identify which host’s address is translated and that means we could theoretically have ~ 65000 hosts on a single public IP address.
All types of NAT are basically simple to configure, as you will see in the next configuration example. Funny thing is, most problems that, you think come from using NAT aren’t related to NAT at all, but to routing.
Configuration examples
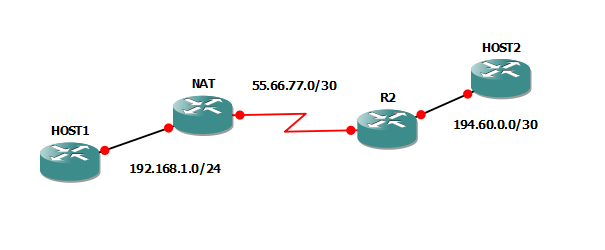
Once again, we’ll use Routers to play the part of Hosts. We’ll make a network design like the one in the image:
Source translation – Overload
NOTE: As NAT Overload is most useful type of NAT, we’ll use it here. We’ll get to static later.
We’ll make NAT router translate the HOST1’s private address to public address so that HOST1 can communicate with HOST2. Simple, really. So, let’s get to it.
The IP addresses used are:
- HOST1 F0/0 -> 192.168.1.75
- NAT F1/0 -> 192.168.1.1
- NAT S0/0 -> 55.66.77.1
- R2 S0/0 -> 55.66.77.2
- R2 F1/0 -> 194.60.0.1
- HOST2 F0/0 -> 194.60.0.2
So, let,s get to it. First, let’s configure R2 and both HOSTS:
R2>en
R2#conf t
Enter configuration commands, one per line.  End with CNTL/Z.
R2(config)#int s0/0
R2(config-if)#ip add 55.66.77.2 255.255.255.252
R2(config-if)#no shut

R2(config-if)#int f1/0
R2(config-if)#ip add 194.60.0.1 255.255.255.252
R2(config-if)#no shut
Now for HOST1:
HOST1>en
HOST1#conf t
Enter configuration commands, one per line.  End with CNTL/Z.
HOST1(config)#int f0/0
HOST1(config-if)#ip add 192.168.1.75 255.255.255.0
HOST1(config-if)#no shut
We’ll use NAT router as the default gateway for HOST1:
HOST1(config-if)#ip route 0.0.0.0 0.0.0.0 192.168.1.1We’ll configure HOST2 in the same manner:
HOST2>en
HOST2#conf t
Enter configuration commands, one per line.  End with CNTL/Z.
HOST2(config)#int fast
HOST2(config)#int fastEthernet 0/0
HOST2(config-if)#ip address 194.60.0.2 255.255.255.252
HOST2(config-if)#no shut
HOST2(config-if)#
*Mar  1 00:02:23.671: %LINK-3-UPDOWN: Interface FastEthernet0/0, changed state to up
*Mar  1 00:02:24.671: %LINEPROTO-5-UPDOWN: Line protocol on Interface FastEthernet0/0, changed state to up
HOST2(config-if)#ip route 0.0.0.0 0.0.0.0 194.60.0.1
OK, we configured HOSTS and R2, now to configure NAT router for inside translation so that HOST1 can communicate to HOST2. Of course, we first need to configure NAT router’s interfaces. When configuring interfaces we have to configure NAT on them as well. First, let’s configure the Serial interface:
NAT>en
NAT#conf t
Enter configuration commands, one per line.  End with CNTL/Z.
NAT(config)#int ser 0/0
NAT(config-if)#ip add 55.66.77.1 255.255.255.252
NAT(config-if)#ip nat outside

*Mar  1 00:01:53.991: %LINEPROTO-5-UPDOWN: Line protocol on Interface NVI0, changed state to up
NAT(config-if)#
NAT(config-if)#no shutdown
Now for Fast Ethernet:
NAT(config-if)#int f1/0
NAT(config-if)#ip nat inside
NAT(config-if)#ip address 192.168.1.1 255.255.255.0
NAT(config-if)#no shutdown
Now the interfaces are configured properly. In our NAT configuration we first need to determine which addresses that NAT router will translate. In this case it’ll translate all the addresses in the 192.168.1.0/24 network. We’ll create an access list to permit translations of addresses in that subnet. Creating an access list is easy, remember you can always use inline-help:
NAT(config)#access-list 1 ?
deny    Specify packets to reject
permit  Specify packets to forward
remark  Access list entry comment

NAT(config)#access-list 1 permit ?
Hostname or A.B.C.D  Address to match
any                  Any source host
host                 A single host address

NAT(config)#access-list 1 permit 192.168.1.0 ?
A.B.C.D  Wildcard bits
log      Log matches against this entry
<cr>

NAT(config)#access-list 1 permit 192.168.1.0 0.0.0.255
We only need that one entry, because we want to permit only that one network and because of the implicite deny at the end of an access list all other addresses are denied. We can view the access list by using show command:
NAT#show ip access-lists 1
Standard IP access list 1
10 permit 192.168.1.0, wildcard bits 0.0.0.255
After we created our access-list we need to create a NAT pool of global addresses. Remember, we’re doing NAT overload, so only one address is really needed: 55.66.77.1.
NAT(config)#ip nat pool ?
WORD  Pool name

NAT(config)#
NAT(config)#
NAT(config)#ip nat pool global ?
A.B.C.D        Start IP address
netmask        Specify the network mask
prefix-length  Specify the prefix length

NAT(config)#
NAT(config)#
NAT(config)#ip nat pool ?
WORD  Pool name

NAT(config)#ip nat pool global ?
A.B.C.D        Start IP address
netmask        Specify the network mask
prefix-length  Specify the prefix length

NAT(config)#ip nat pool global 55.66.77.1 55.66.77.1 netmask 255.255.255.252
So, we create NAT pool named “global” with only one address. Now to configure NAT itself:
NAT(config)#ip nat inside ?
destination  Destination address translation
source       Source address translation

NAT(config)#ip nat inside source ?
list       Specify access list describing local addresses
route-map  Specify route-map
static     Specify static local->global mapping

NAT(config)#ip nat inside source list 1 ?
interface  Specify interface for global address
pool       Name pool of global addresses

NAT(config)#ip nat inside source list 1 pool global overload
So, we configured inside source translation, described it with access list we created earlier and used our address pool for global addresses. We also added overload keyword. So, now everything should work, right? Because we’re translating the private addresses, we should be able to reach HOST2, from HOST1, right? Observe:
HOST1>ping 194.60.0.2

Type escape sequence to abort.
Sending 5, 100-byte ICMP Echos to 194.60.0.2, timeout is 2 seconds:
.UU.U
Success rate is 0 percent (0/5)
What’s happening? It’s simple, really. NAT router doesn’t have a route to the 194.60.0.0/30 network, so it can’t forward the packets. Remember, we’re translating addresses. The routers need to have new addresses in their routing tables. Let’s fix this:
NAT(config)#ip route 194.60.0.0 255.255.255.252 55.66.77.2Now let’s try it:
HOST1>ping 194.60.0.2

Type escape sequence to abort.
Sending 5, 100-byte ICMP Echos to 194.60.0.2, timeout is 2 seconds:
.!!!!
Success rate is 80 percent (4/5), round-trip min/avg/max = 828/972/1104 ms
See? R2 doesn’t have a route to the 192.168.1.0/24 network, but the packet returns anyway. That’s because packet’s source address gets translated to 55.66.77.1 and R2 knows about that network. Let’s see what happens on NAT router:
NAT#show ip nat translations
Pro Inside global      Inside local       Outside local      Outside global
icmp 55.66.77.1:3      192.168.1.75:3     194.60.0.2:3       194.60.0.2:3

NAT#debug ip nat
IP NAT debugging is on
NAT#
*Mar  1 00:33:54.859: NAT*: s=192.168.1.75->55.66.77.1, d=194.60.0.2 [20]
NAT#
*Mar  1 00:33:56.075: NAT*: s=194.60.0.2, d=55.66.77.1->192.168.1.75 [20]
*Mar  1 00:33:56.619: NAT*: s=192.168.1.75->55.66.77.1, d=194.60.0.2 [21]
NAT#
*Mar  1 00:33:57.275: NAT*: s=194.60.0.2, d=55.66.77.1->192.168.1.75 [21]
*Mar  1 00:33:57.651: NAT*: s=192.168.1.75->55.66.77.1, d=194.60.0.2 [22]
NAT#
*Mar  1 00:33:58.339: NAT*: s=194.60.0.2, d=55.66.77.1->192.168.1.75 [22]
*Mar  1 00:33:58.699: NAT*: s=192.168.1.75->55.66.77.1, d=194.60.0.2 [23]
NAT#
*Mar  1 00:33:59.351: NAT*: s=194.60.0.2, d=55.66.77.1->192.168.1.75 [23]
*Mar  1 00:33:59.511: NAT*: s=192.168.1.75->55.66.77.1, d=194.60.0.2 [24]
*Mar  1 00:34:00.295: NAT*: s=194.60.0.2, d=55.66.77.1->192.168.1.75 [24]
The IP address 192.168.1.75 of HOST1 gets translated to 55.66.77.1. Once the packet returns router knows via NAT table that it’s destined for 192.168.1.75 host, so it translates the 55.66.77.1 to 192.168.1.75 and forwards the packet there.
Static translation
That is all good an well, you say, but what about the situation when a host from the Internet needs to contact a server on our private LAN? (For example, e-mail needs to be delivered to our company server)
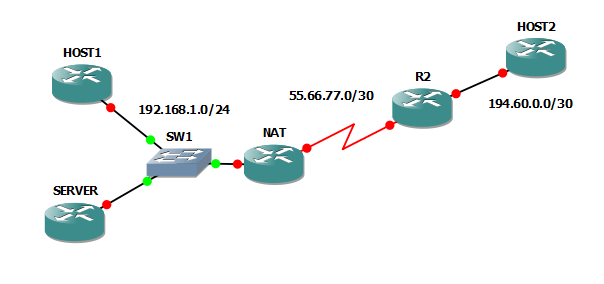
As you can see, there’s a new router which represents the server to which people need to connect. SERVER’s IP address is: 192.168.1.43. This is a private address, which means we need to use NAT router to translate it.
But, first, let’s configure the server. Nothing complicated here, we just need to add IP address to the interface, and a default route to 192.168.1.1:
SERVER>en
SERVER#conf t
Enter configuration commands, one per line.  End with CNTL/Z.
SERVER(config)#int f0/0
SERVER(config-if)#ip add 192.168.1.43 255.255.255.0
SERVER(config-if)#no shut
*Mar  1 00:05:52.635: %LINK-3-UPDOWN: Interface FastEthernet0/0, changed state to up
*Mar  1 00:05:53.635: %LINEPROTO-5-UPDOWN: Line protocol on Interface FastEthernet0/0, changed state to up
SERVER(config-if)#ip route 0.0.0.0 0.0.0.0 192.168.1.1
OK, server’s configuration is complete, now back to NAT router.
We’ll configure static NAT, meaning we’ll translate one private address to one public address, in this case 192.168.1.43 to 65.65.65.2:
NAT(config)#ip nat inside source static 192.168.1.43 65.65.65.2So, we just need to tell R2 how to reach 65.65.65.2:
R2(config)#ip route 65.65.65.2 255.255.255.255 55.66.77.1Note that we haven’t even configured this address on an interface, but we don’t have to. 192.168.1.43 gets translated to this address on NAT router, so NAT router will know that the destination for 65.65.65.2 is really 192.168.1.43, meaning we can reach host on a private network:
HOST2#telnet 65.65.65.2
Trying 65.65.65.2 ... Open


User Access Verification

Password:
SERVER>
SERVER>logout

[Connection to 65.65.65.2 closed by foreign host]
So, that’s basically it. We can get from the private network to the Internet and users from outside our network can reach our server via a public address.
OK, we have definitely scratched the surface of NAT. There’s more to learn and to configure, but we’ll do that in some future blog post. Until then, happy networking or exam preparation! 🙂