Introduction
This article was written with absolute beginners in mind. That means if you don’t know anything about PHP or MySQL it’s OK. We are going to learn.
While some people discuss a lot of theory first I feel that learning by example and the Right-Into-It approach can be more fun. And we will create something useful which will lead to you wanting to know more and more.
How to get PHP/MySQL?
It’s easy! Simply get a distribution that contains Apache, PHP and MySQL such as XAMPP or WampServer. There are of course, other distributions, but one of those two should satisfy all your needs. Personally, I use XAMPP.
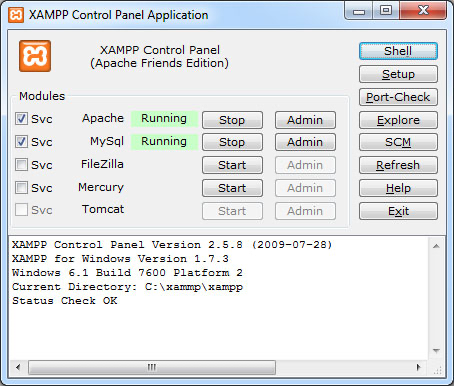
Installation is very easy, all you have to do is extract the package and run the Control Panel. From there you can start/stop the servers or install them as a Windows Service. Once you started the apache server you can access it if you enter „localhost” into your browser address bar.
To correctly display PHP pages via our web server we have to put them into a folder called „htdocs”, which is located in a folder where we installed XAMPP.
As with HTML, you can use any editor to create PHP files, but I recommend you use an editor with syntax highlighting and auto-completion if possible such as free Komodo Edit for example.
Starting with PHP
For our first PHP file let’s create a „Hello World!”. greeting. Open your editor, start a blank file and write:
echo "Hello World!";
Once you save this file with the PHP extension into your htdocs folder and view it via address bar (http://localhost/yourfile.php) you will see Hello World! written.
The beauty of PHP is that we can mix XHTML with PHP code. The < ?php sign marks the beginning of the PHP code and its end.
Now make a PHP file with the following code and run it via the server:
echo "<h1>Hello World!</h1>";
As you can see you can use both XHTML and PHP in the same file, and use PHP to output XHTML. Now let me just quickly teach you about variables and then we go into combining PHP and MySQL. Variables are storage units. You can use them to store information we might need later. To understand variables better let’s just modify our previous example a bit:
    // put our greeting into a variable
    // we must use quotes
    $greeting = "Hello World!";

    // for number values we don’t need quotes
    $number1 = 5;
    $number2 = 10;
?>

PHP greeting:  echo $greeting;
Number 1 + Number 2 =  echo $number1+$number2;
As you can see variables are very useful for storing values and using them later. We will use that knowledge during our work with PHP.
Another thing that will help us is arrays. You can see arrays as variables that can store multiple values. Arrays are a bit tricky so that part may be hard to understand if you never worked in any programming language. In that case, I suggest you do a little research about arrays. For now, let’s try an example that should give you a general idea:
$friends = array("Chandler","Joey","Monica","Phoebe","Rachel","Ross");

echo $friends[0]; // prints: Chandler
echo $friends[2]; // prints: Monica
You can also name keys in an array:
$friends = array();

$friends["friend1"] = "Chandler";
$friends["friend2"] = "Joey";
$friends["friend3"] = "Monica";
$friends["friend4"] = "Phoebe";
$friends["friend5"] = "Rachel";
$friends["friend6"] = "Ross";

echo $friends["friend2"]; // prints: Joey
echo $friends["friend6"]; // prints: Ross
I recommend you experiment a bit with this. Now let’s set up our database so we can read records from it.
Setting up MySQL database
During the installation of XAMPP or WampServer MySQL was also installed. You can access the server using phpMyAdmin which you can access from the XAMPP interface or you can use a front-end program to work with MySQL server, such as free HeidiSQL which I use personally.
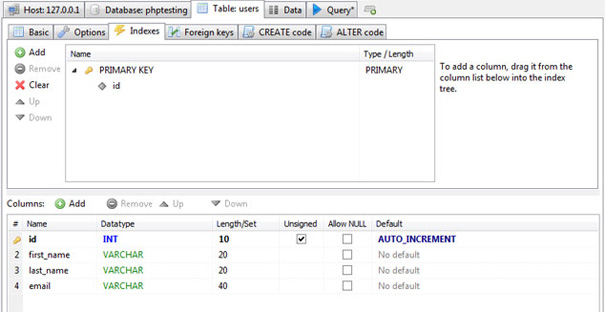
After you connect to the server create a database and tables from which we will display information. You can use phpMyAdmin or HeidiSQL to create your own database and tables or you can use the database and tables I created for this blog entry. To use my database simply copy and paste the following code into your SQL program and execute the query.
CREATE DATABASE `phptesting` DEFAULT CHARACTER SET utf8 COLLATE utf8_general_ci;

USE `phptesting`;

CREATE TABLE `users` (
    `id` INT(10) UNSIGNED NOT NULL AUTO_INCREMENT,
    `first_name` VARCHAR(20) NOT NULL,
    `last_name` VARCHAR(20) NOT NULL,
    `email` VARCHAR(40) NOT NULL,
    PRIMARY KEY (`id`)
)
COLLATE=utf8_general_ci
ENGINE=InnoDB
ROW_FORMAT=DEFAULT
When you create the database you can use your SQL front-end program to enter some data into the table which we will now display using PHP.
Using PHP to display database records
As I promised in the introduction we are now going to use PHP to display records from the database. So let’s finally get into it:
// variables to store data for connecting to the database server
$server = "localhost";
$user = "username";
$pass = "password";

// connect to the server. read data needed for connecting
// from variables $server, $user, $pass
$dbc = mysql_connect($server, $user, $pass)
or die("Error connecting to server " . mysql_error());

// select our "phptesting" database
$dbh = mysql_select_db("phptesting", $dbc) or die("Error selecting database");

// execute the query
$result = mysql_query("select * from users");

// return row as an array
while($row = mysql_fetch_array($result)) {
    echo $row[’first_name’];
    echo " ";
    echo $row[’last_name’];
    echo " - ";
    echo $row[’email’];
    echo "<br />";
}
Assuming our table contains the following fields and data:
| first_name | last_name | |
|---|---|---|
| John | Doe | john@doe.com |
| Jane | Doe | jane@doe.com |
The code above outputs:
John Doe – john@doe.com
Jane Doe – jane@doe.com
Of course, if you are a beginner there are a few things which need explaining, so here are the steps:
- We define the parameters needed to connect to MySQL database, namely server address, username and password.
- In the next two lines, we use functions mysql_connect() and mysql_select_db() to connect to the server and select the database we are going to work with. Note that we store the result of mysql_connect in $dbc. Later we use it to select the database. If one of those operations fails we terminate the script and print an error message.
- Using mysql_query() we send instructions on what to do to and store data into $results variable.
- This is probably the most confusing step. We use the mysql_fetch_array() function to return a row from the database as an array. Each time we call mysql_fetch_array() it returns the next row. While loop loops through all the records. During the loop, we print values that the mysql_fetch_array() stored for us into $row array.
There it is. Hopefully, you learned something from this post. If you have a lot of questions or are very confused hopefully you will be eager to explore and learn more on your own. Also, come back here from time to time as I hope I will be able to provide more examples.